Improved Security with MySQL 5.6

Installed on a clean CentOS 6.4 AWS instance.

sudo su -
cd /tmp
wget http://cdn.mysql.com/Downloads/MySQL-5.6/MySQL-5.6.13-1.el6.x86_64.rpm-bundle.tar
tar xvf MySQL-5.6.13-1.el6.x86_64.rpm-bundle.tar
yum install -y libaio perl
rpm -i MySQL*.rpm

The following output is the sign that security is being considered with new MySQL versions. Woot!

A RANDOM PASSWORD HAS BEEN SET FOR THE MySQL root USER !
You will find that password in '/root/.mysql_secret'.

You must change that password on your first connect,
no other statement but 'SET PASSWORD' will be accepted.
See the manual for the semantics of the 'password expired' flag.

Also, the account for the anonymous user has been removed.

In addition, you can run:

  /usr/bin/mysql_secure_installation

which will also give you the option of removing the test database.
This is strongly recommended for production servers.

See the manual for more instructions.

Please report any problems with the /usr/bin/mysqlbug script!

The latest information about MySQL is available on the web at

http://www.mysql.com

Support MySQL by buying support/licenses at http://shop.mysql.com

New default config file was created as /usr/my.cnf and
will be used by default by the server when you start it.
You may edit this file to change server settings

However, moving the MySQL configuration to /usr. WTF?
Upgrading to MySQL 5.5 on Ubuntu 10.04 LTS

Ubuntu does not provide an apt-get repository package for MySQL 5.5 on this older OS, however this is still a widely used long term support version. The following steps will upgrade an existing MySQL 5.1 apt-get version to a standard MySQL 5.5 binary.

Step 1. Remove existing MySQL 5.1 retaining data and configuration

sudo su -
service mysql stop
cp -r /etc/mysql /etc/mysql.51
cp -r /var/lib/mysql /var/lib/mysql.51
which mysqld
dpkg -P mysql-server mysql-server-5.1 mysql-server-core-5.1
which mysqld
which mysql
dpkg -P mysql-client-5.1 mysql-client-core-5.1
which mysql
dpkg -P libdbd-mysql-perl libmysqlclient16 mysql-common
# This will not remove /etc/mysql if any other files are in the directory
dpkg -l | grep mysql
[ -d /etc/mysql ] && mv /etc/mysql /etc/mysql.uninstall
cp -r /etc/mysql.51 /etc/mysql

2. Prepare configuration and required directories.

sudo su -
MYCNF="/etc/mysql/my.cnf"
grep basedir ${MYCNF}
sed -ie "s/^basedir.*$/basedir=/opt/mysql/" ${MYCNF}
grep basedir ${MYCNF}
sed -ie "/^[mysqld_safe]/a
skip-syslog" ${MYCNF}
chown -R mysql:mysql /var/lib/mysql
mkdir -p /var/run/mysqld
sudo chown mysql:mysql /var/run/mysqld

Install MySQL 5.5

sudo su -
mkdir -p /opt
cd /opt
# Install MySQL 5.5 Binaries
apt-get install -y libaio-dev  # New 5.5 dependency
wget http://cdn.mysql.com/Downloads/MySQL-5.5/mysql-5.5.28-linux2.6-x86_64.tar.gz
tar xvfz mysql*.tar.gz
ln -s mysql-5.5.28-linux2.6-x86_64 /opt/mysql
echo "export MYSQL_HOME=/opt/mysql
export PATH=$MYSQL_HOME/bin:$PATH" > /etc/profile.d/mysql.sh
chmod +x /etc/profile.d/mysql.sh
. /etc/profile.d/mysql.sh
echo $MYSQL_HOME
echo $PATH
which mysql

4. Upgrade and verify MySQL Instance

su - mysql
cd $MYSQL_HOME
bin/mysqld_safe --skip-syslog &
tail /var/log/mysql/error.log
# There will be some expected ERRORS in error log
bin/mysql_upgrade -uroot
bin/mysqladmin -uroot  shutdown
bin/mysqld_safe --skip-syslog &
tail -100 /var/log/mysql/error.log
mysql -uroot -e "SELECT VERSION();"
bin/mysqladmin -uroot  shutdown
exit

5. Setup MySQL for system use

# As Root
sudo su -
INIT="/etc/init.d/mysqld"
cp /opt/mysql/support-files/mysql.server ${INIT}
sed -ie "s/^basedir=$/basedir=/opt/mysql/;s/^datadir=$/datadir=/var/lib/mysql/" ${INIT}
${INIT} start
mysql -uroot -e "SELECT VERSION();"
${INIT} stop

The case against using rpm packaging for MySQL

In some environments using a distro package management system may* provide benefits including handling dependencies and providing a simpler approach when there are no dedicated DBA or SA resources.

However, the incorrect use can result in pain and in this instance production downtime. Even with dedicated resources at an unnamed premium managed hosting provider, the simple mistake of assumption resulted in over 30 minutes of unplanned downtime during peak time.

One of the disadvantages of using a system such as rpm is the lack of control in managing the starting and stopping of your MySQL instance, and the second is unanticipated package dependency upgrades.

So what happened with this client. When attempting to use the MySQL client on the production server, I got the following error.

$ mysql -uxxx -p
error while loading shared libraries: libmysqlclient.so.10: cannot open shared object file: No such file or directory

The server was running MySQL 5.0.27 via an rpm install.

$ rpm -qa | grep -i mysql
MySQL-server-standard-5.0.27-0.rhel3
MySQL-shared-standard-5.0.27-0.rhel3
MySQL-devel-standard-5.0.27-0.rhel3
MySQL-shared-compat-5.0.27-0.rhel3
MySQL-client-standard-5.0.27-0.rhel3

With no access to this managed server the information was relayed to the hosting provider and some time later we found the production website down. Some 30 minutes later we found that to fix the rpm problem, a dependency upgrade has also caused an automatic upgrade from 5.0.27 to 5.0.88.

While upgrading is not necessarily a bad thing, the lack of planning including a backup, a scheduled window of downtime and any level of testing is simply a poor cowboy approach to DBA management.

Installing Mediawiki on Oracle Enterprise Linux LAMP stack

A company wiki can be easily configured in under 10 minutes using Mediawiki the open source LAMP software that powers the top 10 website Wikipedia.

A company wiki is an ideal means for a centralized and user contributed documentation system. The following steps show you how to download, configure and get your Mediawiki site operational.

Software Pre-Requisites

Software Installation

su -
cd /tmp
wget http://download.wikimedia.org/mediawiki/1.16/mediawiki-1.16.0.tar.gz
cd /var/www/html
tar xfz /tmp/mediawiki*.tar.gz
mv mediawiki* wiki
chmod 777 wiki/config

NOTE: You should check the Mediawiki Downloads page for the latest version.

You can now visit http://localhost/wiki and you will be presented with a message of an un-configured Mediawiki environment. You can streamline the MySQL portion of this configuration with the following commands.

mysql -uroot -p -e "DROP SCHEMA IF EXISTS wikidb;CREATE SCHEMA wikidb"
mysql -uroot -p -e "CREATE USER wikiuser @localhost IDENTIFIED BY 'sakila'"
mysql -uroot -p -e "GRANT SELECT,INSERT,UPDATE,DELETE,CREATE,INDEX on wikidb.* TO wikiuser@localhost"

You can now complete the configuration on the Configuration Page. You will need to enter the following information.

  • Wiki name = Example Wiki
  • Contact e-mail = your email address
  • Admin user password = enter password
  • DB password = sakila

After successful installation, one additional step is needed.

mv wiki/config/LocalSettings.php wiki/
chmod 400 wiki/LocalSettings.php
chmod 500 wiki/config

You can now start using your new Wiki at http://localhost/wiki. You will find documentation at the links provided on the displayed home page and also at www.mediawiki.org.

MySQL Structures

Looking at the tables that are created by the installation process:

$ mysql -uwikiuser -psakila blog

mysql> show tables;
+-------------------+
| Tables_in_wikidb  |
+-------------------+
| archive           |
| category          |
| categorylinks     |
| change_tag        |
| external_user     |
| externallinks     |
| filearchive       |
| hitcounter        |
| image             |
| imagelinks        |
| interwiki         |
| ipblocks          |
| job               |
| l10n_cache        |
| langlinks         |
| log_search        |
| logging           |
| math              |
| objectcache       |
| oldimage          |
| page              |
| page_props        |
| page_restrictions |
| pagelinks         |
| protected_titles  |
| querycache        |
| querycache_info   |
| querycachetwo     |
| recentchanges     |
| redirect          |
| revision          |
| searchindex       |
| site_stats        |
| tag_summary       |
| templatelinks     |
| text              |
| trackbacks        |
| transcache        |
| updatelog         |
| user              |
| user_groups       |
| user_newtalk      |
| user_properties   |
| valid_tag         |
| watchlist         |
+-------------------+
45 rows in set (0.00 sec)

mysql> SELECT table_name,engine,table_rows FROM information_schema.tables WHERE table_schema = 'wikidb';
+-------------------+--------+------------+
| table_name        | engine | table_rows |
+-------------------+--------+------------+
| archive           | InnoDB |          0 |
| category          | InnoDB |          0 |
| categorylinks     | InnoDB |          0 |
| change_tag        | InnoDB |          0 |
| external_user     | InnoDB |          0 |
| externallinks     | InnoDB |          0 |
| filearchive       | InnoDB |          0 |
| hitcounter        | MEMORY |          0 |
| image             | InnoDB |          0 |
| imagelinks        | InnoDB |          0 |
| interwiki         | InnoDB |         95 |
| ipblocks          | InnoDB |          0 |
| job               | InnoDB |          0 |
| l10n_cache        | InnoDB |       3686 |
| langlinks         | InnoDB |          0 |
| log_search        | InnoDB |          0 |
| logging           | InnoDB |          0 |
| math              | InnoDB |          0 |
| objectcache       | InnoDB |          2 |
| oldimage          | InnoDB |          0 |
| page              | InnoDB |          1 |
| page_props        | InnoDB |          0 |
| page_restrictions | InnoDB |          0 |
| pagelinks         | InnoDB |          0 |
| protected_titles  | InnoDB |          0 |
| querycache        | InnoDB |          0 |
| querycache_info   | InnoDB |          0 |
| querycachetwo     | InnoDB |          0 |
| recentchanges     | InnoDB |          0 |
| redirect          | InnoDB |          0 |
| revision          | InnoDB |          1 |
| searchindex       | MyISAM |          0 |
| site_stats        | InnoDB |          1 |
| tag_summary       | InnoDB |          0 |
| templatelinks     | InnoDB |          0 |
| text              | InnoDB |          1 |
| trackbacks        | InnoDB |          0 |
| transcache        | InnoDB |          0 |
| updatelog         | InnoDB |          0 |
| user              | InnoDB |          1 |
| user_groups       | InnoDB |          2 |
| user_newtalk      | InnoDB |          0 |
| user_properties   | InnoDB |          0 |
| valid_tag         | InnoDB |          0 |
| watchlist         | InnoDB |          0 |
+-------------------+--------+------------+
45 rows in set (0.01 sec)

Sort URL for this post rb42.com/oel-install-mediawiki

Installing WordPress on Oracle Enterprise Linux LAMP stack

A company blog can be easily configured in under 10 minutes using WordPress, a popular open source LAMP product that runs a reported 12+ million blogs including those found at CNN, NY Times, Wall Street Journal (WSJ), ZDNet, MTV, People Magazine, Playstation and eBay.

A company blog is a great way for the dissemination of information to your user base as well as enabling a means of user feedback via comments.

The following steps show you how to download, configure and get your WordPress blog operational.

Software Pre-Requisites

Software Installation

su -
cd /tmp
wget  http://wordpress.org/latest.tar.gz
cd /var/www/html
tar xfz /tmp/latest.tar.gz
mv wordpress blog

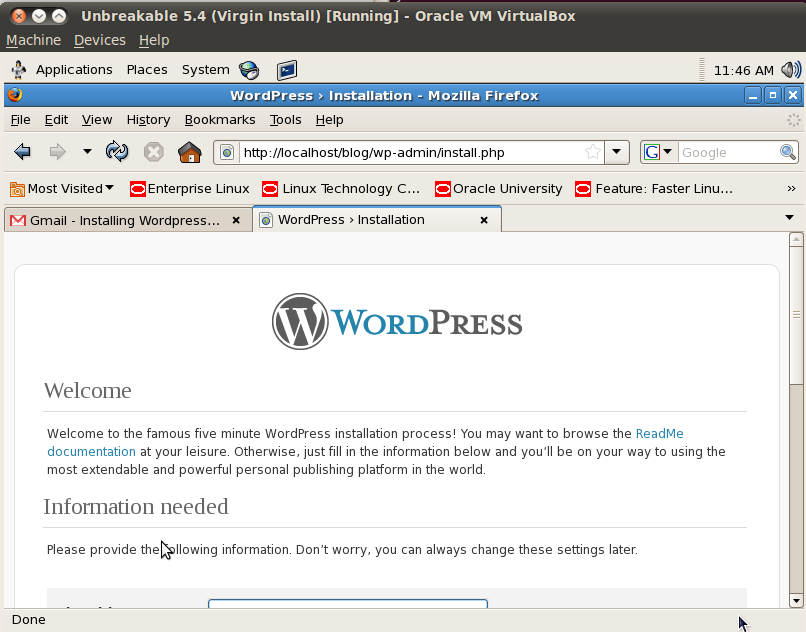
You can now visit http://localhost/blog and you will be presented with a message of an un-configured WordPress environment. You can streamline the MySQL portion of this configuration with the following commands.

cd blog
sed -e "s/database_name_here/blog/;s/username_here/blog_user/;s/password_here/sakila/" wp-config-sample.php > wp-config.php
mysql -uroot -p -e "CREATE SCHEMA blog"
mysql -uroot -p -e "CREATE USER blog_user @localhost IDENTIFIED BY 'sakila'"
mysql -uroot -p -e "GRANT SELECT,INSERT,UPDATE,DELETE,CREATE on blog.* TO blog_user@localhost"

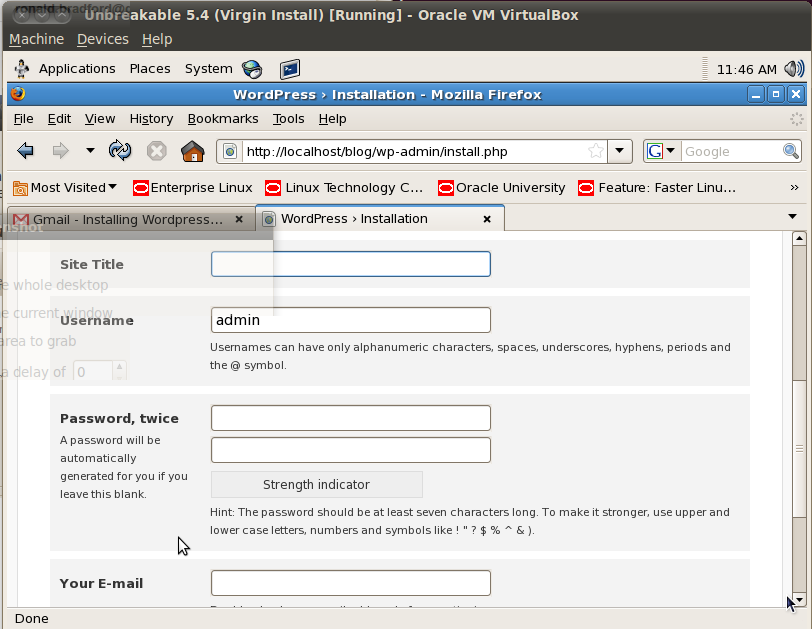
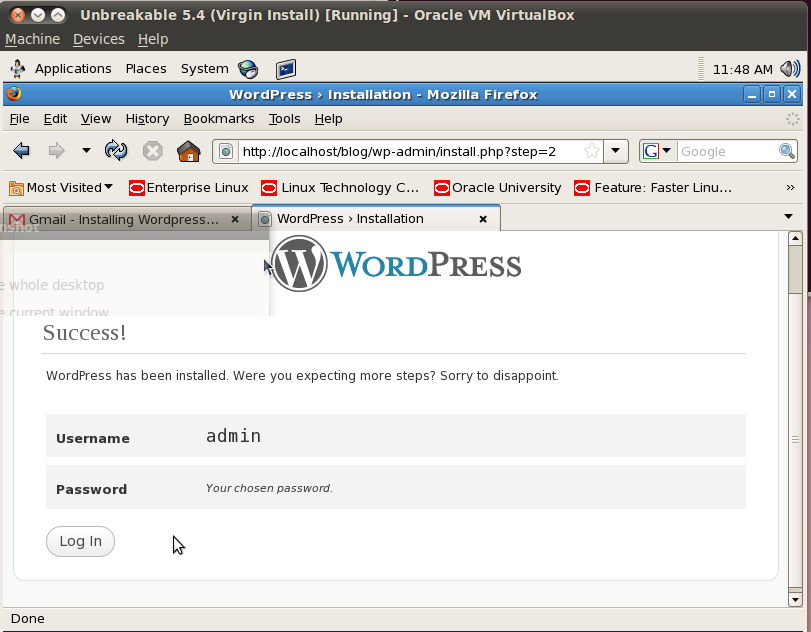
Returning now to http://localhost/blog you simply only need to specify a Title, password and email address, click Save and your Blog at http://localhost/blog is complete and operational.


MySQL Structures

Looking at the tables that are created by the installation process:

$ mysql -ublog_user -psakila blog

mysql> show tables;
+-----------------------+
| Tables_in_blog        |
+-----------------------+
| wp_commentmeta        |
| wp_comments           |
| wp_links              |
| wp_options            |
| wp_postmeta           |
| wp_posts              |
| wp_term_relationships |
| wp_term_taxonomy      |
| wp_terms              |
| wp_usermeta           |
| wp_users              |
+-----------------------+
11 rows in set (0.00 sec)

mysql> SELECT table_name,engine,table_rows FROM information_schema.tables WHERE table_schema = 'blog';
+-----------------------+--------+------------+
| table_name            | engine | table_rows |
+-----------------------+--------+------------+
| wp_commentmeta        | MyISAM |          0 |
| wp_comments           | MyISAM |          1 |
| wp_links              | MyISAM |          7 |
| wp_options            | MyISAM |        109 |
| wp_postmeta           | MyISAM |          1 |
| wp_posts              | MyISAM |          2 |
| wp_term_relationships | MyISAM |          8 |
| wp_term_taxonomy      | MyISAM |          2 |
| wp_terms              | MyISAM |          2 |
| wp_usermeta           | MyISAM |         13 |
| wp_users              | MyISAM |          1 |
+-----------------------+--------+------------+
11 rows in set (0.00 sec)

Additional References

Short URL for this post rb42.com/oel-install-wordpress

Reviewing your MySQL installation on Oracle Enterprise Linux

After successfully Installing MySQL, let us take a look at an operational MySQL instance on your Oracle Enterprise Linux server.

User Management

By default there will be a new mysql user and group created. This user is used to run the mysqld process is generally not used for any other purpose.

$ grep mysql /etc/{passwd,shadow,group}
/etc/passwd:mysql:x:27:27:MySQL Server:/var/lib/mysql:/bin/bash
/etc/shadow:mysql:!!:14796::::::
/etc/group:mysql:x:27:

Binaries

MySQL binaries are found in /usr/bin.

$ ls -l /usr/bin/mysql*
-rwxr-xr-x 1 root root  314568 Feb 16 17:45 /usr/bin/mysql
-rwxr-xr-x 1 root root  110776 Feb 16 14:39 /usr/bin/mysqlaccess
-rwxr-xr-x 1 root root   35144 Feb 16 17:45 /usr/bin/mysqladmin
-rwxr-xr-x 1 root root  112944 Feb 16 17:45 /usr/bin/mysqlbinlog
-rwxr-xr-x 1 root root    7632 Feb 16 17:45 /usr/bin/mysqlbug
-rwxr-xr-x 1 root root   30576 Feb 16 17:45 /usr/bin/mysqlcheck
-rwxr-xr-x 1 root root    7632 Feb 16 17:45 /usr/bin/mysql_config
-rwxr-xr-x 1 root root    3670 Feb 16 17:44 /usr/bin/mysql_convert_table_format
-rwxr-xr-x 1 root root   22522 Feb 16 17:44 /usr/bin/mysqld_multi
-rwxr-xr-x 1 root root   13073 Feb 16 17:44 /usr/bin/mysqld_safe
-rwxr-xr-x 1 root root   75184 Feb 16 17:45 /usr/bin/mysqldump
-rwxr-xr-x 1 root root    6356 Feb 16 17:44 /usr/bin/mysqldumpslow
-rwxr-xr-x 1 root root   11648 Feb 16 17:44 /usr/bin/mysql_explain_log
-rwxr-xr-x 1 root root    3245 Feb 16 14:39 /usr/bin/mysql_find_rows
-rwxr-xr-x 1 root root     483 Feb 16 17:44 /usr/bin/mysql_fix_extensions
-rwxr-xr-x 1 root root    5834 Feb 16 17:44 /usr/bin/mysql_fix_privilege_tables
-rwxr-xr-x 1 root root   31431 Feb 16 17:44 /usr/bin/mysqlhotcopy
-rwxr-xr-x 1 root root   26160 Feb 16 17:45 /usr/bin/mysqlimport
-rwxr-xr-x 1 root root   13659 Feb 16 17:44 /usr/bin/mysql_install_db
-rwxr-xr-x 1 root root    6586 Feb 16 17:44 /usr/bin/mysql_secure_installation
-rwxr-xr-x 1 root root   16687 Feb 16 17:44 /usr/bin/mysql_setpermission
-rwxr-xr-x 1 root root   28224 Feb 16 17:45 /usr/bin/mysqlshow
-rwxr-xr-x 1 root root   14473 Feb 16 14:39 /usr/bin/mysql_tableinfo
-rwxr-xr-x 1 root root  158192 Feb 16 17:45 /usr/bin/mysqltest
-rwxr-xr-x 1 root root   42360 Feb 16 17:45 /usr/bin/mysqltestmanager
-rwxr-xr-x 1 root root   15464 Feb 16 17:45 /usr/bin/mysqltestmanagerc
-rwxr-xr-x 1 root root   13448 Feb 16 17:45 /usr/bin/mysqltestmanager-pwgen
-rwxr-xr-x 1 root root 1312064 Feb 16 17:45 /usr/bin/mysql_tzinfo_to_sql
-rwxr-xr-x 1 root root   54160 Feb 16 17:45 /usr/bin/mysql_upgrade
-rwxr-xr-x 1 root root    5753 Feb 16 17:44 /usr/bin/mysql_upgrade_shell
-rwxr-xr-x 1 root root  112136 Feb 16 17:45 /usr/bin/mysql_waitpid
-rwxr-xr-x 1 root root    3818 Feb 16 17:44 /usr/bin/mysql_zap

The mysqld binary is found in /usr/libexec

Error Log

The MySQL error log is found in /var/log/mysqld.log

The content after an initial start of MySQL will look similar to:

cat /var/log/mysqld.log
100705 22:09:03  mysqld started
InnoDB: The first specified data file ./ibdata1 did not exist:
InnoDB: a new database to be created!
100705 22:09:03  InnoDB: Setting file ./ibdata1 size to 10 MB
InnoDB: Database physically writes the file full: wait...
100705 22:09:03  InnoDB: Log file ./ib_logfile0 did not exist: new to be created
InnoDB: Setting log file ./ib_logfile0 size to 5 MB
InnoDB: Database physically writes the file full: wait...
100705 22:09:03  InnoDB: Log file ./ib_logfile1 did not exist: new to be created
InnoDB: Setting log file ./ib_logfile1 size to 5 MB
InnoDB: Database physically writes the file full: wait...
InnoDB: Doublewrite buffer not found: creating new
InnoDB: Doublewrite buffer created
InnoDB: Creating foreign key constraint system tables
InnoDB: Foreign key constraint system tables created
100705 22:09:03  InnoDB: Started; log sequence number 0 0
100705 22:09:03 [Note] /usr/libexec/mysqld: ready for connections.
Version: '5.0.77'  socket: '/var/lib/mysql/mysql.sock'  port: 3306  Source distribution

On the first invocation of MySQL, the InnoDB storage engine will create a default tablespace and redo logs. This is the majority of messages in the above log.

Processes

MySQL is a multi-threaded single process called mysqld. A second wrapper process mysqld_safe is generally found. This process logs stderr and also will restart the mysqld process if not found.

ps -ef | grep mysql
root     14733     1  0 Jul05 pts/1    00:00:00 /bin/sh /usr/bin/mysqld_safe --datadir=/var/lib/mysql --socket=/var/lib/mysql/mysql.sock --log-error=/var/log/mysqld.log --pid-file=/var/run/mysqld/mysqld.pid --user=mysql
mysql    14783 14733  0 Jul05 pts/1    00:00:10 /usr/libexec/mysqld --basedir=/usr --datadir=/var/lib/mysql --user=mysql --pid-file=/var/run/mysqld/mysqld.pid --skip-external-locking --socket=/var/lib/mysql/mysql.sock

Memory Usage

MySQL can have a very low memory footprint. By default the mysqld process has a 175M virtual size.

$ ps -eopid,fname,rss,vsz,user,command | grep -e "RSS" -e "mysql"
  PID COMMAND    RSS    VSZ USER     COMMAND
14275 grep       720  61136 root     grep -e RSS -e mysql
14733 mysqld_s  1192  63820 root     /bin/sh /usr/bin/mysqld_safe --datadir=/var/lib/mysql --socket=/var/lib/mysql/mysql.sock --log-error=/var/log/mysqld.log --pid-file=/var/run/mysqld/mysqld.pid --user=mysql
14783 mysqld   27004 179496 mysql    /usr/libexec/mysqld --basedir=/usr --datadir=/var/lib/mysql --user=mysql --pid-file=/var/run/mysqld/mysqld.pid --skip-external-locking --socket=/var/lib/mysql/mysql.sock

Disk Usage

The MySQL data files will be stored on a default installation in /var/lib/mysql

$ du -sh /var/lib/mysql
22M     /var/lib/mysql

$ ls -ld /var/lib/mysql
drwxr-xr-x 4 mysql mysql 4096 Jul 13 11:50 /var/lib/mysql

$ ls -l /var/lib/mysql
total 20552
-rw-rw---- 1 mysql mysql 10485760 Jul  5 22:09 ibdata1
-rw-rw---- 1 mysql mysql  5242880 Jul  5 22:09 ib_logfile0
-rw-rw---- 1 mysql mysql  5242880 Jul  5 22:09 ib_logfile1
drwx------ 2 mysql mysql     4096 Jul  5 22:09 mysql
srwxrwxrwx 1 mysql mysql        0 Jul  5 22:09 mysql.sock

The MySQL data directory includes the InnoDB tablespace datafile (ibdata1), redo logs (ib_logfile?), and the mysql directory corresponding to the mysql schema containing instance meta data.

This directory also contains the socket file, which is actually a poor location as this opens the security of this directory for world access. This will be discussed later in securing your installation.

Running MySQL

The best means of controlling the starting and stopping of mysql is to use the provided service init script mysqld

$ ls -l /etc/init.d/mysqld
-rwxr-xr-x 1 root root 4286 Feb 16 17:45 /etc/init.d/mysqld

Configuration

For OEL the MySQL configuration can be found in /etc.
NOTE: MySQL can use multiple configuration files.

$ ls -l /etc/my.cnf
-rw-r--r-- 1 root root 441 Feb 16 14:39 /etc/my.cnf

MySQL includes a minimalistic configuration file by default. The configuration file format is variable=value pairs for a given number of different sections, in this file [mysqld] and [mysqld_safe].

$ cat /etc/my.cnf

[mysqld]
datadir=/var/lib/mysql
socket=/var/lib/mysql/mysql.sock
user=mysql
# Default to using old password format for compatibility with mysql 3.x
# clients (those using the mysqlclient10 compatibility package).
old_passwords=1

# Disabling symbolic-links is recommended to prevent assorted security risks;
# to do so, uncomment this line:
# symbolic-links=0

[mysqld_safe]
log-error=/var/log/mysqld.log
pid-file=/var/run/mysqld/mysqld.pid

Audit

A full audit of all MySQL related files.

find / -name "*mysql*"
/etc/rc.d/rc3.d/S64mysqld
/etc/rc.d/rc5.d/S64mysqld
/etc/rc.d/rc6.d/K36mysqld
/etc/rc.d/init.d/mysqld
/etc/rc.d/rc0.d/K36mysqld
/etc/rc.d/rc4.d/S64mysqld
/etc/rc.d/rc1.d/K36mysqld
/etc/rc.d/rc2.d/S64mysqld
/etc/php.d/pdo_mysql.ini
/etc/php.d/mysql.ini
/etc/php.d/mysqli.ini
/etc/ld.so.conf.d/mysql-x86_64.conf
/etc/ld.so.conf.d/mysql-i386.conf
/usr/lib64/mysql
/usr/lib64/mysql/mysqlbug
/usr/lib64/mysql/libmysqlclient_r.so.15.0.0
/usr/lib64/mysql/libmysqlclient.so.15
/usr/lib64/mysql/libmysqlclient_r.so.15
/usr/lib64/mysql/mysql_config
/usr/lib64/mysql/libmysqlclient.so.15.0.0
/usr/lib64/perl5/vendor_perl/5.8.8/x86_64-linux-thread-multi/Bundle/DBD/mysql.pm
/usr/lib64/perl5/vendor_perl/5.8.8/x86_64-linux-thread-multi/auto/DBD/mysql
/usr/lib64/perl5/vendor_perl/5.8.8/x86_64-linux-thread-multi/auto/DBD/mysql/mysql.so
/usr/lib64/perl5/vendor_perl/5.8.8/x86_64-linux-thread-multi/DBD/mysql
/usr/lib64/perl5/vendor_perl/5.8.8/x86_64-linux-thread-multi/DBD/mysql.pm
/usr/lib64/php/modules/mysql.so
/usr/lib64/php/modules/pdo_mysql.so
/usr/lib64/php/modules/mysqli.so
/usr/libexec/mysqld
/usr/libexec/mysqlmanager
/usr/share/mysql
/usr/share/mysql/mysql_system_tables.sql
/usr/share/mysql/mysql_system_tables_data.sql
/usr/share/mysql/mysql_fix_privilege_tables.sql
/usr/share/mysql/mysql_test_data_timezone.sql
/usr/share/vim/vim70/syntax/mysql.vim
/usr/share/man/man8/mysqld.8.gz
/usr/share/man/man8/mysqlmanager.8.gz
/usr/share/man/man1/mysql.1.gz
/usr/share/man/man1/mysql.server.1.gz
/usr/share/man/man1/mysql_tableinfo.1.gz
/usr/share/man/man1/mysql_upgrade.1.gz
/usr/share/man/man1/mysqlaccess.1.gz
/usr/share/man/man1/mysql_waitpid.1.gz
/usr/share/man/man1/mysql_fix_extensions.1.gz
/usr/share/man/man1/mysqlman.1.gz
/usr/share/man/man1/mysqlbinlog.1.gz
/usr/share/man/man1/mysql_install_db.1.gz
/usr/share/man/man1/mysql_tzinfo_to_sql.1.gz
/usr/share/man/man1/mysql_secure_installation.1.gz
/usr/share/man/man1/mysqld_safe.1.gz
/usr/share/man/man1/mysqladmin.1.gz
/usr/share/man/man1/mysqlimport.1.gz
/usr/share/man/man1/mysql_zap.1.gz
/usr/share/man/man1/msql2mysql.1.gz
/usr/share/man/man1/mysqlshow.1.gz
/usr/share/man/man1/mysqldump.1.gz
/usr/share/man/man1/safe_mysqld.1.gz
/usr/share/man/man1/mysql_explain_log.1.gz
/usr/share/man/man1/mysql_config.1.gz
/usr/share/man/man1/mysqlbug.1.gz
/usr/share/man/man1/mysqld_multi.1.gz
/usr/share/man/man1/mysql_setpermission.1.gz
/usr/share/man/man1/mysqlhotcopy.1.gz
/usr/share/man/man1/mysql_find_rows.1.gz
/usr/share/man/man1/mysql_convert_table_format.1.gz
/usr/share/man/man1/mysql_fix_privilege_tables.1.gz
/usr/share/man/man1/mysqldumpslow.1.gz
/usr/share/man/man1/mysqltest.1.gz
/usr/share/man/man1/mysqlcheck.1.gz
/usr/share/man/man3/Bundle::DBD::mysql.3pm.gz
/usr/share/man/man3/DBD::mysql.3pm.gz
/usr/share/man/man3/DBD::mysql::INSTALL.3pm.gz
/usr/share/doc/mysql-server-5.0.77
/usr/share/doc/mysql-5.0.77
/usr/share/doc/selinux-policy-2.4.6/html/services_mysql.html
/usr/share/pixmaps/comps/mysql.png
/usr/share/info/mysql.info.gz
/usr/share/selinux/devel/include/services/mysql.if
/usr/bin/mysql_fix_extensions
/usr/bin/mysql
/usr/bin/mysqltestmanager
/usr/bin/mysqldumpslow
/usr/bin/mysql_upgrade_shell
/usr/bin/mysql_convert_table_format
/usr/bin/mysqlimport
/usr/bin/mysqldump
/usr/bin/mysqltestmanager-pwgen
/usr/bin/mysql_tzinfo_to_sql
/usr/bin/mysqlbug
/usr/bin/mysqlhotcopy
/usr/bin/mysqlaccess
/usr/bin/mysqltest
/usr/bin/mysqladmin
/usr/bin/mysql_upgrade
/usr/bin/mysqltestmanagerc
/usr/bin/mysqld_safe
/usr/bin/mysql_zap
/usr/bin/mysql_waitpid
/usr/bin/msql2mysql
/usr/bin/mysql_secure_installation
/usr/bin/mysql_fix_privilege_tables
/usr/bin/mysqlshow
/usr/bin/mysql_config
/usr/bin/mysql_setpermission
/usr/bin/mysql_tableinfo
/usr/bin/mysql_find_rows
/usr/bin/mysqld_multi
/usr/bin/mysqlcheck
/usr/bin/mysqlbinlog
/usr/bin/mysql_install_db
/usr/bin/mysql_explain_log
/usr/lib/mysql
/usr/lib/mysql/mysqlbug
/usr/lib/mysql/libmysqlclient_r.so.15.0.0
/usr/lib/mysql/libmysqlclient.so.15
/usr/lib/mysql/libmysqlclient_r.so.15
/usr/lib/mysql/mysql_config
/usr/lib/mysql/libmysqlclient.so.15.0.0
/usr/lib/python2.4/site-packages/sos/plugins/mysql.pyo
/usr/lib/python2.4/site-packages/sos/plugins/mysql.pyc
/usr/lib/python2.4/site-packages/sos/plugins/mysql.py
/var/log/mysqld.log
/var/run/mysqld
/var/run/mysqld/mysqld.pid
/var/lock/subsys/mysqld
/var/lib/mysql
/var/lib/mysql/mysql
/var/lib/mysql/mysql.sock
/root/.mysql_history
/selinux/booleans/mysqld_disable_trans
/selinux/booleans/allow_user_mysql_connect

Installing a LAMP stack on Oracle Enterprise Linux

After successfully installing MySQL on Oracle Enterprise Linux installing a LAMP (Linux/Apache/MySQL/PHP) stack can also be performed with a single command:

$ yum install -y httpd php php-mysql
# Start the Apache Httpd Process
$ /etc/init.d/httpd start

To test and confirm Apache Httpd and PHP, we can use the CLI browser lynx:

$ yum install -y lynx
$ echo "<? phpinfo() ?>" > /var/www/html/phpinfo.php
$ lynx http://localhost/phpinfo.php

If successful, you will find a web page that contains the following.

phpinfo() (p1 of 31)

   PHP Logo

PHP Version 5.1.6

   System Linux localhost.localdomain 2.6.18-164.el5 #1 SMP Thu Sep 3 04:15:13
   EDT 2009 x86_64
   Build Date Feb 11 2010 19:07:36
   Configure   Command   './configure'  '--build=x86_64-redhat-linux-gnu'
   '--host=x86_64-redhat-linux-gnu'    '--target=x86_64-redhat-linux-gnu'
   '--program-prefix=''--prefix=/usr''--exec-prefix=/usr''--bindir=/usr/bin'
   '--sbindir=/usr/sbin'    '--sysconfdir=/etc'    '--datadir=/usr/share'
   '--includedir=/usr/include'                      '--libdir=/usr/lib64'
   '--libexecdir=/usr/libexec'                     '--localstatedir=/var'
   '--sharedstatedir=/usr/com'                  '--mandir=/usr/share/man'
   '--infodir=/usr/share/info'             '--cache-file=../config.cache'
   '--with-libdir=lib64'                   '--with-config-file-path=/etc'

It is important to note that PHP is also a standalone scripting language that doesn’t require a web browser. You can use PHP on the command line, for example:

$ php --version
PHP 5.1.6 (cli) (built: Feb 11 2010 19:06:40)
Copyright (c) 1997-2006 The PHP Group
Zend Engine v2.1.0, Copyright (c) 1998-2006 Zend Technologies

$ echo "<?phpinfo()?>" | php | grep -i mysql
Configure Command =>  './configure' '--build=x86_64-redhat-linux-gnu' '--host=x86_64-redhat-linux-gnu' '--target=x86_64-redhat-linux-gnu' '--program-prefix=' '--prefix=/usr' '--exec-prefix=/usr' '--bindir=/usr/bin' '--sbindir=/usr/sbin' '--sysconfdir=/etc' '--datadir=/usr/share' '--includedir=/usr/include' '--libdir=/usr/lib64' '--libexecdir=/usr/libexec' '--localstatedir=/var' '--sharedstatedir=/usr/com' '--mandir=/usr/share/man' '--infodir=/usr/share/info' '--cache-file=../config.cache' '--with-libdir=lib64' '--with-config-file-path=/etc' '--with-config-file-scan-dir=/etc/php.d' '--disable-debug' '--with-pic' '--disable-rpath' '--without-pear' '--with-bz2' '--with-curl' '--with-exec-dir=/usr/bin' '--with-freetype-dir=/usr' '--with-png-dir=/usr' '--enable-gd-native-ttf' '--without-gdbm' '--with-gettext' '--with-gmp' '--with-iconv' '--with-jpeg-dir=/usr' '--with-openssl' '--with-png' '--with-pspell' '--with-expat-dir=/usr' '--with-pcre-regex=/usr' '--with-zlib' '--with-layout=GNU' '--enable-exif' '--enable-ftp' '--enable-magic-quotes' '--enable-sockets' '--enable-sysvsem' '--enable-sysvshm' '--enable-sysvmsg' '--enable-track-vars' '--enable-trans-sid' '--enable-yp' '--enable-wddx' '--with-kerberos' '--enable-ucd-snmp-hack' '--with-unixODBC=shared,/usr' '--enable-memory-limit' '--enable-shmop' '--enable-calendar' '--enable-dbx' '--enable-dio' '--with-mime-magic=/usr/share/file/magic.mime' '--without-sqlite' '--with-libxml-dir=/usr' '--with-xml' '--with-system-tzdata' '--enable-force-cgi-redirect' '--enable-pcntl' '--with-imap=shared' '--with-imap-ssl' '--enable-mbstring=shared' '--enable-mbstr-enc-trans' '--enable-mbregex' '--with-ncurses=shared' '--with-gd=shared' '--enable-bcmath=shared' '--enable-dba=shared' '--with-db4=/usr' '--with-xmlrpc=shared' '--with-ldap=shared' '--with-ldap-sasl' '--with-mysql=shared,/usr' '--with-mysqli=shared,/usr/lib64/mysql/mysql_config' '--enable-dom=shared' '--with-dom-xslt=/usr' '--with-dom-exslt=/usr' '--with-pgsql=shared' '--with-snmp=shared,/usr' '--enable-soap=shared' '--with-xsl=shared,/usr' '--enable-xmlreader=shared' '--enable-xmlwriter=shared' '--enable-fastcgi' '--enable-pdo=shared' '--with-pdo-odbc=shared,unixODBC,/usr' '--with-pdo-mysql=shared,/usr/lib64/mysql/mysql_config' '--with-pdo-pgsql=shared,/usr' '--with-pdo-sqlite=shared,/usr' '--enable-dbase=shared'
/etc/php.d/mysql.ini,
/etc/php.d/mysqli.ini,
/etc/php.d/pdo_mysql.ini,
mysql
MySQL Support => enabled
MYSQL_MODULE_TYPE => external
MYSQL_SOCKET => /var/lib/mysql/mysql.sock
MYSQL_INCLUDE => -I/usr/include/mysql
MYSQL_LIBS => -L/usr/lib64/mysql -lmysqlclient
mysql.allow_persistent => On => On
mysql.connect_timeout => 60 => 60
mysql.default_host => no value => no value
mysql.default_password => no value => no value
mysql.default_port => no value => no value
mysql.default_socket => no value => no value
mysql.default_user => no value => no value
mysql.max_links => Unlimited => Unlimited
mysql.max_persistent => Unlimited => Unlimited
mysql.trace_mode => Off => Off
mysqli
MysqlI Support => enabled
MYSQLI_SOCKET => /var/lib/mysql/mysql.sock
mysqli.default_host => no value => no value
mysqli.default_port => 3306 => 3306
mysqli.default_pw => no value => no value
mysqli.default_socket => no value => no value
mysqli.default_user => no value => no value
mysqli.max_links => Unlimited => Unlimited
mysqli.reconnect => Off => Off
PDO drivers => mysql, sqlite
pdo_mysql
PDO Driver for MySQL, client library version => 5.0.77

Short URL: rb42.com/oel-install-lamp

Understanding installing MySQL rpm versions

I have a problem with an easy way to install MySQL via rpm without resorting to specifying the exact point release of MySQL. Presently my local yum repository has versions of 5.0, 5.1,5.4 and 5.5.

If I want to install MySQL Sever, I can just run:

$ sudo yum install -y MySQL-server
Setting up Install Process
Package MySQL-server-community-5.5.0-1.rhel5.x86_64 already installed and latest version
Nothing to do

The issue here is the most current version is installed. If I want to install the most current version of 5.1 for example, I have found no way to specify MySQL-server-5.1, or MySQL-server-community-5.1, I have to specify the point release MySQL-server-community-5.1.40

I suspect there is some internal aliasing that may be possible within rpm’s to support this. I’m seeking help from any rpm experts and would appreciate any feedback.

My current products include:

$ sudo yum list MySQL-server-community
Installed Packages
MySQL-server-community.x86_64      5.5.0-1.rhel5        installed
Available Packages
MySQL-server-community.x86_64      5.0.82-0.rhel5       mydb-rhel5-server-x86_64
MySQL-server-community.x86_64      5.0.82-0.rhel5       mydb-rhel5-x86_64
MySQL-server-community.x86_64      5.1.40-0.rhel5       mydb-rhel5-server-x86_64
MySQL-server-community.x86_64      5.1.40-0.rhel5       mydb-rhel5-x86_64
MySQL-server-community.x86_64      5.4.3-0.rhel5        mydb-rhel5-server-x86_64
MySQL-server-community.x86_64      5.4.3-0.rhel5        mydb-rhel5-x86_64
MySQL-server-community.x86_64      5.5.0-1.rhel5        mydb-rhel5-server-x86_64
MySQL-server-community.x86_64      5.5.0-1.rhel5        mydb-rhel5-x86_64

How do I create a simple MySQL database

I was asked this question recently “I am wanting to create a simple MySQL database consisting of 5 tables”?

While it’s easy to tell people to RTFM, the question does warrant an answer for the MySQL beginner to provide a more specific guidance as to where to start, and what to do. As a expert in MySQL it’s easy to forget how you would describe what to do. Here are my tips to getting started.

Step 1. Download the MySQL 5.1 software for your platform (e.g. Linux, Windows, Mac etc) from MySQL 5.1 Downloads. There are many different versions of MySQL, MySQL 5.1 is the current production version.

Step 2. You will need to install the MySQL software. The MySQL reference manual is the place to go, Chapter 2 describes installing MySQL. You can also download a copy of the manual in various different formats at MySQL Documentation. This is also valuable for the time when the documentation may be be unavailable online.

Step 3. Download a GUI tool to help you in the design of your first MySQL Tables. There are a number of products available to do this, the MySQL Query Browser and WebYog are just two examples. If your bold, you can use the mysql client command line tool and use the CREATE TABLE command to create your table structures.

MySQL by itself is ineffective for producing a client facing end result unless you have an application purpose and therefore a general application to access the data in MySQL. Using a LAMP/WAMP stack is a good place to start. XAMPP is a good cross platform program that gives you MySQL and a PHP technology stack. You also get PhpMyAdmin included with XAMPP which is a good web based design tool. I don’t mention earlier because it needs a running php/apache/mysql environment. If you elect to start with this stack, then you don’t need to install any GUI tools.

Finally, there a wealth of knowledge, not at least the MySQL Forums and the #mysql channel on irc.freenode.net which can be good places to get free beginner information.

MiFi Installation woes

As I mentioned in MiFi Introduction I took the plunge and purchased a Verizon MiFi. I got this under a 2 year contract for $149.99 and $59.99 per month for 5GB of traffic.

While happy to have a new tech toy, the installation and use of, well that was a painful experience I’d rather not have to endure. Unfortunately I didn’t document all steps with screen shots so I will need to describe what I have.

While it stated the device worked with a Mac, it was clearly not as simple as the instructions stated.

  1. The first problem is, you can’t use the device until you activate it. You can’t activate it unless you already have Internet Access.
  2. The Tips, hits and shortcuts manual also states “VZAccess Manager Installation”, … connect device …, VZAccess installer auto-launches and the drivers will install automatically. You have to read one page further before you get “Mac customers are not required to use VZAccess Manager to use their device”. First, you do have to install the software to use the device (for the first time), there seems no way around that, and second, it does not auto-launch.
  3. Trying to install I read the instructions, “connect to a USB Port, … auto-launches”. This doesn’t happen. Opening in Finder, hoping for an attached device no luck? Now what.
  4. One page further, under Mac OS/X Users, the section that states “not required to use…” also includes a point stating that activation requires MAC OS X 10.4.0 or higher and WWAN Support Update 1.0. It would be nice if you included this as Pre-Requistes in your documentation so it reads chronologically. The docs state this is a free download.
  5. So I downloaded WWAN Support Update 1.0 from the apple web site, got to run it, and it states “Alert: This computer cannot use this update”. What the. I did between my first two attempts to connect to the device, and now run a Software Update, so guessing it was in this because I know no easy way to confirm installed software on a Mac, I truck on.
  6. The Important MiFI 2220 Connection Information
  7. page, shown below states you can access the MiFi Admin Portal at http://192.168.1.1. See Exhibit 1 below. I try that and I get the admin page, and it states “Not Activated”. Did the store not activate the device, or is my attempt to blunder through these steps not correct

  8. Being frustrated I try Verizon Phone Support, the number 1800 922 0204, conveniently absent from the docs FYI. The automated system asks are you a customer, yes I am, what is your number? Well my number is on AT&T, this is just a broadband device, not a phone, trying that doesn’t work. Then trying to get out of the automated system to get an operator an ordeal. Finally a real person.
  9. Real person asks, what is your number, I explain the same story, then I decide to grab the receipt from the store, and I find in small print, under the device name on the receipt a number? Is that my number? I give that and lone behold, that’s the Cell number for the device. Would be nice if they told you that.
  10. I explain my problem, and I’m put on hold, and hold a second time, and more hold a third time to talk to a more technical person.
  11. During this time, I go back over the steps I undertook and lone behold, there is now a device in my Finder. See Exhibit 2. Did it take like 10 mins to find it or what? Perplexing. So while waiting for a tech person, I move on.
  12. I see VZAccess Manager install package, I take this route, and following system reboot on the Mac, the software auto starts, and I’m prompted with the VZAccess Manager screen, See Exhibit 3.
  13. In fine print down the bottom, Activation required. Nice if that was in big letters on first usage of software. A few menu buttons on the top, and a Connect WWan button bottom right. Again, lack of clear UI here.
  14. Clicking Connect WWAN goes though a number of steps, which unfortunately I didn’t keep, but at the end, I finally get an I’m activated message.
  15. To get the device working however, there was also some pain. I had to disconnect my Internet connect, disable Wireless, and talk to the device directly via USB. I could then confirm I could access the Internet. I then had to remove the USB, enable Wireless and connect to get it to communicate via wireless. The activation process needed the USB connection.
  16. I’m finally online, now the need to plug this into my network. The device has an Admin portal at http://192.168.1.1. The first pain, I can’t access this because my Internal network, and multiple devices runs from my router at the same address. Seeing no way around this, I have to reconfigure my internal network, which was a pain. No I can access the Admin Portal. My goal is to change SSID, change password that’s printed on multiple pieces of paper, and also change the address.
  17. On the admin portal, an input box, and button for Login. See Exhibit 4. Nothing in the documentation on this login box, the Verizon tech didn’t know any information about this, so while they were researching I started randomly choosing logins. It was weird that the input was a password protected input (e.g. *****) and there was no username/password. I try the WiFi Password, seems to get truncated. I try admin and lone behold I’m logged in. That’s about as insecure as having nothing.
  18. After all this, I’m finally able to configure the device. See Exhibit 5. I trust it will work when I’m next on the road. Documentation get’s a fail, it’s unclear and incomplete. There needs to be clear and seperate sections for Windows and Mac OS/X, and it needs to detail the installation process correctly and clearly, and probably with some screen prints. I’m not a novice user, and I had difficulty with this process.

Exhibit 1 – Important Information Page

Exhibit 2 – VZAccess Manager Finder

Exhibit 3 – VZAccess Manager

Exhibit 4 – MiFi Administration Portal Login

Exhibit 5 – MiFi Administration Change Password