I have just received copies of my Effective MySQL series that are available in Chinese. The picture speaks more than words.


I have just received copies of my Effective MySQL series that are available in Chinese. The picture speaks more than words.
I have recently been working with the Donors Choose Open Data Set which happens to be in PostgreSQL. Easy enough to install and load the data in PostgreSQL, however as I live and breath MySQL, lets load the data into MySQL.
And here is where start our discussion, first some history.
SQL – Structure Query Language is a well known common language for communicating with Relational Databases (RDBMS). It is not the only language I might add, having both used many years ago and just mentioned QUEL at a Looker Look and Tell event in New York. It has also been around since the 1970s making it; along with C; one of oldest in general use programming languages today.
SQL became an ANSI standard in 1986, and an ISO standard in 1987. The purpose of a standard is to provide commonality when communicating or exchanging information; in our case; a programming language communicating with a RDBMS. There have been several iterations of the standard as functionality and syntax improves. These are commonly referred to as SQL-86, SQL-89, SQL-92, SQL:1999, SQL:2003, SQL:2006, SQL:2008 and SQL:2011.
And so, with SQL being a standard it means that what we can do in PostgreSQL should translate to what we can do in MySQL.
Both products provide a Command Line Interface (CLI) client tool for SQL communication, mysql for MySQL and psql for PostgreSQL. No surprises there. Both use by default the semicolon ; as a SQL statement terminator, and both CLI tools use \q as a means to quit and exit the tool. Certainly not a standard but great for syntax compatibility.
Our journey begins with defining tables.
Both products SQL syntax support DROP TABLE. Infact, both support the DROP TABLE [IF EXISTS] syntax.
DROP TABLE donorschoose_projects;
DROP TABLE IF EXISTS donorschoose_projects;
Both support CREATE TABLE.
Both support defining columns in the typical format <column_name> <datatype>, and both support the NOT NULL attribute. Talking about specific datatypes for columns is a topic on its own and so I discuss this later.
The PostgreSQL syntax was a table option WITHOUT OIDS which is not valid in MySQL. It is also obsolescent syntax in PostgreSQL 9.3. From the PostgreSQL manual “This optional clause specifies whether rows of the new table should have OIDs (object identifiers) assigned to them. The default is to have OIDs. Specifying WITHOUT OIDS allows the user to suppress generation of OIDs for rows of a table. This may be worthwhile for large tables … Specifying WITHOUT OIDS also reduces the space required to store the table on disk by 4 bytes per row of the table, thereby improving performance.”
In this example as this is just for testing, dropping the WITHOUT OIDS syntax creates a mutually compatible syntax.
Both MySQL and PostgreSQL support -- as an inline comment in an SQL statement. No need to strip those out.
Both support ALTER TABLE ADD CONSTRAINT syntax which in our example is used to define the PRIMARY KEY, however while the syntax remains the same, the choice of datatype affects the outcome.
The following works in both products when the datatype is CHARACTER(32). More about CHARACTER() later.
ALTER TABLE donorschoose_projects ADD CONSTRAINT pk_donorschoose_projects PRIMARY KEY(_projectid);
In our example dataset, the primary key is defined with a TEXT datatype, and in MySQL this fails.
ERROR 1170 (42000): BLOB/TEXT column '_projectid' used in key specification without a key length
As the data in the dataset for primary keys by further analysis is indeed a 32 byte hexadecimal value, this is changed to CHARACTER(32) to be compatible for this data loading need. This however is an important key difference in any migration process with other data sets.
Side Note
Both products support the definition of the PRIMARY KEY in the CREATE TABLE syntax two different ways.
CREATE TABLE demo_pk1 (id character(32) NOT NULL PRIMARY KEY);
CREATE TABLE demo_pk2 (id character(32) NOT NULL, PRIMARY KEY(id));
Both use CREATE INDEX syntax however with our sample dataset, this is the first observed difference in syntax with provided sample SQL statements.
PostgresSQL
CREATE INDEX projects_schoolid ON projects USING btree (_schoolid);
MySQL
The USING <type> qualifier must appear before the ON <table>.
CREATE INDEX USING btree projects_schoolid ON projects (_schoolid);
In both products USING btree is an optional syntax (for minimum compatibility) purposes so removing this provides a consistency.
The following data types are defined in the PostgreSQL example data set. Each is discussed to identify a best fit in MySQL. For reference:
This data type is for a fixed width character field and requires a length attribute. MySQL supports CHARACTER(n) syntax for compatibility, however generally CHAR(n) is the preferred syntax. Indeed, PostgreSQL also supports CHAR(n).
The following showing both variants is valid in both products.
CREATE TABLE demo_character(c1 CHARACTER(1), c2 CHAR(1));
While this dataset does not use these datatypes, they are critical in the general conservations of character (aka string) types. This refers to a variable length string.
While character varying is not a valid MySQL syntax, varchar is compatible with both products.
CREATE TABLE demo_varchar(vc1 VARCHAR(10));
In PostgresSQL, text is used for variables of undefined length. The maximum length of a field is 1GB as stated in the FAQ.
In MySQL however TEXT only stores 2^16 characters (64K). The use of LONGTEXT is needed to support the full length capacity in PostgeSQL. This store 2^32 characters (~4GB).
Of all the complexity of this example dataset, the general use of text will be the most difficult to modify to a more applicable VARCHAR or TEXT datatype when optimizing in MySQL.
PostgreSQL uses the integer datatype for a signed 4 byte integer value. MySQL supports the same syntax, however generally prefers to refer to the shorter INT syntax. Both products support both overall.
mysql> CREATE TABLE demo_integer(i1 INTEGER, i2 INT);
Query OK, 0 rows affected (0.11 sec)

mysql> INSERT INTO demo_integer VALUES (1,-1);
Query OK, 1 row affected (0.05 sec)

mysql> SELECT * FROM demo_integer;
+------+------+
| i1   | i2   |
+------+------+
|    1 |   -1 |
+------+------+
1 row in set (0.00 sec)
demo=# CREATE TABLE demo_integer(i1 INTEGER, i2 INT);
CREATE TABLE
demo=# INSERT INTO demo_integer VALUES (1,-1);
INSERT 0 1
demo=# SELECT * FROM demo_integer;
 i1 | i2
----+----
  1 | -1
(1 row)
And just to note the boundary of this data type.
mysql> TRUNCATE TABLE demo_integer;
Query OK, 0 rows affected (0.04 sec)

mysql> INSERT INTO demo_integer VALUES (2147483647, -2147483648);
Query OK, 1 row affected (0.04 sec)

mysql> SELECT * FROM demo_integer;
+------------+-------------+
| i1         | i2          |
+------------+-------------+
| 2147483647 | -2147483648 |
+------------+-------------+
1 row in set (0.00 sec)
demo=# TRUNCATE TABLE demo_integer;
TRUNCATE TABLE

demo=# INSERT INTO demo_integer VALUES (2147483647, -2147483648);
INSERT 0 1
demo=# SELECT * FROM demo_integer;
     i1     |     i2
------------+-------------
 2147483647 | -2147483648
(1 row)
The difference is in out-of-bounds value management, and here MySQL defaults suck. You can read my views at DP#4 The importance of using sql_mode.
demo=# TRUNCATE TABLE demo_integer;
TRUNCATE TABLE
demo=# INSERT INTO demo_integer VALUES (2147483647 + 1, -2147483648 - 1);
ERROR:  integer out of range
demo=# SELECT * FROM demo_integer;
 i1 | i2
----+----
(0 rows)
mysql> TRUNCATE TABLE demo_integer;
Query OK, 0 rows affected (0.04 sec)

mysql> INSERT INTO demo_integer VALUES (2147483647 + 1, -2147483648 - 1);
Query OK, 1 row affected, 2 warnings (0.07 sec)

mysql> SELECT * from demo_integer;
+------------+-------------+
| i1         | i2          |
+------------+-------------+
| 2147483647 | -2147483648 |
+------------+-------------+
1 row in set (0.00 sec)
While not in this dataset, both support the bigint data type. While the PostgreSQL docs indicate bigint is 8 bytes, testing with PostgresSQL 9.3 failed. Something to investigate more later.
demo=# CREATE TABLE demo_bigint(i1 BIGINT);
CREATE TABLE
demo=# INSERT INTO demo_bigint VALUES (2147483647 + 1), (-2147483648 - 1);
ERROR:  integer out of range
mysql> CREATE TABLE demo_bigint(i1 BIGINT);
Query OK, 0 rows affected (0.12 sec)

mysql> INSERT INTO demo_bigint VALUES (2147483647 + 1), (-2147483648 - 1);
Query OK, 2 rows affected (0.04 sec)
Records: 2  Duplicates: 0  Warnings: 0

mysql> SELECT * from demo_bigint;
+-------------+
| i1          |
+-------------+
|  2147483648 |
| -2147483649 |
+-------------+
2 rows in set (0.01 sec)
And for reference, both products support smallint, a 2-byte integer.
Each product has additional integer data types.
For a fixed-precision number, PostgreSQL uses numeric but supports decimal.It would not be surprising to know that MySQL uses DECIMAL and for compatibility supports NUMERIC.
This leads to a side-bar discussion on knowing your data-types for your product. In a recent interview for a MySQL Engineer, a candidate (with SQL Server experience) provided a code example defining the NUMERIC datatype. I knew it was technically valid in MySQL syntax, but never actually seen this in use. When I asked the candidate for what was the syntax commonly used for a fixed-precision datatype they were unable to answer.
This dataset does not include these data types, however for reference, PostgresSQL uses real for 4 bytes, and double precision for 8 bytes. MySQL uses float for 4 bytes, and double for 8 bytes. MySQL however supports both PostgreSQL syntax options, however PostgreSQL supports float, but not double.
demo=# CREATE TABLE demo_floatingpoint(f1 FLOAT, f2 REAL, d1 DOUBLE, d2 DOUBLE PRECISION);
ERROR:  type "double" does not exist
LINE 1: ...TE TABLE demo_floatingpoint(f1 FLOAT, f2 REAL, d1 DOUBLE, d2...

demo=# CREATE TABLE demo_floatingpoint(f1 FLOAT, f2 REAL, d2 DOUBLE PRECISION);
CREATE TABLE
mysql> CREATE TABLE demo_floatingpoint(f1 FLOAT, f2 REAL, d1 DOUBLE, d2 DOUBLE PRECISION);
Query OK, 0 rows affected (0.07 sec)
Both PostgreSQL and MySQL use the date data type.
Both PostgreSQL and MySQL use the timestamp data type to store date/time values. However, there is a difference in both precision and implementation here.
In PostgresSQL, timestamp supports a date before EPOCH, while in MySQL it does not. MySQL uses the DATETIME datatype.
Using PostgresSQL timestamp and MySQL DATETIME, both support microsecond precision. MySQL however only started to provide this in MySQL 5.6.
A key difference in column definition is the PostgreSQL timestamp without time zone syntax, used in our example dataset. Analysis of data loading will determine the impact here.
SQL:1999 calls for a Boolean datatype, and both PostgreSQL and MySQL support defining a column as BOOLEAN. MySQL however implicitly converts this to a SIGNED TINYINT, and any future DDL viewing shows this reference.
When referencing boolean, in PostgreSQL WHERE column_name = TRUE or WHERE column_name = t retrieves a true value. In MySQL WHERE column_name = TRUE or WHERE column_name = 1. When you SELECT a boolean, in PostgresSQL the answer is ‘t’, in MySQL, the answer is 1.
demo=# CREATE TABLE demo_boolean (b1 boolean);
CREATE TABLE
demo=# INSERT INTO demo_boolean VALUES (TRUE),(FALSE);
INSERT 0 2
demo=# SELECT * FROM demo_boolean;
 b1
----
 t
 f
(2 rows)
mysql> CREATE TABLE demo_boolean (b1 boolean);
Query OK, 0 rows affected (0.11 sec)

mysql> INSERT INTO demo_boolean VALUES (TRUE),(FALSE);
Query OK, 2 rows affected (0.03 sec)
Records: 2  Duplicates: 0  Warnings: 0

mysql> SELECT * FROM demo_boolean;
+------+
| b1   |
+------+
|    1 |
|    0 |
+------+
2 rows in set (0.00 sec)
Only the data types in this example have been reviewed.
In our sample SQL script, there is psql specific syntax to show a debugging line with \qecho .... For compatibility these are removed.
The loading of data with the \COPY <table_name> FROM PSTDIN WITH CSV HEADER is PostgreSQL specific and so loading the data is a future topic.
Finally, the VACUUM ANALYZE <table_name> command is also PostgreSQL specific and removed. This is a means effectively of optimizing and analyzing the table.
Both PostgreSQL and MySQL have an ANALYZE command, however the syntax is different, with the required TABLE keyword in MySQL.
PostgresSQL
ANALYZE donorschoose_projects;

ANALYZE TABLE donorschoose_projects;
ERROR:  syntax error at or near "table"
MySQL
ANALYZE donorschoose_projects;
ERROR 1064 (42000): You have an error in your SQL syntax;...

ANALYZE TABLE donorschoose_projects;
MySQL has an OPTIMIZE TABLE syntax, however while technically valid syntax this is not compatible with the default storage table InnoDB.
mysql> OPTIMIZE TABLE donorschoose_projects;
+----------------------------+----------+----------+-------------------------------------------------------------------+
| Table                      | Op       | Msg_type | Msg_text                                                          |
+----------------------------+----------+----------+-------------------------------------------------------------------+
| test.donorschoose_projects | optimize | note     | Table does not support optimize, doing recreate + analyze instead |
| test.donorschoose_projects | optimize | status   | OK                                                                |
+----------------------------+----------+----------+-------------------------------------------------------------------+
2 rows in set (0.32 sec)
If you are die hard Bourne Shell (/bin/sh) scripter, it can be a challenge not to be enticed by the syntax niceties of the Born Again Borne Shell (/bin/bash).
One example is the {..} syntax
#!/bin/bash
for I in {0..5}
do
   echo $I
done
0
1
2
3
4
5
This syntax is not valid in /bin/sh on Linux.
#!/bin/sh
for I in {0..5}
do
   echo $I
done
{0..5}
NOTE: However apparently it does work in Mac OS X, which is derived from BSD, not Linux.
/bin/sh gives you a for loop but it requires the full list of iterated values instead of a range.
#!/bin/sh

for I in 0 1 2 3 4 5
do
  echo $I
done
Note: Passing a string does not work by default.
#!/bin/sh

for I in "0 1 2 3 4 5"
do
  echo $I
done
The approach to product the same result requires some format management.
#!/bin/sh

OIFS=$IFS
IFS=" "
for I in `echo "0 1 2 3 4 5"`
do
  echo $I
done
IFS=$OIFS
You can use while
#!/bin/sh

I=0
while [ $I -le 5 ]
do
  echo $I
  I=`expr $I + 1`
done
You can use one of several other shell commands, in this example awk
#!/bin/sh

for I in `awk 'BEGIN{for (i=0;i<=5;i++) print i}'`
do
  echo $I
done
Or, the function specifically design for sequences of numbers seq
#!/bin/sh

for I in `seq 0 5`
do
  echo $I
done
And for these few examples, there will be more possibilities to achieve close to feature parity of the /bin/bash syntax.
An example found on BSD is jot - 0 5. This is not available Ubuntu by default but installed with the athena-jot package. However the syntax is then different for correct usage.
When reading a MySQL Query Execution Plan (QEP) produced by the EXPLAIN command, generally one of the first observations is to validate an index is being used per table (i.e. per row of output). In MySQL, this is observed with the key column.
In the following two simple single table examples we see the use of the PRIMARY key. To the untrained eye this may lead to assume that the right index is being used.
+----+-------------+----------------+-------+---------------+---------+---------+------+------+-------------+
| id | select_type | table          | type  | possible_keys | key     | key_len | ref  | rows | Extra       |
+----+-------------+----------------+-------+---------------+---------+---------+------+------+-------------+
|  1 | SIMPLE      | txxxxxxxxxxxx  | index | NULL          | PRIMARY | 4       | NULL |  100 | Using where |
+----+-------------+----------------+-------+---------------+---------+---------+------+------+-------------+
+----+-------------+------------+-------+---------------+---------+---------+-------+------+-------+
| id | select_type | table      | type  | possible_keys | key     | key_len | ref   | rows | Extra |
+----+-------------+------------+-------+---------------+---------+---------+-------+------+-------+
|  1 | SIMPLE      | txxxxxxxxx | const | PRIMARY       | PRIMARY | 4       | const |    1 |       |
+----+-------------+------------+-------+---------------+---------+---------+-------+------+-------+
However this is not entirely true. While used, it is not as intended. A MySQL index can be used during three different stages of the query execution, the JOIN/WHERE, the GROUP BY and the ORDER BY. This type of use can be seen by looking at the Index Hint Syntax which enables you to suggest or force an index at these three various stages.
Without looking at the SQL statements for the above plans, the first giveaway is the possible_keys column which indicates the indexes considered when evaluating the JOIN/WHERE of your SQL statement. The absence in the first query informs you that no index was used. The use of the PRIMARY key in the first query is the result of an ORDER BY syntax. If we remove this ORDER BY we see the true possible execution.
+----+-------------+----------------+------+---------------+------+---------+------+--------+-------------+
| id | select_type | table          | type | possible_keys | key  | key_len | ref  | rows   | Extra       |
+----+-------------+----------------+------+---------------+------+---------+------+--------+-------------+
|  1 | SIMPLE      | txxxxxxxxxxxx  | ALL  | NULL          | NULL | NULL    | NULL | 262827 | Using where |
+----+-------------+----------------+------+---------------+------+---------+------+--------+-------------+
The first query also includes a LIMIT and hence gives the perception that only a small number of rows are processed. In relational theory you would surmise this query is not efficient. Unfortunately as this example was on version MySQL 5.5, it was not possible to use the optimizer_trace functionality in MySQL 5.6 to delve deeper into understanding what decisions MySQL would take.
This example is not to say that you should add an index. This is one possible outcome in optimizing the SQL statement, however there are advantages and disadvantages. Each SQL statement should be reviewed in conjunction with it’s usage, the overall table structure(s) and all other SQL statements that utilize applicable tables.
In software development this is a simple question. What is [the purpose of] testing? If asked to give a one sentence answer what would you say? I have asked this simple question of attendees at many presentations, and also to software developers I have worked with or consulted to.
The most common answer is. “Testing is about making sure the software works, the function your testing does what it should, for example saves the information you entered”.
Unfortunately this is not the purpose of testing, and this attitude leads to what I generally term as poor quality software. “Testing is about trying to break your product any way possible, all the time.”
With this clarification in understanding of a basic and necessary software engineering principle, the attitude towards software development and the entire focus and mindset of engineering and quality assurance can change for the better.
Another very simple example which I often ask when consulting. What does your website look like when it’s down? Again, the general answer is often vague and/or incomplete. How do you know when your website is down? I have heard the response “The users will let you know”. You may laugh, but it is certainly not funny. Show me your website in a down state? Show me your website in a degraded state? When the answer is either unclear, or with a recent employment the same response, there has simply been little thought into producing a quality product by a testing process that is intent on breaking your software.
What procedures do you follow when receiving alerts about errors? What procedures do you put in place to ensure they do not happen again? Again, one has to be disappointed when the response is, “I will set up an email alert to the team for this type of error?” This reactive response is not addressing the problem, only acknowledging the existence of a problem. What is needed is being proactive. Was a bug raised? Can the problem be easily reproduced? How was the problem fixed the first time? Can this be corrected in the code? Can the interim resolution be automated?
When there is a negative user experience from any type of failure or error another important feedback loop is the post-mortem to review the when, why, how and who of the situation and to create a plan to ensure this does not happen again.
Testing needs to baked in to everything that is done, and practice makes for a more perfect outcome. In a high volume environment it is critical to have a simulated environment where you can benchmark performance of any new release for any regressions. A well defined load testing environment can be used to review experimental branches of possible performance improvements. It is also where you can determine the bottleneck and breaking point as you increase load 2X, 5X, 10X. It is impossible to be proactive when your system can fail at 2X load, and the engineering resources needed to implement a solution will not happen in time.
Disaster is inevitable. It will happen, whether small or large. Hardware and software inherently fails. How it fails and what is done to mitigate this to ensure the best possible consistent and rewarding consumer experience is only possible by consistently practicing to break your software at all stages in the development and deployment lifecycle.
A trivial cost saving tip for checking if you are spending money in your AWS environment on unused resources. This is especially appropriate when using provisioned IOPS EBS volumes.
$ ec2-describe-volumes | grep available

VOLUME	vol-44dff904	8	snap-d86d0884	us-east-1b	available	2014-08-01T14:11:24+0000	standard
VOLUME	vol-62dff922	100		us-east-1b	available	2014-08-01T14:11:24+0000	io1	1000
VOLUME	vol-15dff955	8	snap-d86d0884	us-east-1b	available	2014-08-01T14:11:24+0000	standard
VOLUME	vol-80a88ec0	8	snap-d86d0884	us-east-1b	available	2014-08-01T15:12:54+0000	standard
VOLUME	vol-ca82a48a	100		us-east-1b	available	2014-08-01T16:13:49+0000	standard
VOLUME	vol-5d79581d	8	snap-d86d0884	us-east-1b	available	2014-08-01T18:27:01+0000	standard
VOLUME	vol-baf9dbfa	8	snap-d86d0884	us-east-1b	available	2014-08-03T18:20:59+0000	standard
VOLUME	vol-53ffdd13	8	snap-d86d0884	us-east-1b	available	2014-08-03T18:25:52+0000	standard
VOLUME	vol-ade7daed	8	snap-d86d0884	us-east-1b	available	2014-08-13T20:10:46+0000	standard
VOLUME	vol-34e2df74	8	snap-065a2e52	us-east-1b	available	2014-08-13T20:26:17+0000	standard
VOLUME	vol-cacef38a	100	snap-280ffb7f	us-east-1b	available	2014-08-13T21:19:18+0000	standard
VOLUME	vol-41350a01	8	snap-f23ccba5	us-east-1b	available	2014-08-14T16:54:27+0000	standard
VOLUME	vol-51350a11	100	snap-fc3ccbab	us-east-1b	available	2014-08-14T16:54:27+0000	standard
VOLUME	vol-912f10d1	8	snap-96ee24c1	us-east-1b	available	2014-08-14T17:15:06+0000	standard
VOLUME	vol-a82f10e8	100	snap-9dee24ca	us-east-1b	available	2014-08-14T17:15:06+0000	standard
These are available and unused EBS volumes which you should consider deleting.
As discussed in my presentation to NYLUG, I wanted to provide system administrations with some really quick analysis and performance fixes if you had limited knowledge of MySQL.
One of the most important things with MySQL is to tune memory properly. This can be complex as there are global buffers, and per session buffers, memory tables, and differences between storage engines. Even this first tip has conditions.
Configuration of MySQL can be found in the my.cnf file (How can I find that). Some variables are dynamic and some are not, and these can change between versions. Check out The most important MySQL Reference Manual page that everybody should bookmark for reference.
Here is a great example for the key_buffer_size found in the [mysqld] section of my.cnf. This is also historically known in legacy config files as key_buffer. This older format has been removed in 5.7. This is a global buffer that is responsible for caching the MyISAM Index data only. Two important things here, this is for the MyISAM storage engine only, and it’s only for indexes. MyISAM data relies on the OS file system cache.
We can confirm the current value in a running MySQL instance with:
mysql> SELECT LOWER(variable_name) as variable, variable_value/1024/1024 as MB
       FROM   information_schema.global_variables
       WHERE  variable_name = 'key_buffer_size';
+-----------------+------+
| variable        | MB   |
+-----------------+------+
| key_buffer_size |   16 |
+-----------------+------+
1 row in set (0.00 sec)
The following query will give you the current size of MyISAM indexes stored on disk in your instance.
mysql> SELECT FORMAT(SUM(data_length)/1024/1024,2) as data_mb,
              FORMAT(SUM(index_length)/1024/1024,2) as index_mb
       FROM   information_schema.tables
       WHERE  engine='MyISAM';
+--------------+--------------+
| data_mb      | index_mb     |
+--------------+--------------+
| 504.01       | 114.48       |
+--------------+--------------+
1 row in set (2.36 sec)
NOTE: This is all MyISAM indexes in all schemas. At this time we have not determined what is “hot” data, “cold” data, backup tables etc. It’s a crude calculation, but in absence of more information, seeing that MyISAM is being used, and the buffer is not configured (default is generally 8MB), or is configured poorly as in this example shows that changing this value is an important step to consider. However, The first part of solving the problem is identifying the problem.
Tuning the buffer is hard. You have to take into consideration the amount of system RAM, is the server dedicated for MySQL only, or a shared server for example with a web container such as Apache. Are other storage engines used (for example InnoDB) that requires it’s own buffer size, are there multiple MySQL Instances on the server.
For this example of tuning, we are assuming a dedicated MySQL server and no other storage engines used.
Determining the system RAM and current usage can be found with:
$ free -m
             total       used       free     shared    buffers     cached
Mem:          3955       3846        109          0        424       1891
-/+ buffers/cache:       1529       2426
Swap:         1027          0       1027
With this information, we see a system with 4G of RAM (plenty of available RAM), a key_buffer_size of 16M, and the current maximum size of indexes is 114M. For this most simple case it’s obvious we can increase this buffer, to say 128M and not affect overall system RAM usage, but improve MyISAM performance.
Here are the same numbers for a different system to give you a comparison of what you may uncover.
mysql> SELECT LOWER(variable_name) as variable, variable_value/1024/1024 as MB
    ->        FROM   information_schema.global_variables
    ->        WHERE  variable_name = 'key_buffer_size';
+-----------------+------+
| variable        | MB   |
+-----------------+------+
| key_buffer_size |  354 |
+-----------------+------+
1 row in set (0.00 sec)

mysql> SELECT FORMAT(SUM(data_length)/1024/1024,2) as data_mb,
    ->               FORMAT(SUM(index_length)/1024/1024,2) as index_mb
    ->        FROM   information_schema.tables
    ->        WHERE  engine='MyISAM';
+------------+------------+
| data_mb    | index_mb   |
+------------+------------+
| 150,073.57 | 122,022.97 |
+------------+------------+
1 row in set (3.71 sec)
As I follow up in my next post on the innodb_buffer_pool_size, I will further clarify the complexity of MySQL memory tuning, and show that this information gathering is only a guide, and first step to a more complex analysis and tuning operation.
Improving the performance of a web system involves knowledge of how the entire technology stack operates and interacts. There are many simple and common tips that can provide immediate improvements for a website. Some examples include:
Understanding where to invest your energy first, knowing what the return on investment can be, and most importantly the measurement and verification of every change made is the difference between blind trial and error and a solid plan and process. Here is a great example for the varied range of outcome to the point about “Updating your software versions”.
On one project the MySQL database was reaching saturation, both the maximum number of database connections and maximum number of concurrent InnoDB transactions. The first is a configurable limit, the second was a hard limit of the very old version of the software. Changing the first configurable limit can have dire consequences, there is a tipping point, however that is a different discussion. A simple software upgrade of MySQL which had many possible improvement benefits, combined with corrected configuration specific for this new version made an immediate improvement. The result moved a production system from crashing consistently under load, to at least barely surviving under load. This is an important first step in improving the customer experience.
In the PHP application stack for the same project the upgrading of several commonly used frameworks including Slim and Twig by the engineering department seemed like a good idea. However applicable load testing and profiling (after it was deployed, yet another discussion point) found the impact was a 30-40% increase in response time for the application layer. This made the system worse, and cancelled out prior work to improve the system.
How to tune a system to support 100x load increase with no impact in performance takes knowledge, experience, planning, testing and verification.
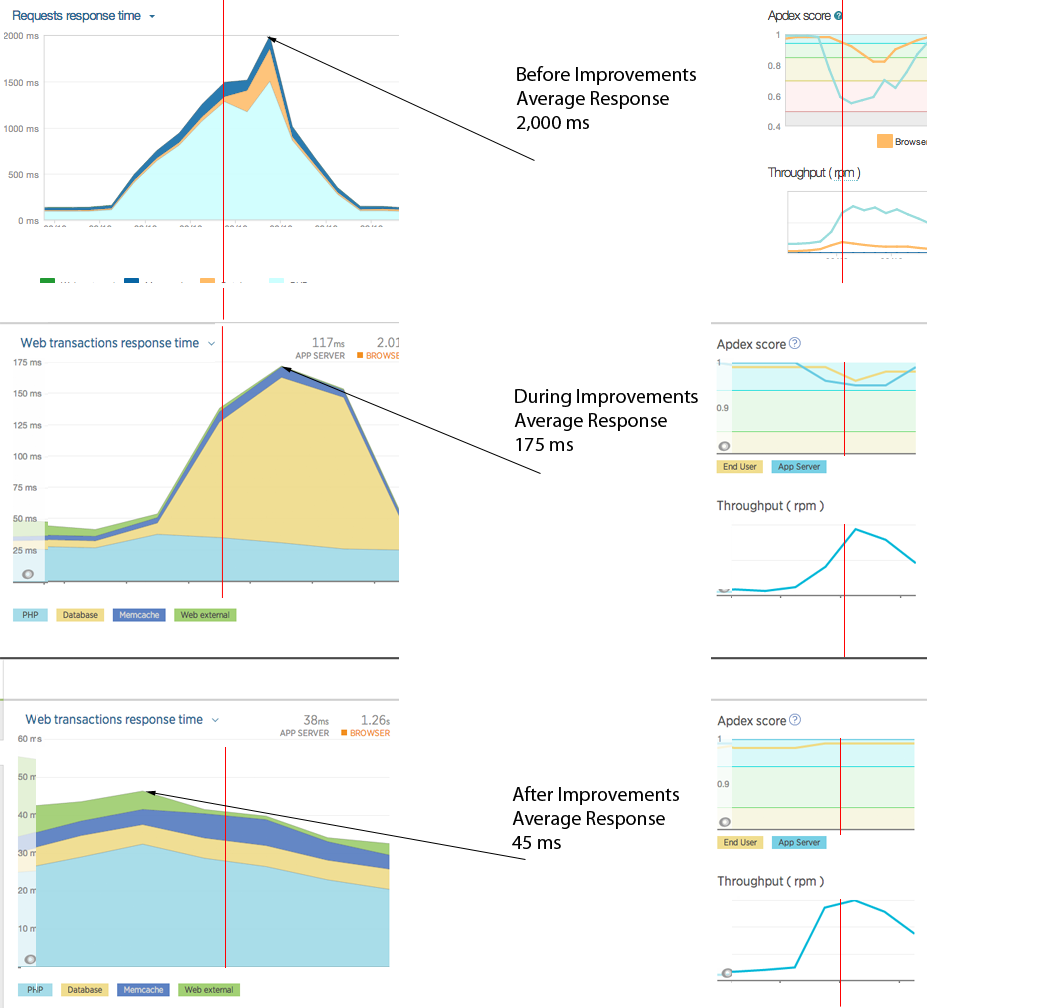
The following summarized graphs; using New Relic monitoring as a means of representative comparison; shows three snapshots of the average response time during various stages of full stack tuning and optimization. This is a very simplified graphical view that is supported by more detailed instrumentation using different products, specifically with much finer granularity of hundreds of metrics.
These graphs represent the work undertaken for a system under peak load showing an average 2,000ms response time, to the same workload under 50ms average response time. That is a 40x improvement!
If your organization can benefit from these types of improvements feel free to Contact Me.
There are numerous steps to achieving this. A few highlights to show the scope of work you need to consider includes:
These graphs show the improvement work in the application tier (1500ms to 35ms to 25ms) and the database tier (500ms to 125ms to 10ms) at various stages. These graphs do not show for example improvements made in DNS resolution, different CDNs, managing static content, different types and ways of compression, remove unwanted software components and configuration, standardized and consistent stack deployments using chef, and even a reduction in overall servers. All of these successes contributed to a better and more consistent user experience.