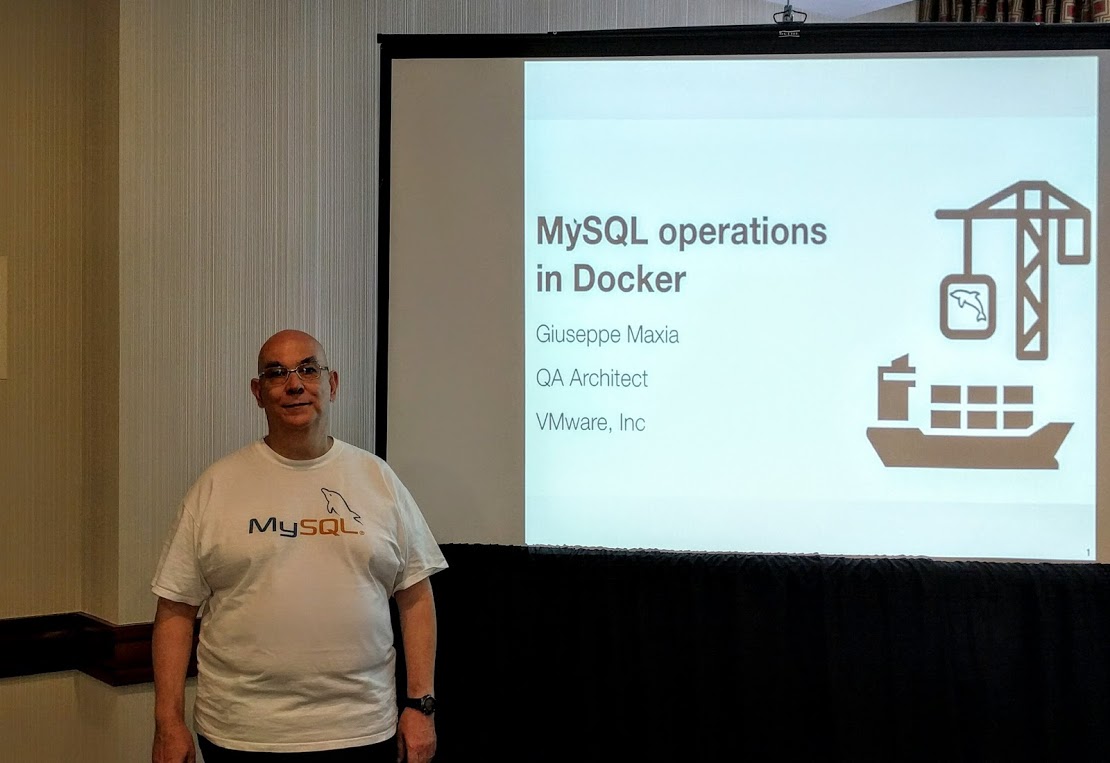
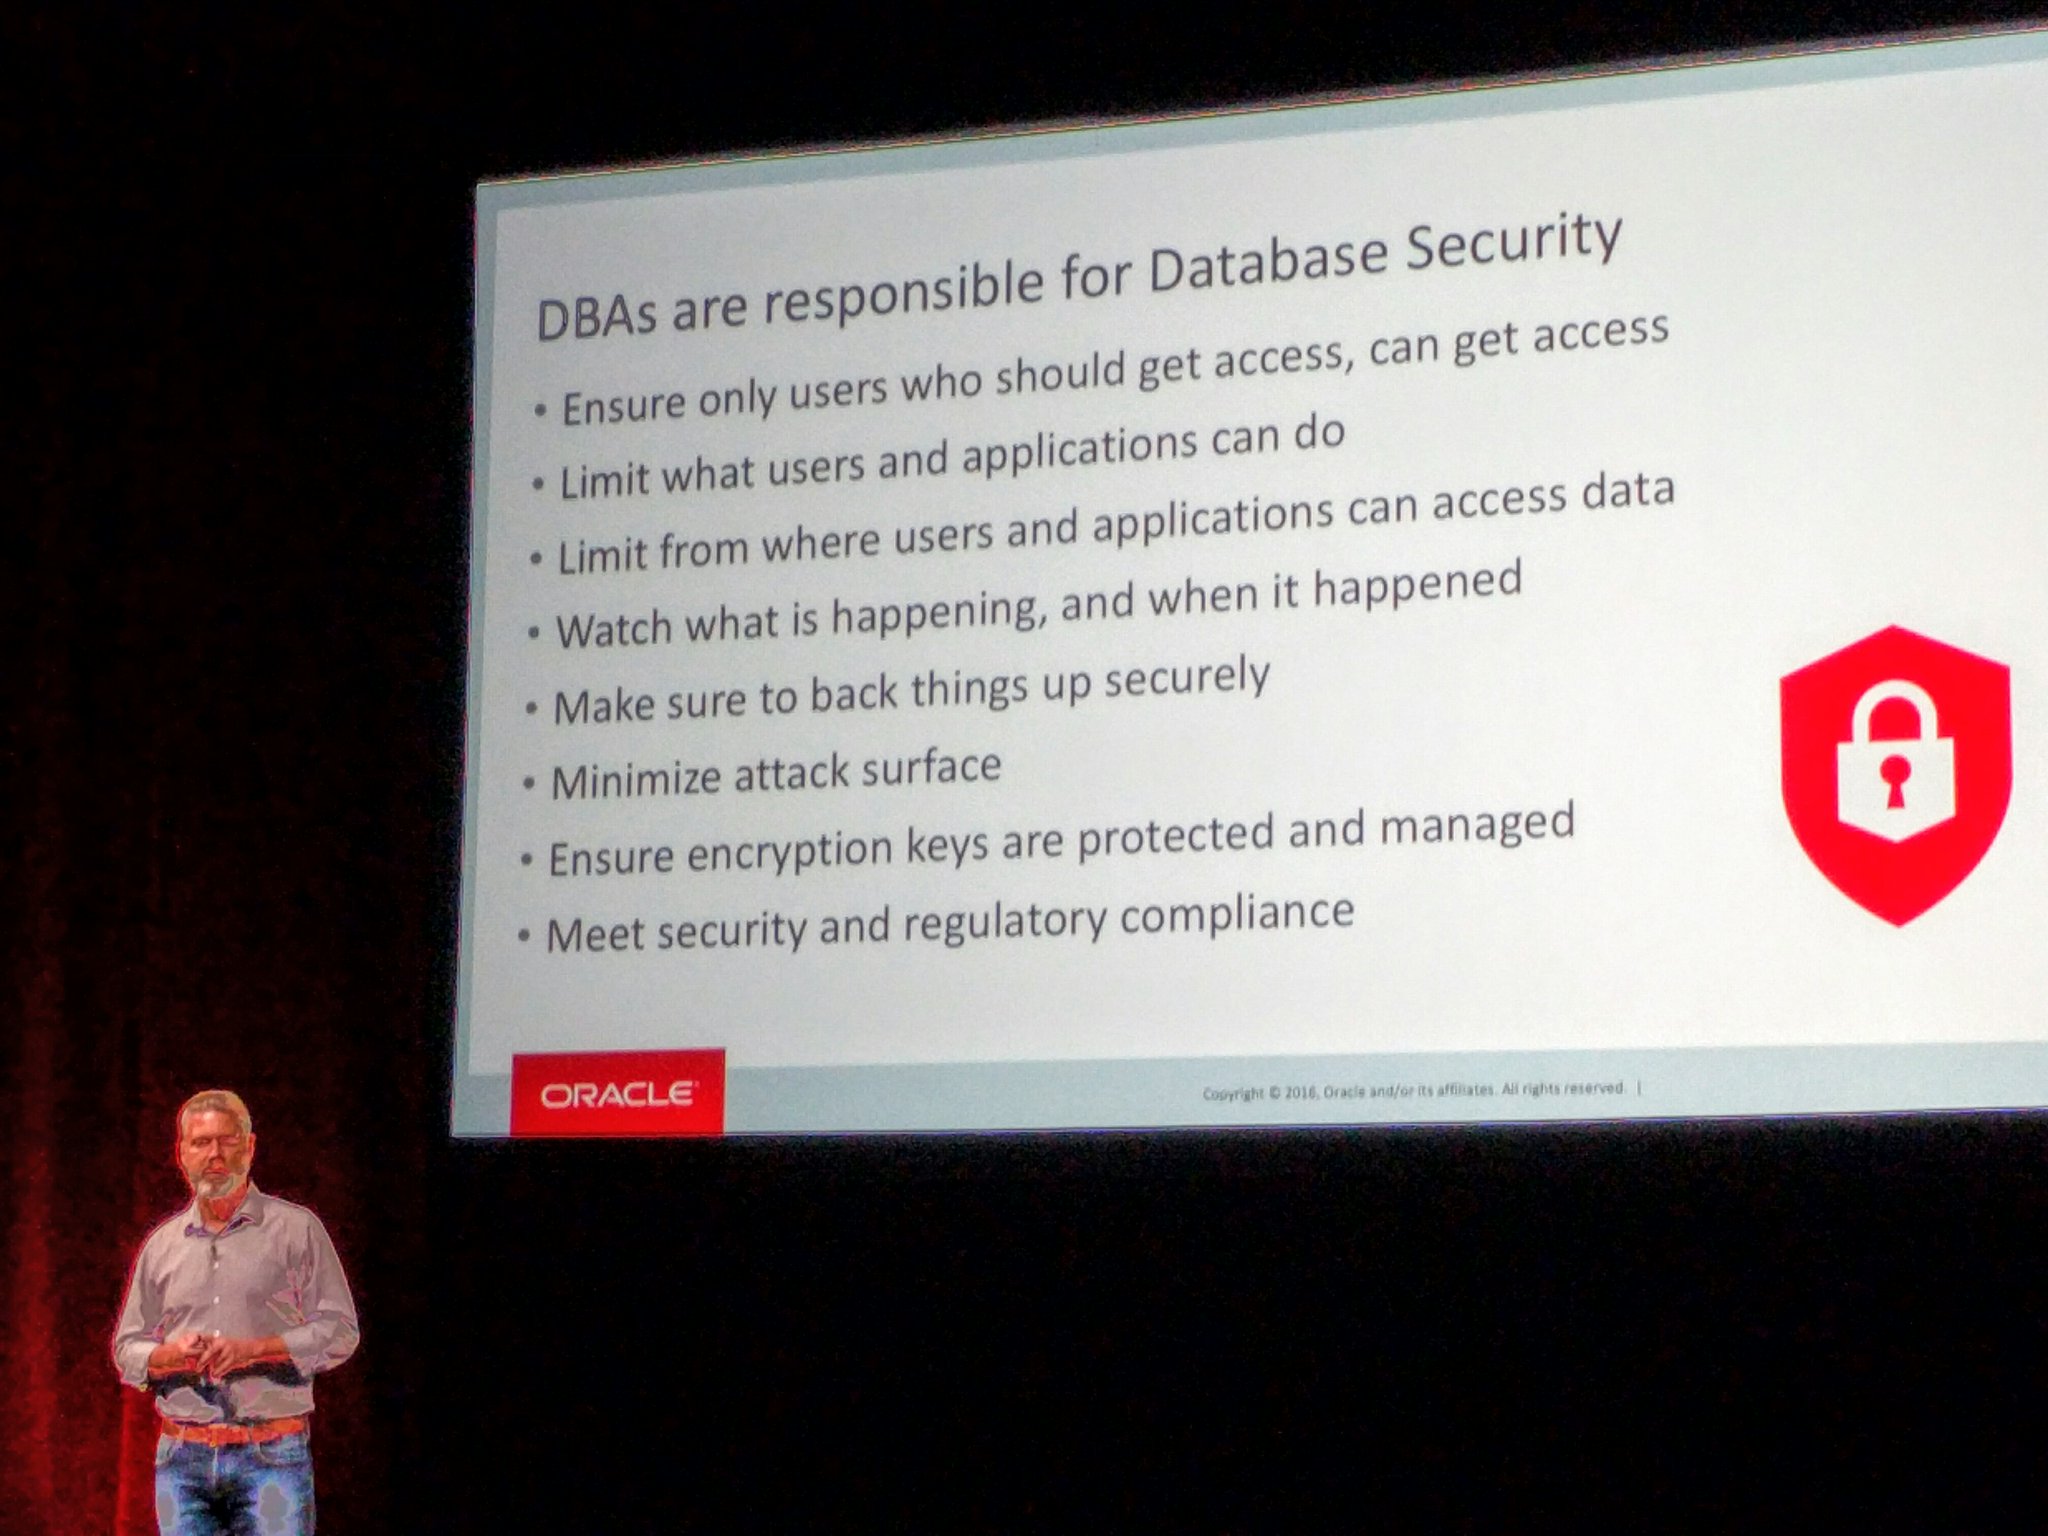
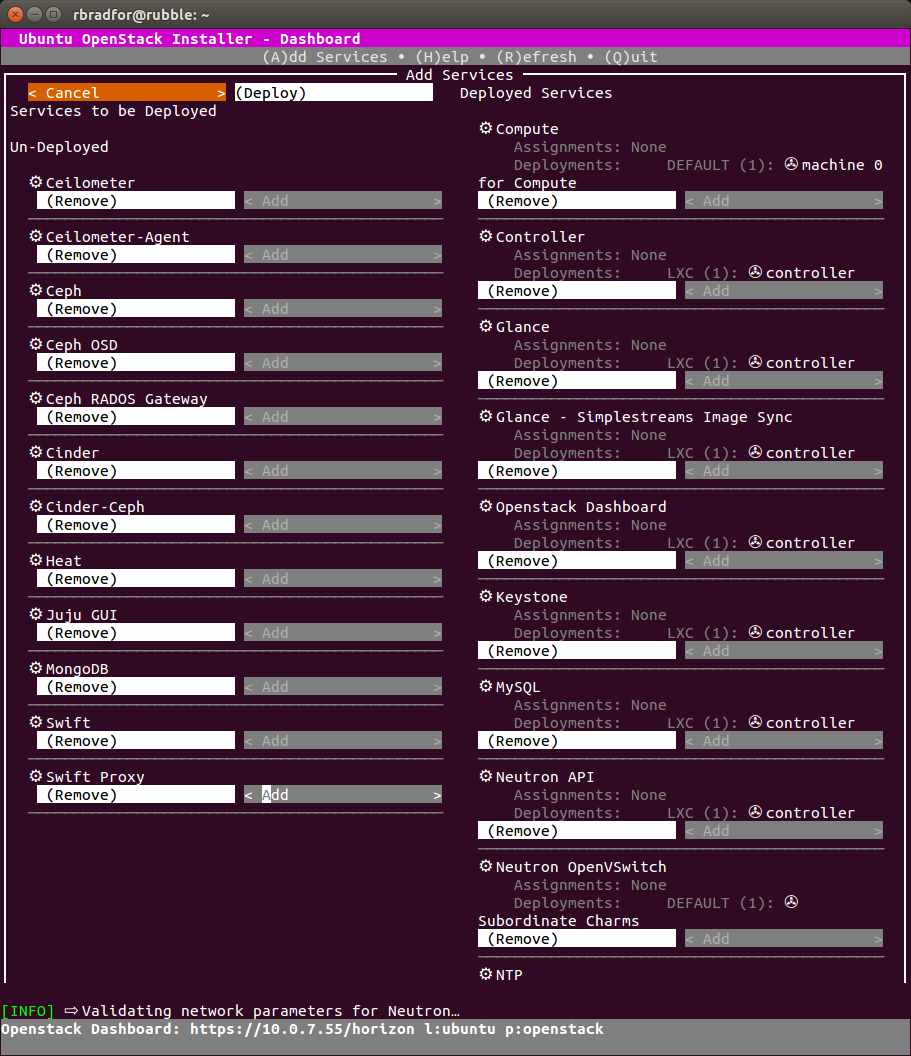
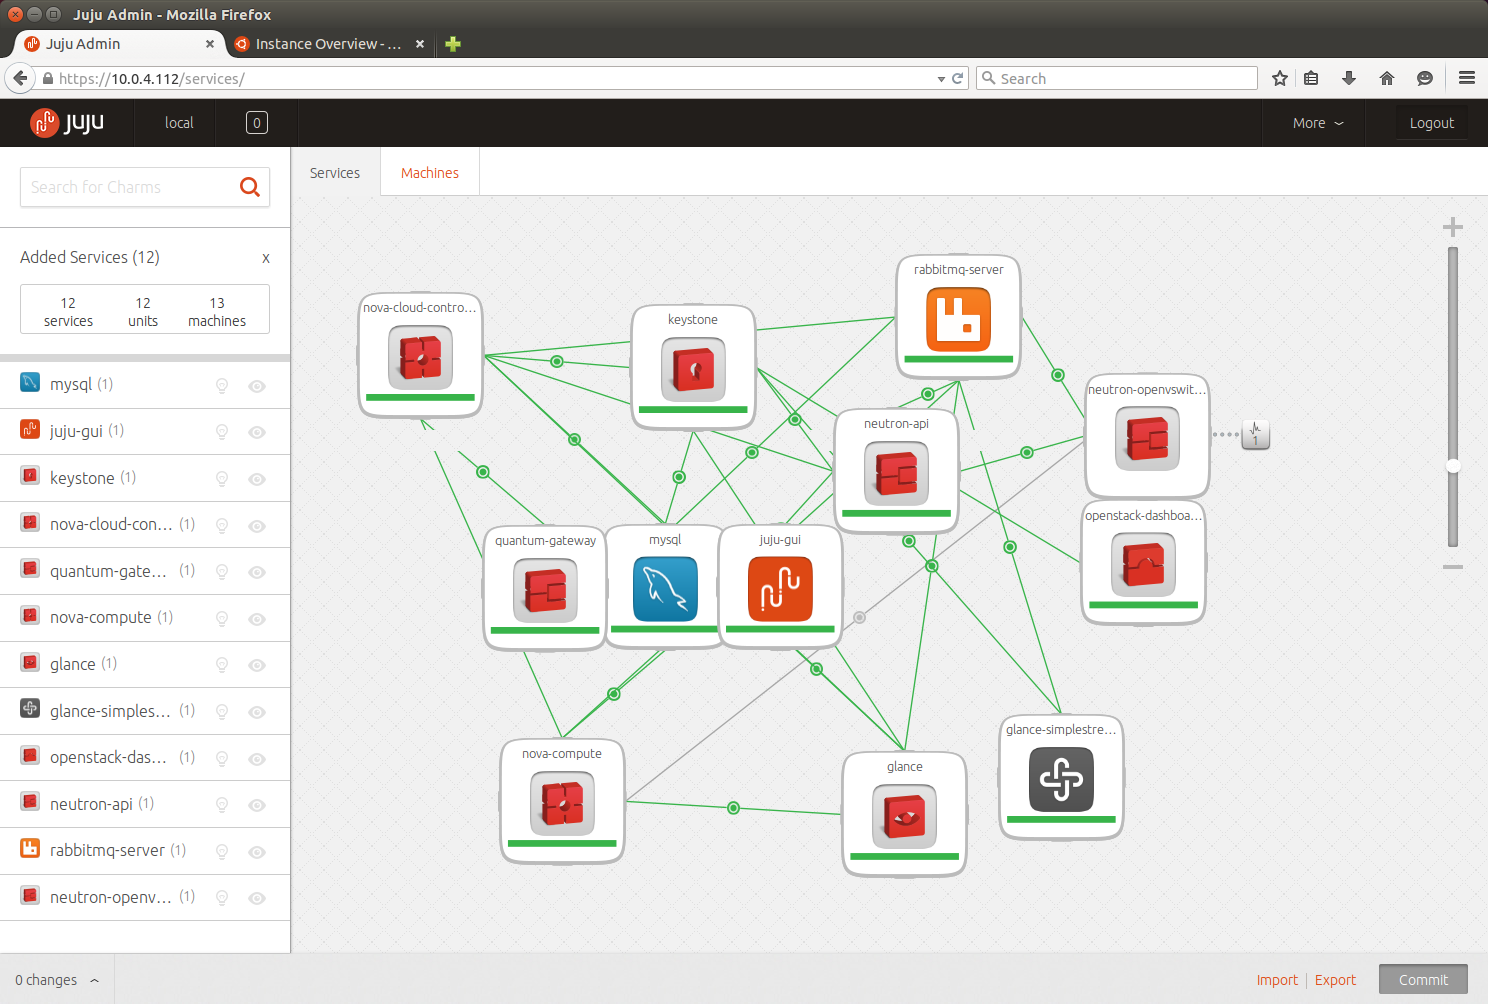
MySQL Group Replication OOW Tutorial

The second MySQL tutorial session at Oracle Open World was “MySQL Group Replication in a Nutshell” by MySQL Community Manager Frederic Descamps. This is succinctly described as:

“Multi-master update anywhere replication for MySQL with built-in conflict detection and resolution, automatic distributed recovery, and group membership.”

MySQL Group Replication (GR) is a virtually synchronous replication solution which is an integral component of MySQL InnoDB Cluster announced at the MySQL keynote. You can download a labs version of MySQL InnoDB cluster which includes three components.

  • MySQL Router
  • MySQL Shell
  • MySQL Group Replication

While included as part of MySQL InnoDB cluster, MySQL Group Replication can be run standalone. It is a plugin, made by and packaged by MySQL. With the plugin architecture in MySQL 5.7 the ability to release new features is greatly reduced from the more typical 2+ year general availability (GA) cycle. Plugins also allow for functionality to be not enabled by default therefore preserving the stability of an existing MySQL instance running version 5.7. This is a change in the philosophy of new functionality that I discussed in Understanding the MySQL Release Cadence which in 5.7.13 introduced the SQL interface for keyring key management. Not all in the community are happy however I consider it an important requirement for time-to-market in a fast paced open source data ecosystem.

MySQL GR is based on Replicated Database State Machine Theory and uses Paxos for evaluating consensus of available nodes in the cluster, being referred to as the Group Communication System (GCS). This is one key difference with Galera as the Paxos approach relies on accepting the certification stage within the cluster after a major of the nodes have acknowledged, rather than all nodes. MySQL GR is supported on a wide range of platforms including Linux, Windows, FreeBSD and Mac OS X, another difference with Galera.

The current Release Candidate (RC) version of MySQL Group Replication has some required configurations and some situations for applications that may not be ideal use cases for a synchronous solution. There is the complexities in the migration process of any existing infrastructure to considering MySQL Group Replication, which has at a minimum requirements of MySQL 5.7, GTID’s and row based replication. I would like to see MySQL put a lot more effort into the education and promotion of MySQL migrations from older versions to the current MySQL 5.7. Ideally I’d like to see better tools starting with MySQL 5.0 which I still see in production operation.

Some things are just the impact of current development priorities. The shell does not offer a means to promote a master in a single write configuration, i.e. the only way to simulate a failure is to produce a failure, which really means your three node cluster is no longer highly available. The use of savepoints is not currently available, a needed feature for future full compatibility for use in an OpenStack deployment. The creation of a cluster via the MySQL shell requires you to make the decision of supporting multi-master writes or a single master write. I can see the ideal need to be able to better support large batch transactions and DDL (some of those edge cases) to be able to toggle to a single write master and back. The current workaround is to utilize MySQL router to simulate this use case. The MySQL shell greatly reduces the complexity of orchestration. One of the features I like is a very convenient means to validate an Instance to see if the configuration matches minimum requirements. For example:

$ mysqlsh
> dba.validateInstance('root@mysql3:3306')

...
ERROR: Error executing the 'check' command: The operation could not
continue due to the following requirements not being met:
Some active options on server 'mysql3@3306' are incompatible with Group
Replication.
Please restart the server 'mysql3@3306' with the updated options file
and try again.
Option name                      Required Value   Current Value
Result
-------------------------------  ---------------  ---------------
-----
binlog_checksum                  NONE             CRC32            FAIL
master_info_repository           TABLE            FILE             FAIL
relay_log_info_repository        TABLE            FILE             FAIL
transaction_write_set_extraction  XXHASH64         OFF
FAIL
 at (shell):1:4
in

Something you can now do dynamically and persist in MySQL 8.0 using the SET PERSIST syntax.

The overall setup in a greenfield application is reasonable clear and will improve as the product moves towards general availability. The MySQL shell has a lot of future potential in a number of administrative functions, and the ability to switch easily between JavaScript and SQL means you can get the best of multiple languages.

In subsequent posts I will look into more of the detail of setup and monitoring of a cluster with performance_schema. I hope that existing monitoring tools will also start to support monitoring Group Replication. As the author of the New Relic MySQL Plugin in 2013 I may need to get motivated to offer a SaaS solution also.

You can find more information with official blog posts on MySQL Group Replication.

Presentations at Percona Live Amsterdam 2016

I was fortunate enough to give four presentations at the Percona Live 2016 event in Amsterdam. The slides for these are now available.

New UUID functions in MySQL 8.0.0

MySQL 8.0.0 introduces three new miscellaneous UUID functions of IS_UUID(), UUID_TO_BIN() and BIN_TO_UUID() joining the UUID() (in 5.0) and UUID_SHORT() (in 5.1) functions. See 8.0.0 Release Notes.

Thanks to the great work and hosting by Marcus Popp anybody can test out the SQL syntax of MySQL 8.0.0 using db4free without installing anything. If you want a minimal install Giuseppe Maxia provides docker minimal images of 5.0+ versions including 8.0.0.

A running docker container with MySQL 8.0 is as easy as:

The following script shows the usage and checks of these new functions.

Historically, to encode a UUID into a BINARY(16) datatype was to use UNHEX(REPLACE()) syntax. There was however no easy to unencode a BINARY(16) into the original value. BIN_TO_UUID() as shown in the output below solves this problem.

mysql> SELECT IS_UUID(1);
+------------+
| IS_UUID(1) |
+------------+
|          0 |
+------------+
1 row in set (0.01 sec)

mysql> SET @uuid='aaaaaaaa-bbbb-cccc-dddd-eeeeeeeeeeee';
Query OK, 0 rows affected (0.00 sec)

mysql> SELECT IS_UUID(@uuid) AS is_uuid;
+---------+
| is_uuid |
+---------+
|       1 |
+---------+
1 row in set (0.01 sec)

mysql> SELECT IS_UUID(REPLACE(@uuid,'-','')) AS is_uuid;
+---------+
| is_uuid |
+---------+
|       1 |
+---------+
1 row in set (0.00 sec)

mysql> SELECT @uuid_bin := UUID_TO_BIN(@uuid) AS uuid_bin, LENGTH(@uuid_bin) AS len;
+------------------+------+
| uuid_bin         | len  |
+------------------+------+
| ���������������� |   16 |
+------------------+------+
1 row in set (0.00 sec)

mysql> SELECT @old_uuid_bin := UNHEX(REPLACE(@uuid,'-','')) AS old_uuid_bin, LENGTH(@old_uuid_bin) AS len;
+------------------+------+
| old_uuid_bin     | len  |
+------------------+------+
| ���������������� |   16 |
+------------------+------+
1 row in set (0.00 sec)

mysql> SELECT @uuid_bin = @old_uuid_bin;
+---------------------------+
| @uuid_bin = @old_uuid_bin |
+---------------------------+
|                         1 |
+---------------------------+
1 row in set (0.00 sec)

mysql> SELECT BIN_TO_UUID(@uuid_bin) AS uuid, HEX(@old_uuid_bin) AS uuid_old;
+--------------------------------------+----------------------------------+
| uuid                                 | uuid_old                         |
+--------------------------------------+----------------------------------+
| aaaaaaaa-bbbb-cccc-dddd-eeeeeeeeeeee | AAAAAAAABBBBCCCCDDDDEEEEEEEEEEEE |
+--------------------------------------+----------------------------------+
1 row in set (0.01 sec)

Introducing the MySQL Cloud Service

The MySQL keynote at Oracle Open World 2016 announced the immediate availability of the MySQL Cloud Service, part of the larger Oracle Cloud offering. You can evaluate this now with a trial copy at cloud.oracle.com/mysql. MySQL server product manager Morgan Tocker gave two presentations at the event including a deep dive session.

This is the first release of the MySQL cloud service. As with all first releases there are some highlights and some pipeline features. All major cloud providers have MySQL offerings. AWS RDS (traditional, MAZ and Aurora) GCP Cloud SQL and Azure MySQL App Service. Users of OpenStack have Trove for comparison. I am not going to be evaluating features between cloud offerings in this post.

Highlights

The differentiating highlights as I see them from the presentation. I will provide a followup blog on actual usage at a later time.

  • MySQL 5.7
  • MySQL Enterprise Edition (a key difference with other cloud providers)
    • MySQL Enterprise features like Firewall, Thread Pool, Auditing etc
    • MySQL Enterprise support is included in price
    • MySQL Enterprise Monitor (MEM) is available and included in price
  • SSH access to machine
    • SSH access is a non-privileged user (opc). This shows and intention on security first policy.
  • Separated partitioning in OS/MySQL disk layout
  • ZFS. (Nice, I have missed using this)
  • Optimized partition workloads different for data and sequential logging
  • Two predefined backup policies, ZFS appliance (7 day retention) and cloud storage (30 day retention)
  • The managed backup philosophy is a weekly full backup, and daily incrementals
  • Sane default MySQL configuration (my.cnf)
  • Patching notification and capability. Automated backup before patching, and rollback capability
  • The Ksplice Oracle UEK functionality for improved host uptime with security vulnerabilities or kernel improvements

Overall an A effort on paper in V1 with the willingness to be useful, sane and flexible. In a future post I will evaluate the actual MySQL cloud capabilities with the available trial.

Observations

Features and functionality I see missing from V1 during this presentation. Some are features I would like to see, some are just observations, and some are likely present features but not discussed. I will leave it up the reader to decide which is which.

  • No MySQL 5.6. There was mention of supporting two versions in future moving forward (i.e. 5.7 and 8)
  • Separated MEM configuration and management. See my later thoughts on this.
  • MySQL topologies and easy to apply templates, including the future MySQL InnoDB Cluster
  • A longer archive storage retention capability policy for backups and/or binary logs (e.g. for compliance reasons)
  • The size of the pre-defined dedicated logging partition and binary logging may be problematic for longer retention capacity
  • Provisioned IOPS capacity or performance guarantees for Disk I/O
  • An ability to define MySQL configuration templates (e.g. dev, test, prod, master, slave etc) and be able to select these for a new instance deployment. You can of course manage this after the fact manually.
  • The compute workloads are more generic at present. There appears to be no optimized disk, network or CPU variants.
  • Improved key management being able to select an already defined SSH public key (e.g. with another instance)

Only offering MySQL 5.7 is an adoption impediment. This requires any organization with applications that are not greenfield to have already migrated to MySQL 5.7. I can understand the long-term rationale view here, but I see it as a clear limitation for more rapid adoption.

The details

The MySQL Cloud Service takes the hard parts out of managing MySQL. This is deployed in the Oracle Public Cloud, leveraging the fault-tolerant regional deployments in place. This Database as a Service (PaaS) helps to remove those annoying pieces of administration including backups, patches, monitoring etc. Powered by MySQL 5.7 Enterprise edition (the only cloud provider to offer this), the cloud system version in use is identical to the downloadable on-premise version. The Cloud service offers an initially optimized MySQL configuration of my.cnf to begin with, i.e. improvements on 5.7 defaults, and has variety of compute workload sizes to choose from. Storage is a ZFS appliance, but there is no information on provisioned IOPS for intensive workloads. You can use the web interface or REST API endpoints to create, deploy and manage your cloud instances. The REST API endpoints were not demonstrated in this session.

The predefined disk layout for storage is a very sane configuration. The Operating System (Oracle Unbreakable Linux 6 ) has a dedicated partition, (not part of sizing). There is a dedicated and throughput optimized ZFS LUN for data (what you size with the setup), a dedicated and latency optimized ZFS LUN for binary and InnoDB logs (which appears not initially sizable at present) and a dedicated ZFS LUN for backups. There is also a secondary backup storage capacity by default in Cloud Storage.

The UI interface provides the capability to configure a MEM server and a MEM client. To conserve presentation time Morgan consolidated these into his initial demo instance. I feel there is room here to optimize the initial setup and to separate out the “management” server capabilities, e.g. selecting your MEM configuration, and by default offering just the MEM client authentication (if MEM server is configured). For users not familiar with MySQL Enterprise features separating the definition and management in the initial creation stage is an optimization to remove complexity. There may even be an option for a getting started quick setup step that can provision your MEM setup in a dedicated instance when there is none detected or with a new account. Here is the flip side. An inexperienced user starting out may launch a MEM server with several test instances because the initial UI setup offers these as input fields, this is not the goal when managing multiple servers. The current version of MEM shown was 3.2, with 3.3 planned. Version 3.3. includes it’s own web interface for backup management.

Some things that are not in the initial release but I’m sure are on the roadmap. One is an upsize and downsize optimization. It would appear via the demo, that when a compute size modification occurs, the existing MySQL instance is shutdown and the VM is shutdown. A new VM is provisioned using the setup and disk partitions of the prior VM. An optimization is to provision a new VM, startup MySQL, then stop MySQL on new, stop on old, unmount on old, mount on new, and start MySQL. This removes the downtime in the VM provisioning step. Ideally I’d like to see the capability to perform this on a slave, and promote a slave more seamlessly. Practically however, this has many more moving pieces than in theory and so the future use MySQL router is a solution. The upcoming MySQL InnoDB cluster will also suffer from the complexity of resizing and uptime availability, especially when nodes are of varying compute sizes. As mentioned, I would like to see pre defined MySQL configurations. I would also like the option to pre-create multiple user authentications for instances, rather than having to specific one each time. I can see for a class of servers, e.g. a load test environment of a master/slave setup, and an application with several MySQL accounts, a means of bulk user and permission management.

Under the Hood Morgan talked about the InnoDB IO configuration optimizations, the number of IO Threads, use of O_DIRECT, the redo log size and buffer pool optimized to compute shape. The thread pool is enabled by default. The same considerations are in place for the operating system, Oracle Linux 6 UEK, MySQL task priority, memlock, and ext4 filesystem.

Again, those unfamiliar with MySQL Enterprise features will need greater help and UI help understanding the features, capabilities and configuration of Firewall, Encryption, Authentication, Audit, Monitor, Backup and Thread Pool.

The SSH access is what gives this first release control to be flexible. You can modify the MySQL configuration, incorporate configuration management processes. You can utilize on system database restore capabilities. You can monitor physical resource utilizations. I am unsure of the total control of changing (or breaking the system and the kernel).

There was a lot to digest in the 45 minute practical demonstration session. I am sure as with more reading and evaluation there will be more to share. As the roadmap for MySQL InnoDB cluster develops I can see there being a good cadence on new features and functionality released for the MySQL Cloud Service.

My Live Tweets (as the presentation was happening)

Oracle MySQL Public Cloud landing page

MySQL Operations in Docker at Oracle Open World 2016

One of the Monday tutorials at Oracle Open World was MySQL Operations in Docker. A 2 hour tutorial by Giuseppe Maxia. This tutorial showed what you can do with MySQL on Docker which is specifically good for testing. Some key points from the tutorial included:

  • Differences between containers and Virtual Machines (VM)
    • VM are mutable architecture, you start then modify
    • containers are an immutable architecture
  • Containers are not micro-services
  • Understanding about the “official” MySQL docker image. (Hint: Use mysql/mysql-server, not mysql)
  • The issues of specifying a required password to install MySQL on a container
  • Understanding how to use volumes, for a file (e.g. /etc/my.cnf), or a directory (e.g. /var/lib/mysql)
  • How to produce a more secure MySQL installation using files
  • How to get MySQL 5.0,5.1,5.5,5.6,5.7 and 8.0 on #CentOS, #Ubuntu and #debian for #docker using his own minimal MySQL docker images. (NOTE: MySQL images by Oracle, Percona and MariaDB are only the current version)
  • MySQL Group replication demo (mysql/mysql-gr)

Giuseppe performed his demos on a dedicated Linux machine. My attempts to reproduce the tutorial steps on Mac failed, as mentioned because of issues with volumes. MySQL Group Replication with Docker on Mac is also unpredictable.

In summary, Giuseppe talked about how wonderful Docker is for development and testing but not advisable for production. Some of the questions regarding production concerns included the inability working with orchestrators, stability with volumes and overall container user security. In addition, a tough audience question “How do you upgrade MySQL in production using containers?” highlighted that this technology is evolving, and while becoming ideal for stateless applications, it is not ready for primetime for databases that require state to operate.

Get the Code Examples on GitHub.

Docker has become a popular technology for containers starting in 2013. It did not invent containers, A Brief History of Container Technology gives a timeline of technologies that have got us to where we are today.

MySQL Keynote at Oracle Open World 2016

Tomas Ulin made a number of key announcements at this year’s State of the Dolphin and Customer Experiences keynote. MySQL Public Cloud, MySQL 8.0 DMR, MySQL InnoDB Cluster, MySQL Group Replication (RC). Some tweets and points of the keynote:

There were also user stories by Nicolai Plum – Senior Systems Architect at Booking.com and Andrew Archibald – VP of Development at Churchill Downs.

Nicolai talked about how booking has evolved over the years starting with the traditional MySQL replication model, moving to a more complex sharded and partitioned architecture, and now a re-architecture towards a loosely coupled, write optimized and read optimized data model leveraging Redis queues. This work has enabled services to hide the complexity and need for developers to write SQL and leverage better data translation and interoperability, e.g. MySQL to Hadoop to MySQL. Booking.com is actively using MySQL 5.7, and is evaluating how to incorporate the new features of MySQL 8.0.

Andrew talked about how twinspires.com uses a multi data center master-master replication setup with MySQL 5.6 to manage critical availability needs for online wagering of horse races around the world. During peak times, load can increase 100x, similar to my own experiences handling 100x flash sales Improving performance – A full stack problem.

I have yet to discover how to deep link to this presentation at the OOW 2016 agenda to enable viewers to read the overview and speaker profiles.

Q: Does MySQL support ACID? A: Yes

I was recently asked this question by an experienced academic at the NY Oracle Users Group event I presented at.

Does MySQL support ACID? (ACID is a set of properties essential for a relational database to perform transactions, i.e. a discrete unit of work.)

Yes, MySQL fully supports ACID, that is Atomicity, Consistency, Isolation and Duration. (*)

This is contrary to the first Google response found searching this question which for reference states “The standard table handler for MySQL is not ACID compliant because it doesn’t support consistency, isolation, or durability”.

The question is however not a simple Yes/No because it depends on timing within the MySQL product’s lifecycle and the version/configuration used in deployment. What is also *painfully* necessary is to understand why this question would even be asked of the most popular open source relational database.

MySQL has a unique characteristic of supporting multiple storage engines. These engines enabling varying ways of storing and retrieving data via the SQL interface in MySQL and have varying features for supporting transactions, locking, index strategies, compression etc. The problem is that the default storage engine from version 3.23 (1999) to 5.1 (2010) was MyISAM, a non-transactional engine, and hence the first point of confusion.

The InnoDB storage engine has been included and supported from MySQL 3.23. This is a transactional engine supporting ACID properties. However, not all of the default settings in the various MySQL versions have fully meet all ACID needs, specifically the durability of data. This is the second point of confusion. Overtime other transactional storage engines in MySQL have come and gone. InnoDB has been there since the start so there is no excuse to not write applications to fully support transactions. The custodianship of Oracle Corporation starting in 2010 quickly corrected this *flaw* by ensuring the default storage engine in MySQL 5.5 is InnoDB. But the damage to the ecosystem that uses MySQL, that is many thousands of open source projects, and the resources that work with MySQL has been done. Recently working on a MySQL 5.5 production system in 2016, the default engine was specifically defined in the configuration defined as MyISAM, and some (but not all tables) were defined using MyISAM. This is a further conversation as to why, is this a upgrade problem? Are there legacy dependencies with applications? Are the decision makers and developers simply not aware of the configuration? Or, are developers simply not comfortable with transactions?

Like other anti-reasonable MySQL defaults the unaware administrator or developer could consider MySQL as supporting ACID properties, however until detailed testing with concurrency and error conditions not realize the impact of poor configuration settings.

The damage of having a non-transactional storage engine as the default for over a decade has created a generation of professionals and applications that abuses one of the primary usages of a relational database, that is a transaction, i.e. to product a unit for work that is all or nothing. Popular open source projects such as WordPress, Drupal and hundreds more have for a long time not supported transactions or used InnoDB. Mediawiki was at least one popular open source project that was proactive towards InnoDB and transaction usage. The millions of plugins, products and startups that build on these technologies have the same flaws.

Further confusion arises when an application uses InnoDB tables but does not use transactions, or the application abuses transactions, for example 3 different transactions that should really be 1.

While newer versions of MySQL 5.6 and 5.7 improve default configurations, until these versions a more commonly implemented non-transactional use in a relational database will remain. A recent Effective MySQL NYC Meetup survey showed that installations of version 5.0 still exist, and that few have a policy for a regular upgrade cadence.

Do you control your database outages?

Working with a client last week I noted in my analysis, “The mysql server was restarted on Thursday and so the [updated] my.cnf settings seems current”. This occurred between starting my analysis on Wednesday and delivering my findings on Friday.

# more /var/lib/mysql/ip-104-238-102-213.secureserver.net.err
160609 17:04:43 [Note] /usr/sbin/mysqld: Normal shutdown

The client however stated they did not restart MySQL and would not do that at 5pm which is still a high usage time of the production system. This is unfortunately not an uncommon finding, that a production system had an outage and that the client did not know about it and did not instigate this.

There are several common causes and the “DevOps” mindset for current production systems has made this worse.

  • You have managed hosting and they perform software updates with/without your knowledge. I have for example worked with several Rackspace customers and there would be an outage because Rackspace engineers decided to apply an upgrade at a time that suited them, not their customers.
  • You have chosen automate updates for your Operating System.
  • Your developers update the software when they like.
  • You are using a 3rd party product that is making an arbitrary decision.

In this case the breadcrumbs lead to the last option, that cPanel is performing this operation as hinted by the cPanel specific installed MySQL binaries.

$ rpm -qa | grep -i mysql
cpanel-perl-522-MySQL-Diff-0.43-1.cp1156.x86_64
MySQL55-devel-5.5.50-1.cp1156.x86_64
MySQL55-client-5.5.50-1.cp1156.x86_64
cpanel-perl-522-DBD-mysql-4.033-1.cp1156.x86_64
compat-MySQL50-shared-5.0.96-4.cp1136.x86_64
MySQL55-server-5.5.50-1.cp1156.x86_64
cpanel-mysql-libs-5.1.73-1.cp1156.x86_64
MySQL55-shared-5.5.50-1.cp1156.x86_64
MySQL55-test-5.5.50-1.cp1156.x86_64
compat-MySQL51-shared-5.1.73-1.cp1150.x86_64
cpanel-mysql-5.1.73-1.cp1156.x86_64

Also note that cPanel still uses MySQL 5.1 shared libraries.

So why did cPanel perform not one shutdown, but two in immediate succession? The first was 17 seconds, the second was 2 seconds. Not being experienced with cPanel I cannot offer an answer for this shutdown occurance. I can for others which I will detail later.

160609 17:04:24 [Note] /usr/sbin/mysqld: Normal shutdown
...
160609 17:04:28 [Note] /usr/sbin/mysqld: Shutdown complete
...
160609 17:04:41 [Note] /usr/sbin/mysqld: ready for connections.
...
160609 17:04:43 [Note] /usr/sbin/mysqld: Normal shutdown
...
160609 17:04:45 [Note] /usr/sbin/mysqld: ready for connections.
...

And why did the customer not know about the outage? If you use popular SaaS monitoring solutions such as New Relic and Pingdom you would not have been informed because these products have a sampling time of 60 seconds. I use these products along with Nagios on my personal blog site as they provide adequate instrumentation based on the frequency of usage. I would not recommend these tools as the only tools used in a high volume production system simply because of this one reason. In high volume system you need sampling are much finer granularity.

So just when you were going to justify that 17 seconds while unexpected is tolerable, I want to point out that this subsequently occurred and the outage was over 4 minutes.

160619 11:58:07 [Note] /usr/sbin/mysqld: Normal shutdown
...
160619 12:02:26 mysqld_safe Starting mysqld daemon with databases from /var/lib/mysql
...

An analysis of the MySQL error log which is correctly not rolled as I always recommend showed a pattern of regular MySQL updates, from 5.5.37 thru 5.5.50. This is the most likely reason a 3rd party product has performed a database outage, to perform a software update at their choosing, not yours.

150316  3:54:11 [Note] /usr/sbin/mysqld: ready for connections.
Version: '5.5.37-cll'  socket: '/var/lib/mysql/mysql.sock'  port: 3306  MySQL Community Server (GPL)

150316  3:54:22 [Note] /usr/sbin/mysqld: ready for connections.
Version: '5.5.37-cll'  socket: '/var/lib/mysql/mysql.sock'  port: 3306  MySQL Community Server (GPL)

150316 19:07:31 [Note] /usr/sbin/mysqld: ready for connections.
Version: '5.5.37-cll'  socket: '/var/lib/mysql/mysql.sock'  port: 3306  MySQL Community Server (GPL)

150317  2:05:45 [Note] /usr/sbin/mysqld: ready for connections.
Version: '5.5.40-cll'  socket: '/var/lib/mysql/mysql.sock'  port: 3306  MySQL Community Server (GPL)

150317  2:05:54 [Note] /usr/sbin/mysqld: ready for connections.
Version: '5.5.40-cll'  socket: '/var/lib/mysql/mysql.sock'  port: 3306  MySQL Community Server (GPL)

150319  1:17:26 [Note] /usr/sbin/mysqld: ready for connections.
Version: '5.5.42-cll'  socket: '/var/lib/mysql/mysql.sock'  port: 3306  MySQL Community Server (GPL)

150319  1:17:34 [Note] /usr/sbin/mysqld: ready for connections.
Version: '5.5.42-cll'  socket: '/var/lib/mysql/mysql.sock'  port: 3306  MySQL Community Server (GPL)

150616  1:39:44 [Note] /usr/sbin/mysqld: ready for connections.
Version: '5.5.42-cll'  socket: '/var/lib/mysql/mysql.sock'  port: 3306  MySQL Community Server (GPL)

150616  1:39:52 [Note] /usr/sbin/mysqld: ready for connections.
Version: '5.5.42-cll'  socket: '/var/lib/mysql/mysql.sock'  port: 3306  MySQL Community Server (GPL)

151006  1:01:45 [Note] /usr/sbin/mysqld: ready for connections.
Version: '5.5.45-cll'  socket: '/var/lib/mysql/mysql.sock'  port: 3306  MySQL Community Server (GPL)

151006  1:01:54 [Note] /usr/sbin/mysqld: ready for connections.
Version: '5.5.45-cll'  socket: '/var/lib/mysql/mysql.sock'  port: 3306  MySQL Community Server (GPL)

151027  1:21:12 [Note] /usr/sbin/mysqld: ready for connections.
Version: '5.5.46-cll'  socket: '/var/lib/mysql/mysql.sock'  port: 3306  MySQL Community Server (GPL)

160105  1:31:35 [Note] /usr/sbin/mysqld: ready for connections.
Version: '5.5.47-cll'  socket: '/var/lib/mysql/mysql.sock'  port: 3306  MySQL Community Server (GPL)

160211  1:52:47 [Note] /usr/sbin/mysqld: ready for connections.
Version: '5.5.48-cll'  socket: '/var/lib/mysql/mysql.sock'  port: 3306  MySQL Community Server (GPL)

160211  1:52:55 [Note] /usr/sbin/mysqld: ready for connections.
Version: '5.5.48-cll'  socket: '/var/lib/mysql/mysql.sock'  port: 3306  MySQL Community Server (GPL)

160503  1:14:59 [Note] /usr/sbin/mysqld: ready for connections.
Version: '5.5.49-cll'  socket: '/var/lib/mysql/mysql.sock'  port: 3306  MySQL Community Server (GPL)

160503  1:15:03 [Note] /usr/sbin/mysqld: ready for connections.
Version: '5.5.49-cll'  socket: '/var/lib/mysql/mysql.sock'  port: 3306  MySQL Community Server (GPL)

160521 18:46:24 [Note] /usr/sbin/mysqld: ready for connections.
Version: '5.5.49-cll'  socket: '/var/lib/mysql/mysql.sock'  port: 3306  MySQL Community Server (GPL)

160522 11:51:45 [Note] /usr/sbin/mysqld: ready for connections.
Version: '5.5.49-cll'  socket: '/var/lib/mysql/mysql.sock'  port: 3306  MySQL Community Server (GPL)

160529 15:26:41 [Note] /usr/sbin/mysqld: ready for connections.
Version: '5.5.49-cll'  socket: '/var/lib/mysql/mysql.sock'  port: 3306  MySQL Community Server (GPL)

160529 15:30:12 [Note] /usr/sbin/mysqld: ready for connections.
Version: '5.5.49-cll'  socket: '/var/lib/mysql/mysql.sock'  port: 3306  MySQL Community Server (GPL)

160604 23:29:15 [Note] /usr/sbin/mysqld: ready for connections.
Version: '5.5.49-cll'  socket: '/var/lib/mysql/mysql.sock'  port: 3306  MySQL Community Server (GPL)

160609 17:04:41 [Note] /usr/sbin/mysqld: ready for connections.
Version: '5.5.50-cll'  socket: '/var/lib/mysql/mysql.sock'  port: 3306  MySQL Community Server (GPL)

160609 17:04:45 [Note] /usr/sbin/mysqld: ready for connections.
Version: '5.5.50-cll'  socket: '/var/lib/mysql/mysql.sock'  port: 3306  MySQL Community Server (GPL)

160619 12:21:58 [Note] /usr/sbin/mysqld: ready for connections.
Version: '5.5.50-cll'  socket: '/var/lib/mysql/mysql.sock'  port: 0  MySQL Community Server (GPL)

What is intriguing from this analysis is that several versions were skipped including .38, .39, .41, .43, .44. One may ask the question why?

For Clients

This leads to several questions of the strategy used in your organization for controlling outages of your MySQL infrastructure for upgrades or for other reasons.

  • What is an acceptable outage time?
  • What is the acceptable maintenance window to perform outages?
  • What is your release cadence for MySQL upgrades?
  • Who or what performs updates?
  • Can your monitoring detect small outages?

You should also consider in your business strategy having a highly available (HA) MySQL infrastructure to avoid any outage, or application intelligence to support varying levels of data access as I describe in Successful MySQL Scalability Principles.

Understanding the MySQL Release Cadence

At the recent New York Oracle Users Group summer general meeting I gave a presentation to the Oracle community on the MySQL product release cycle. Details included:

  • Identifying the server product options covering community, enterprise and ecosystem.
  • Describe MySQL enterprise products, features and support options.
  • Describing the DMR, RC, GA, EOL and labs product lifecycle.
  • Discussing the GA release frequency.
  • Talking about the MySQL Upgrade path.

Utilizing OpenStack Trove DBaaS for deployment management

Trove is used for self service provisioning and lifecycle management for relational and non-relational databases in an OpenStack cloud. Trove provides a RESTful API interface that is same regardless of the type of database. CLI tools and a web UI via Horizon are also provided wrapping Trove API requests.

In simple terms. You are a MySQL shop. You run a replication environment with daily backups and failover capabilities which you test and verify regularly. You have defined DBA and user credentials ACL’s across dev, test and prod environments. Now there is a request for using MongoDB or Cassandra, the engineering department has not decided but they want to evaluate the capabilities. How long as a operator does it take to acquire the software, install, configure, setup replication, backups, ACLs and enable the engineering department to evaluate the products?

With Trove DBaaS this complexity is eliminated due to a consistent interface to perform the provisioning, configuration, HA, B&R, ACL across other products the exact same way you perform these tasks for MySQL. This enables operations to be very proactive to changing technology requests supporting digital transformation strategies.

Enabling this capability is not an automatic approval of a new technology stack. It is important that strategic planning, support and management is included in the business strategy to understanding the DBaaS capability for your organization. Examples of operations due diligence would include how to integrate these products into your monitoring, logging and alerting systems. Determine what additional disk storage requirements may be needed. Test, verify and time recovery strategies.

Trove specifically leverages several other OpenStack services for source image and instance management. Each trove guest image includes a base operating system, the applicable database software and a database technology specific trove guest agent. This agent is the intelligence that knows the specific syntax and version needs to perform the tasks. The agent is also the communication mechanism between Trove and the running nova instance.

Trove is a total solution manager for the instance running your chosen database. Instances have no ssh, telnet or other general access. The only access is via the SQL communication via the defined ports, e.g. 3306 for MySQL.

The Trove lifecycle management covers the provisioning, management, security, configuration and tuning of your database. Amrith Kumar in a recent presentation at the NYC Postgres meetup provides a good description of the specifics.

Trove is capable of describing and supporting clustering and replication topologies for the various data stores. It can support backup and restore, failover and resizing of clusters without the operator needing to know the specific syntax of complexities of a database product they are unfamiliar with.

A great example is the subtle difference in MySQL replication management using GTID’s between MySQL and MariaDb. To the developer, the interaction between MySQL and MariaDB via SQL is the same, the management of a replication topology is not identical, but is managed by the Trove guest agent. To the operator, the management is the same.

Also in his presentation, Kumar described Tesora, an enterprise class Trove service provided with a number of important additional features. Tesora supports additional database products including Oracle and DB2Express as well as commercial versions for Oracle MySQL, EnterpriseDB, Couchbase, Datastax, and mongoDB. Using the Horizon UI customizations with pre-defined trove instances greatly reduces the work needed for operators and deployers to build there own.

Understanding the DBaaS capability for your organization

As your organization transforms to embrace the wealth of digital information that is becoming available, the capability to store, manage and consume this data in any given format or product becomes an increasing burden for operations.

How does your organization handle the request, “I need to use product Z to store data for my new project?” There are several responses I have experienced first-hand with clients.

  1. Enforce the company policy that Products O and S are all that can be used.
  2. Ignore the request.
  3. Consider the request, but antagonize your own internal organization with long wait times (e.g. months or years) and with repeated delays to evaluate a product you simply do not want to support.
  4. Do whatever the developers say, they know best.

Unfortunately I have seen too many organizations use the first three options as the answer. The last option you make consider as a non valid answer however I have also seen this prevalent when there is no operations team or strategic technical oversight.

Ignorance of the question only leads to a greater pressure point at a later time. This may be when your executive team now enforces the requirement with their timetable. I have seen this happen and with painful ramifications. With the ability to consume public cloud resources with only access to a credit card, development resources can now proceed unchecked more easily if ignored or delayed. When a successful proof of concept is produced this way and now a more urgent need is required to deploy, support and manage, the opportunity to have a positive impact on the design decision of a new data product has passed.

Using DBaaS is one enabling tool within a strategic business model for your organization to satisfy this question with greater control. This however is not the solution but rather one tool combined with applicable processes. In order to scope the requirements for the original question, your model also needs to consider the following:

  • Provisioning capabilities
  • Strategic planning and insight
  • Support and management
  • Release criteria

Provisioning

This is the strength of DBaaS. Operations can enable development to independently provision resources and technology with little additional impeding dependency. There is input from operations to enable varying products to be available by self servicing, however there is also some control. DBaaS can be viewed as a controlled and flexible enabler. A specific example is an organization that uses the MySQL relational database, and now a developer wishes to use the MongoDB NoSQL unstructured store. An operator may cringe at the notion of a lack of data consistency, structure data query access or performance capabilities. These are all valid points, however those are discussions at a strategic level discussion your workflow pipeline and should not be an impediment to iterate quickly. Without oversight, to iterate quickly can lead to unmanageable outcomes.

Strategic Planning

There always needs to be oversight combined with applicable strategy. A single developer stating they want to use the new product Z for a distribution key/value store needs to be vetted first within the engineering organization and its own developer peers. If another project is already using Product Y that has the same core data access and features, this burden of an additional product support should be a self contained discussion validating the need first.

This is one strength of a good engineering manager that balances the requirements of the business needs and objectives with the capabilities of the resources available, including staff, tools and technology. Applicable principles put in place should also ensure that some aspect of planning is instilled into the development culture.

Support and Management

The development and engineering resources rarely consider the administration and support required for the suite of products and services used in an organization. The emphasis is on feature development and customer requirements, not the sustainability, longevity and security of any system. Operational support is a long list of needs, just a few include:

  • Information security.
  • Information availability.
  • Service level agreements (SLAs) between partners, service providers and the internal organization
  • The backup ecosystem, time taken, consistency, point-in-time recovery, testing and verification, cost of H/W, S/W, licenses.
  • Internet connectivity.
  • Capacity planning and cost analysis of storing and archiving ever increasing sources of data.
  • Hardware and software upgrades.

Two way communication which is often overlooked is the start of better understanding. That is, operations being included and involved in strategic development planning, and engineering resources included in operations needs and requirements for ensuring those new product features operate for the benefit of customers. In summary, “bridging the communication chasm”.

DevOps is an abused term, this implies that developers now perform a subset of responsibilities of Operations. As an individual that has worked in both development teams and lead operations teams, your resources skills, personality, rational thinking and decision making needs are vastly different between an engineering task and a production operations task.

Developers need to live a 24 hour day (with the unnecessary 3am emergency call) in the shoes of an operator. The reverse is also true, however the ramifications to business continuity are not the same. Just one factor, the cost, or more specifically the loss to the business due to a production failure alters the decision making process. Failure can be anything from a hardware or connectivity problem, bad code that was released to a data breach.

Release Criteria

If an organization has a strong (and flexible) policy on release criteria, all parties from the stack-holder, executive, engineering, operations and marketing should be able to contribute to the discussion and decision for a new product, and applicable in-house or third-party support. This discussion is not a pre-requisite for any department or developer to iterate quickly, however it is pre-requisite to migrate from a proof-of-concept prototype to a supported feature. Another often overlooked criteria in the pursuit for rapid deployment of new features which are significantly more difficult to remove after publication.

Expired MySQL passwords

I was surprised to find on one of my websites the message “Connect failed: Your password has expired. To log in you must change it using a client that supports expired passwords.

Not knowing that I was using a MySQL password expiry policy I reviewed the 5.7 documentation quickly which *clearly* states “The default default_password_lifetime value is 0, which disables automatic password expiration.”.

I then proceeded to investigate further, my steps are below the following comment.

However, it is always important with MySQL documentation and a new feature (in this case a 5.7 feature) to review release notes when installing versions or to least read ALL the documentation, because you may miss important information, such as.

Note:
From MySQL 5.7.4 to 5.7.10, the default default_password_lifetime value is 360 (passwords must be changed approximately once per year). For those versions, be aware that, if you make no changes to the default_password_lifetime variable or to individual user accounts, all user passwords will expire after 360 days, and all user accounts will start running in restricted mode when this happens. Clients…

I would encourage you to view the MySQL password expiry policy to see the full note. I have only include the intro here are a teaser, because you need to read the entire note.

Analysis

Back to impatient analysis steps.

$ mysql -u admin -p 
*********

SELECT VERSION();
+-----------+
| VERSION() |
+-----------+
| 5.7.9-log |
+-----------+

SHOW GLOBAL VARIABLES LIKE 'default_p%';
+---------------------------+-------+
| Variable_name             | Value |
+---------------------------+-------+
| default_password_lifetime | 360   |
+---------------------------+-------+


SELECT host,user,password_last_changed 
FROM mysql.user
WHERE password_last_changed + INTERVAL @@default_password_lifetime DAY < CURDATE();
+-----------+--------------+-----------------------+
| host      | user         | password_last_changed |
+-----------+--------------+-----------------------+
| localhost | XXX          | 2014-12-01 12:53:36   |
| localhost | XXXXX        | 2014-12-01 12:54:04   |
| localhost | XX_XXXX      | 2015-06-04 11:01:11   |
+-----------+--------------+-----------------------+

Indeed there are some passwords that have expired.

After finding the applicable application credentials I looked at verifying the problem.

$ mysql -uXX_XXXX -p
*******************
Enter password: 
Welcome to the MySQL monitor.  Commands end with ; or \g.
Server version: 5.7.9-log

mysql>

Interesting, there was no error to make a client connection, however.

mysql> use XXXX;
ERROR 1820 (HY000): You must reset your password using ALTER USER statement before executing this statement.

I then proceeded to change the password with the applicable hint shown.

ALTER USER XX_XXXX@localhost IDENTIFIED BY '*************************';

I chose to reuse the same password because changing the password would require a subsequent code change. MySQL accepted the same password. (A topic for a separate discussion on this point).

A manual verification showed the application and users operating as it should be, so immediate loss of data was averted. Monitoring of the sites home page however did not detect this problem of a partial page error, so should a password expiry policy be used, an applicable check in a regularly scheduled operational task is a good feature request.

All of this could have been avoided if my analysis started with reading the documentation and the note (partly shown above) which has an alternative and potentially more practical immediate solution.

In a firefighting operational mode it can be a priority to correct the problem, however more detailed analysis is prudent to maintain a "Being proactive rather than reactive" mindset. Being a Friday, I feel the old saying "There is more than one way to skin a cat" is applicable.

I am also more familiar with the SET PASSWORD syntax, so reviewing this 5.7 manual page is also a good read to determine what specific syntax is now deprecated and what "ALTER USER is now the preferred statement for assigning passwords" also.

Understanding the Oslo Libraries

Underpinning all of the OpenStack projects including Nova, Cinder, Keystone, Glance, Horizon, Heat, Trove, Murano and others is a set of core common libraries that provide a consistent, highly tested and compatible feature set. The Oslo project is a collection of over 30 libraries that are designed to reduce the technical debt of code duplication across projects and provide for a greater quality code path due to the frequency of use in OpenStack projects.

These libraries provide a variety of different features from the more commonly used functionality found in projects including configuration, logging, caching, messaging and database management to more specific features like deprecation management, handling plugins as well as frameworks for command line programs and state machines. The Oslo Python libraries are designed to be Python 2.7 and Python 3.4 compatible, leading the way in migration towards Python 3.

The first stable Oslo library oslo.config was included in the Grizzly release. Now over 30 libraries comprise the Oslo project. These libraries fall into a number of broad categories.

1. Stable OpenStack specific libraries

These libraries, using the olso. prefix are generally well described the library name.

  • oslo.cache
  • oslo.concurrency
  • oslo.context
  • oslo.config
  • oslo.db
  • oslo.i18n
  • oslo.log
  • oslo.messaging
  • oslo.middleware
  • oslo.policy
  • oslo.privsep
  • oslo.reports
  • oslo.serialization
  • oslo.service
  • oslo.utils
  • oslo.versionedobjects
  • oslo.vmware

2. Python libraries that can easily operate with other projects

In addition to the oslo namespace libraries, Oslo has a number of generically named libraries that are not OpenStack specific. The goal is that these libraries can be utilized outside of OpenStack by any Python project. These include:

  • automaton – a framework for building state machines.
  • cliff – a framework for building command line programs.
  • debtcollector – a collection of python patterns that help you collect your technical debt in a non-destructive manner (following deprecation patterns and strategies and so-on).
  • futurist – a collection of async functionality and additions from the future.
  • osprofiler – an OpenStack cross-project profiling library.
  • hacking – a library that provides a set of tools for enforcing coding style guidelines.
  • pbr – (or Python Build Reasonableness) is a add-on library that helps provide (and enforce) a set of sensible default setuptools behaviours.
  • pyCADF – a python implementation of the DMTF Cloud Audit (CADF) data model.
  • stevedore – a library for managing plugins for Python applications.
  • taskflow – a library that helps create applications that handle state/failures… in a reasonable manner.
  • tooz – a library that aims at centralizing the most common distributed primitives like group membership protocol, lock service and leader election

3. Convenience libraries

There are also several libraries that are used during the creation of, or support of OpenStack libraries.

The first was oslo-incubator where as the name suggests, initial libraries were incubated. As this code matured it was refactored into standard libraries. Projects have either graduated, been incorporated elsewhere or been deprecated. While the Oslo Incubator has been removed of libraries in Mitaka, one of the goals of the Newton cycle is to see the adoption of Oslo libraries in all projects. We will be providing a series of blogs to detail the walkthrough and reviews of existing projects for reference.

Other libraries include:

  • oslosphinx is a sphinx add-on library that provides theme and extension support for generating documentation with Sphinx. The Developer Documentation, Release Notes, a number of the OpenStack manuals including the Configuration Reference and now the Nova API Reference rely on this library.

  • oslotest is a helper library that provides base classes and fixtures for creating unit and functional tests.
  • oslo-cookiecutter is a project that creates a skeleton Oslo library from a set of templates.

4. Proposed or deprecated libraries

Some libraries fall outside of these categories, such as oslo.rootwrap. This was a mature library for handling fine filtering of shell commands to run as root. This is now deprecated in favor of oslo.privsep which is a mechanism for running selected python code with elevated privileges.

pylockfile is a legacy (and adopted) inter-process lock management library that was never used within OpenStack.

The oslo.version is an example of a proposed library at present to help in using python metadata to determine versioning.

The Oslo team is also evaluating what other common code may be suitable for an Oslo library.

The meaning behind the Oslo Name

Each OpenStack project has some reason behind the name. Oslo is in reference to the Oslo Peace Accords and “bringing peace” to the OpenStack project.

Oslo is also the capital of Norway, and in Norway you can find Moose. The moose is our project mascot.

Oracle OpenStack leveraging MySQL Cluster and Docker

At Oracle Openworld this year, Oracle OpenStack Release 2 was announced. This Kilo based distribution included some new deployment features not see in other OpenStack distros including the use of Kolla, Docker and MySQL Cluster. The press release states “First commercially available OpenStack implementation completely packaged as Docker instances”.

Using Docker to containerize each component of services is a very convenient means of dev/test/prod management. Your single node developer environment gets HA automatically, you can easily deploy to two or more management nodes varying services, and they look and act just like your production environment. I have often struggled with developing in OpenStack either with single project environments, creating a devstack, a previously installed 3 node physical server deployment which takes up room and power in my office, and also comparing other single node solutions including Canonical and Mirantis. I am often left to using online services such as Mirantis Express, TryStack and HP Cloud to more easily evaluate the end product, but without any access to the operating cloud under the covers.

It is an interesting move to using MySQL Cluster. I liked this announcement. This is a very robust Master/Master MySQL compatible product that starts with a High Availability implemented through a shared nothing architecture. You get the benefit of dynamic adding of data shards as your system grows. However MySQL Cluster is a very different product under the covers. For those familiar with managing MySQL server a different set of skills are required, starting with the concept of a management node, data nodes and SQL nodes and the different ways to manage, monitor and triage. MySQL Cluster is effectively an in-memory solution so this will require some additional sizing considerations especially for production deployments. Your backup/recovery/disaster recovery strategy will also change. All of this administration exists for MySQL Cluster, it is just different. If you only use MySQL server these are new skills to master. As an expert in MySQL server and having not used MySQL Cluster for at least 7 years, I cannot provide an insights for example of the use of common monitoring tools (including newer SaaS offerings). Still, MySQL Cluster is an extremely stable and production ready product, that scales to millions of QPS easily. Using this as a HA solution gives you a rock solid base which is what you need first.

While I attended a number of sessions and took the Hands On Lab for Oracle OpenStack the proof is having a running local environment. My next post will talk about my experiences installing.

References

Managing MySQL Version Upgrades Presentation

The following presentation was given at the Oracle Technology Network (OTN) Latin America 2015 tour events in Uruguay, Argentina, Chile and Peru.

In this presentation I talk about the various versions and means of installing and upgrading MySQL including:

  • MySQL version history from 3.23 to 5.7.8
  • Historical installation options
  • Recommended use of Oracle yum repository for current version
  • The installation and upgrade process, and errors that occur
  • Compatibility changes between MySQL 5.5 and MySQL 5.6 including
    • Reserved words (and their true impact)
    • Legacy TIMESTAMP usage
    • FULLTEXT indexes
    • The query optimizer
    • Clear text password warnings and security improvements
  • Important configuration differences
  • Other recommendations
  • The use of replication

Testing and Verifying your MySQL Backup Strategy Presentation

This past week I have been the sole MySQL representative on the Oracle Technology Network (OTN) Latin America 2015 tour events in Uruguay, Argentina, Chile and Peru.

In this presentation I talk about the important steps for testing and verifying your MySQL backup strategy to ensure your business continuity in any disaster recovery situation. This includes:

  • Overview of the primary product options
  • Backup and recovery strategy considerations
  • Technical requirements
  • Common problems observed
  • What about a failover strategy

Deploying Ubuntu OpenStack Kilo

My previous Ubuntu OpenStack setup has been using the Juno release. I received some installation problems for Kilo using the stable repo and so I switched to using the experimental repo. This comes with a number of surface changes.

  • The interactive installation asks for the installation type first, and password second.
  • The IP range of installed OpenStack services changes from 10.0.4.x to 10.0.7.x.
  • Juju GUI is no longer installed by default. You need to specifically add this as a service after initial installation.
  • The GUI displays additional information during installation.
  • The LXC container name changes from uoi-bootstrap to openstack-single-<user>.

Uninstall any existing environment

Remove any existing installed OpenStack cloud.

sudo openstack-install -k
sudo openstack-install -u

NOTE: Be sure to remove your existing cloud before upgrading. Failing to do so will mean you need to manually cleanup some things with:

sudo lxc-stop --name uoi-bootstrap
sudo lxc-destroy --name uoi-bootstrap
rm -rf $HOME/.cloud_install

Update the OpenStack installer

Upgrade Ubuntu OpenStack with the following commands. In my environment this installed version 0.99.14.

sudo apt-add-repository ppa:cloud-installer/experimental
sudo apt-get update
sudo apt-get upgrade openstack

Install OpenStack Kilo

Installing an Ubuntu OpenStack environment still uses the openstack-install command with an additional argument.

sudo openstack-install --upstream-ppa

NOTE: Updated 6/18/15 When using the experimental repo with version 0.99.12 or earlier you must specify the --extra-ppa argument and value, i.e. sudo openstack-install –extra-ppa ppa:cloud-installer/experimental. Thanks stokachu for pointing this out.

Adding Services

After setting up a Kilo cloud using Ubuntu OpenStack I was able to successfully add a Swift component. Something else that was not quite working as expected in stable.

References

Writing and testing unit tests in OpenStack

The following outlines an approach of identifying and improving unit tests in an OpenStack project.

Obtain the source code

You can obtain a copy of current source code for an OpenStack project at http://git.openstack.org. Active projects are categorized into openstack, openstack-dev, openstack-infra and stackforge.

NOTE: While you can find OpenStack projects on GitHub, these are just a mirror of the source repositories.

In this example I am going to use the Magnum project.

$ git clone git://git.openstack.org/openstack/magnum 
$ cd magnum

Run the current tests

The first step should be to run the current tests to verify the current code. This is to become familiar with the habit, especially if you may have made modifications and are returning to looking at your code. This will also create a virtual environment, which you will want to use later to test your changes.

$ tox -e py27

Should this fail, you may want to ensure all OpenStack developer dependencies are inplace on your OS.

Identify unit tests to work on

You can use the code coverage of unit tests to determine possible places to start adding to existing unit tests. The following command will produce a HTML report in the /cover directory of your project.

$ tox -e cover

This output will look similar to this example coverage output for Magnum. You can also produce a text based version with:

$ coverage report -m 

I will use this text version as a later verification.

Working on a specific unit test

Drilling down on any individual test file you will get an indication of code that does not have unit test coverage. For example in magnum/common/utils:

Once you have found a place to work with and you have identified the corresponding unit test file in the magnum/tests/unit sub-directory, in this example I am working on on magnum/tests/unit/common/test_utils.py, you will want to run this individual unit test in the virtual environment you previously created.

$ source .tox/py27/bin/activate
$ testr run test_utils -- -f

You can now start working on making your changes in whatever editor you wish. You may want to also work interactively in python initially to test and verify classes and methods especially if you are unfamiliar with how the code functions. For example, using the identical import found in test_utils.py for the test coverage I started with these simple checks.

(py27)$ python
Python 2.7.6 (default, Mar 22 2014, 22:59:56)
[GCC 4.8.2] on linux2
Type "help", "copyright", "credits" or "license" for more information.
>>> from magnum.common import utils
>>> utils.is_valid_ipv4('10.0.0.1') == True
True
>>> utils.is_valid_ipv4('') == False
True

I then created some appropriate unit tests for these two methods based on this interactive validation. These tests show that I not only test for valid values, I also test various boundary contains for invalid values including blank, character and out of range values of IP addresses.

    def test_valid_ipv4(self):
        self.assertTrue(utils.is_valid_ipv4('10.0.0.1'))
        self.assertTrue(utils.is_valid_ipv4('255.255.255.255'))

    def test_invalid_ipv4(self):
        self.assertFalse(utils.is_valid_ipv4(''))
        self.assertFalse(utils.is_valid_ipv4('x.x.x.x'))
        self.assertFalse(utils.is_valid_ipv4('256.256.256.256'))
        self.assertFalse(utils.is_valid_ipv4(
                         'AA42:0000:0000:0000:0202:B3FF:FE1E:8329'))

    def test_valid_ipv6(self):
        self.assertTrue(utils.is_valid_ipv6(
                        'AA42:0000:0000:0000:0202:B3FF:FE1E:8329'))
        self.assertTrue(utils.is_valid_ipv6(
                        'AA42::0202:B3FF:FE1E:8329'))

    def test_invalid_ipv6(self):
        self.assertFalse(utils.is_valid_ipv6(''))
        self.assertFalse(utils.is_valid_ipv6('10.0.0.1'))
        self.assertFalse(utils.is_valid_ipv6('AA42::0202:B3FF:FE1E:'))

After making these changes you want to run and verify your modified test works as previously demonstrated.

$ testr run test_utils -- -f
running=OS_STDOUT_CAPTURE=${OS_STDOUT_CAPTURE:-1} \
OS_STDERR_CAPTURE=${OS_STDERR_CAPTURE:-1} \
OS_TEST_TIMEOUT=${OS_TEST_TIMEOUT:-160} \
${PYTHON:-python} -m subunit.run discover -t ./ ${OS_TEST_PATH:-./magnum/tests/unit} --list  -f
running=OS_STDOUT_CAPTURE=${OS_STDOUT_CAPTURE:-1} \
OS_STDERR_CAPTURE=${OS_STDERR_CAPTURE:-1} \
OS_TEST_TIMEOUT=${OS_TEST_TIMEOUT:-160} \
${PYTHON:-python} -m subunit.run discover -t ./ ${OS_TEST_PATH:-./magnum/tests/unit}  --load-list /tmp/tmpDMP50r -f
Ran 59 (+1) tests in 0.824s (-0.016s)
PASSED (id=19)

If your tests fail you will see a FAILED message like. I find it useful to write a failing test intentionally just to validate the actual testing process is working.


${PYTHON:-python} -m subunit.run discover -t ./ ${OS_TEST_PATH:-./magnum/tests/unit}  --load-list /tmp/tmpsZlk3i -f
======================================================================
FAIL: magnum.tests.unit.common.test_utils.UtilsTestCase.test_invalid_ipv6
tags: worker-0
----------------------------------------------------------------------
Empty attachments:
  stderr
  stdout

Traceback (most recent call last):
  File "magnum/tests/unit/common/test_utils.py", line 98, in test_invalid_ipv6
    self.assertFalse(utils.is_valid_ipv6('AA42::0202:B3FF:FE1E:832'))
  File "/home/rbradfor/os/openstack/magnum/.tox/py27/local/lib/python2.7/site-packages/unittest2/case.py", line 672, in assertFalse
    raise self.failureException(msg)
AssertionError: True is not false
Ran 55 (-4) tests in 0.805s (-0.017s)
FAILED (id=20, failures=1 (+1))

Confirming your new unit tests

You can verify this has improved coverage percentage by re-running the coverage commands. I use the text based version as an easy way to see a decrease in the number of lines not covered.

Before

$ coverage report -m | grep "common/utils"
magnum/common/utils    273     94     76     38    62%   92-94, 105-134, 151-157, 208-211, 215-218, 241-259, 267-270, 275-279, 325, 349-384, 442, 449-453, 458-459, 467, 517-518, 530-531, 544
$ tox -e cover

After

$ coverage report -m | grep "common/utils"
magnum/common/utils    273     86     76     38    64%   92-94, 105-134, 151-157, 241-259, 267-270, 275-279, 325, 349-384, 442, 449-453, 458-459, 467, 517-518, 530-531, 544

I can see 8 lines of improvement which I can also verify if I look at the html version.

Before

After

Additional Testing

Make sure you run a full test before committing. This runs all tests in multiple Python versions and runs the PEP8 code style validation for your modified unit tests.

$ tox -e py27

Here are some examples of PEP8 problems with my improvements to the unit tests.

pep8 runtests: commands[0] | flake8
./magnum/tests/unit/common/test_utils.py:88:80: E501 line too long (88 > 79 characters)
./magnum/tests/unit/common/test_utils.py:91:80: E501 line too long (87 > 79 characters)
...
./magnum/tests/unit/common/test_utils.py:112:32: E231 missing whitespace after ','
./magnum/tests/unit/common/test_utils.py:113:32: E231 missing whitespace after ','
./magnum/tests/unit/common/test_utils.py:121:30: E231 missing whitespace after ','
...

Submitting your work

In order for your time and effort to be included in the OpenStack project there are a number of key details you need to follow that I outlined in contributing to OpenStack. Specifically these documents are important.

You do not have to be familiar with the procedures in order to look at the code, and even look at improving the code. You will need to follow the steps as outlined in these links if you want to contribute your code. Remember if you are new, the best access to help is to jump onto the IRC channel of the project you are interested in.

This example along with additions for several other methods was submitted (See patch). It was reviewed and ultimately approved.

References

Some additional information about the tools and processes can be found in these OpenStack documentation and wiki pages.

Contributing to OpenStack

Following my first OpenStack Summit in Vancouver 4/2015 it was time to become involved with contributing to OpenStack.

I have lurked around the mailing lists and several IRC channels for a few weeks and familiarized myself with OpenStack in varying forms including devstack, the free hosted Mirantis Express and the VM version, Ubuntu OpenStack, and even building my own 3 physical server cloud from second hand hardware purchased on eBay.

There are several resources available however I suggest you start with this concise presentation I attended at the summit by Adrian Otto on “7 Habits of Highly Effective Contributors” (slides, video).

You should also look at contributions from existing developers by looking at current code being submitted for review at https://review.openstack.org. I spent several weeks just looking at submissions, and I look at new submissions most days. While it does not always make sense (including a lot initially) its important to look at the full scope of all the projects. It is extremely valuable to look at how the review process works, how others comment on contributions, and look at the types of patches and code changes that are being contributed. There are a number of ways of not doing it right which can be discouraging when you first start contributing. The following links are vital to read, and re-read.

Individual projects also have various information, for example Magnum’s Ways to Contribute.

The benefit of observing for some time is you can be better prepared when you start to contribute. I was also new to how unit testing and automated testing worked in Python (about 7th on my list of known languages), and so learning about running OpenStack tests with tox and understanding the different OpenStack tox configs were valuable lessons, helped by feedback of OpenStack developers on the mailing list and IRC (If you have not looked at the 7 Habits presentation, now is a great time).

I took the time to find areas of interest and value which become more apparent after attending my first Design Summit. I even committed to assist in a design priority in the Magnum project as a result of my learning about how unit testing worked.

And if you write about your experiences another thing you can do is Add your blog to Planet OpenStack. I have received great feedback from the OpenStack community when writing about my first experiences.

Tracking the Ubuntu OpenStack installation process

Following on from Installing Ubuntu OpenStack the following steps help you navigate around the single server installation, monitoring and debugging the installation process.

Configuration

The initial execution of the installer will create a default config.yaml file that defines the container and OpenStack services. After a successful installation this looks like:

$ more $HOME/.cloud-install/config.yaml
container_ip: 10.0.3.149
current_state: 2
deploy_complete: true
install_type: Single
openstack_password: openstack
openstack_release: juno
placements:
  controller:
    assignments:
      LXC:
      - nova-cloud-controller
      - glance
      - glance-simplestreams-sync
      - openstack-dashboard
      - juju-gui
      - keystone
      - mysql
      - neutron-api
      - neutron-openvswitch
      - rabbitmq-server
    constraints:
      cpu-cores: 2
      mem: 6144
      root-disk: 20480
  nova-compute-machine-0:
    assignments:
      BareMetal:
      - nova-compute
    constraints:
      mem: 4096
      root-disk: 40960
  quantum-gateway-machine-0:
    assignments:
      BareMetal:
      - quantum-gateway
    constraints:
      mem: 2048
      root-disk: 20480

This file changes during the installation process which I described later.

The LXC Container

The single server installation is managed within a single LXC container. You can obtain details of and connect to the container with the following.

$ sudo lxc-ls --fancy
----------------------------------------------------------------------------
uoi-bootstrap  RUNNING  10.0.3.149, 10.0.4.1, 192.168.122.1  -     YES      

$ sudo lxc-info --name uoi-bootstrap
Name:           uoi-bootstrap
State:          RUNNING
PID:            19623
IP:             10.0.3.149
IP:             10.0.4.1
IP:             192.168.122.1
CPU use:        27692.85 seconds
BlkIO use:      63.94 GiB
Memory use:     24.29 GiB
KMem use:       0 bytes
Link:           vethC0E9US
 TX bytes:      507.43 MiB
 RX bytes:      1.43 GiB
 Total bytes:   1.93 GiB

$ sudo lxc-attach --name uoi-bootstrap

You can also connect to the server directly. As I prefer to NEVER configure or connect to a server as root this is how I access the LXC container.

$ ssh [email protected]

Juju Status

When connected to the LXC container you can then look at the status of the Juju orchestration with.

$ export JUJU_HOME=~/.cloud-install/juju

$ juju status
environment: local
machines:
  "0":
    agent-state: started
    agent-version: 1.20.11.1
    dns-name: localhost
    instance-id: localhost
    series: trusty
    state-server-member-status: has-vote
  "1":
    agent-state: started
    agent-version: 1.20.11.1
    dns-name: 10.0.4.62
    instance-id: ubuntu-local-machine-1
    series: trusty
    hardware: arch=amd64 cpu-cores=1 mem=4096M root-disk=40960M
  "2":
    agent-state: started
    agent-version: 1.20.11.1
    dns-name: 10.0.4.77
    instance-id: ubuntu-local-machine-2
    series: trusty
    containers:
      2/lxc/0:
        agent-state: started
        agent-version: 1.20.11.1
        dns-name: 10.0.4.147
        instance-id: ubuntu-local-machine-2-lxc-0
        series: trusty
        hardware: arch=amd64
      2/lxc/1:
        agent-state: started
        agent-version: 1.20.11.1
        dns-name: 10.0.4.15
        instance-id: ubuntu-local-machine-2-lxc-1
        series: trusty
        hardware: arch=amd64
      2/lxc/2:
        agent-state: started
        agent-version: 1.20.11.1
        dns-name: 10.0.4.135
        instance-id: ubuntu-local-machine-2-lxc-2
        series: trusty
        hardware: arch=amd64
      2/lxc/3:
        agent-state: started
        agent-version: 1.20.11.1
        dns-name: 10.0.4.133
        instance-id: ubuntu-local-machine-2-lxc-3
        series: trusty
        hardware: arch=amd64
      2/lxc/4:
        agent-state: started
        agent-version: 1.20.11.1
        dns-name: 10.0.4.119
        instance-id: ubuntu-local-machine-2-lxc-4
        series: trusty
        hardware: arch=amd64
      2/lxc/5:
        agent-state: started
        agent-version: 1.20.11.1
        dns-name: 10.0.4.88
        instance-id: ubuntu-local-machine-2-lxc-5
        series: trusty
        hardware: arch=amd64
      2/lxc/6:
        agent-state: started
        agent-version: 1.20.11.1
        dns-name: 10.0.4.155
        instance-id: ubuntu-local-machine-2-lxc-6
        series: trusty
        hardware: arch=amd64
      2/lxc/7:
        agent-state: started
        agent-version: 1.20.11.1
        dns-name: 10.0.4.36
        instance-id: ubuntu-local-machine-2-lxc-7
        series: trusty
        hardware: arch=amd64
      2/lxc/8:
        agent-state: started
        agent-version: 1.20.11.1
        dns-name: 10.0.4.11
        instance-id: ubuntu-local-machine-2-lxc-8
        series: trusty
        hardware: arch=amd64
    hardware: arch=amd64 cpu-cores=2 mem=6144M root-disk=20480M
  "3":
    agent-state: started
    agent-version: 1.20.11.1
    dns-name: 10.0.4.10
    instance-id: ubuntu-local-machine-3
    series: trusty
    hardware: arch=amd64 cpu-cores=1 mem=2048M root-disk=20480M
  "4":
    agent-state: started
    agent-version: 1.20.11.1
    dns-name: 10.0.4.96
    instance-id: ubuntu-local-machine-4
    series: trusty
    hardware: arch=amd64 cpu-cores=1 mem=512M root-disk=8192M
  "5":
    agent-state: started
    agent-version: 1.20.11.1
    dns-name: 10.0.4.140
    instance-id: ubuntu-local-machine-5
    series: trusty
    hardware: arch=amd64 cpu-cores=1 mem=512M root-disk=8192M
  "6":
    agent-state: started
    agent-version: 1.20.11.1
    dns-name: 10.0.4.197
    instance-id: ubuntu-local-machine-6
    series: trusty
    hardware: arch=amd64 cpu-cores=1 mem=512M root-disk=8192M
services:
  glance:
    charm: cs:trusty/glance-11
    exposed: false
    relations:
      amqp:
      - rabbitmq-server
      cluster:
      - glance
      identity-service:
      - keystone
      image-service:
      - nova-cloud-controller
      - nova-compute
      object-store:
      - swift-proxy
      shared-db:
      - mysql
    units:
      glance/0:
        agent-state: started
        agent-version: 1.20.11.1
        machine: 2/lxc/4
        open-ports:
        - 9292/tcp
        public-address: 10.0.4.119
  glance-simplestreams-sync:
    charm: local:trusty/glance-simplestreams-sync-0
    exposed: false
    relations:
      amqp:
      - rabbitmq-server
      identity-service:
      - keystone
    units:
      glance-simplestreams-sync/0:
        agent-state: started
        agent-version: 1.20.11.1
        machine: 2/lxc/5
        public-address: 10.0.4.88
  juju-gui:
    charm: cs:trusty/juju-gui-16
    exposed: false
    units:
      juju-gui/0:
        agent-state: started
        agent-version: 1.20.11.1
        machine: 2/lxc/1
        open-ports:
        - 80/tcp
        - 443/tcp
        public-address: 10.0.4.15
  keystone:
    charm: cs:trusty/keystone-12
    exposed: false
    relations:
      cluster:
      - keystone
      identity-service:
      - glance
      - glance-simplestreams-sync
      - neutron-api
      - nova-cloud-controller
      - openstack-dashboard
      - swift-proxy
      shared-db:
      - mysql
    units:
      keystone/0:
        agent-state: started
        agent-version: 1.20.11.1
        machine: 2/lxc/2
        public-address: 10.0.4.135
  mysql:
    charm: cs:trusty/mysql-12
    exposed: false
    relations:
      cluster:
      - mysql
      shared-db:
      - glance
      - keystone
      - neutron-api
      - nova-cloud-controller
      - nova-compute
      - quantum-gateway
    units:
      mysql/0:
        agent-state: started
        agent-version: 1.20.11.1
        machine: 2/lxc/0
        public-address: 10.0.4.147
  neutron-api:
    charm: cs:trusty/neutron-api-6
    exposed: false
    relations:
      amqp:
      - rabbitmq-server
      cluster:
      - neutron-api
      identity-service:
      - keystone
      neutron-api:
      - nova-cloud-controller
      neutron-plugin-api:
      - neutron-openvswitch
      shared-db:
      - mysql
    units:
      neutron-api/0:
        agent-state: started
        agent-version: 1.20.11.1
        machine: 2/lxc/7
        open-ports:
        - 9696/tcp
        public-address: 10.0.4.36
  neutron-openvswitch:
    charm: cs:trusty/neutron-openvswitch-2
    exposed: false
    relations:
      amqp:
      - rabbitmq-server
      neutron-plugin:
      - nova-compute
      neutron-plugin-api:
      - neutron-api
    subordinate-to:
    - nova-compute
  nova-cloud-controller:
    charm: cs:trusty/nova-cloud-controller-51
    exposed: false
    relations:
      amqp:
      - rabbitmq-server
      cloud-compute:
      - nova-compute
      cluster:
      - nova-cloud-controller
      identity-service:
      - keystone
      image-service:
      - glance
      neutron-api:
      - neutron-api
      quantum-network-service:
      - quantum-gateway
      shared-db:
      - mysql
    units:
      nova-cloud-controller/0:
        agent-state: started
        agent-version: 1.20.11.1
        machine: 2/lxc/3
        open-ports:
        - 3333/tcp
        - 8773/tcp
        - 8774/tcp
        - 9696/tcp
        public-address: 10.0.4.133
  nova-compute:
    charm: cs:trusty/nova-compute-14
    exposed: false
    relations:
      amqp:
      - rabbitmq-server
      cloud-compute:
      - nova-cloud-controller
      compute-peer:
      - nova-compute
      image-service:
      - glance
      neutron-plugin:
      - neutron-openvswitch
      shared-db:
      - mysql
    units:
      nova-compute/0:
        agent-state: started
        agent-version: 1.20.11.1
        machine: "1"
        public-address: 10.0.4.62
        subordinates:
          neutron-openvswitch/0:
            upgrading-from: cs:trusty/neutron-openvswitch-2
            agent-state: started
            agent-version: 1.20.11.1
            public-address: 10.0.4.62
  openstack-dashboard:
    charm: cs:trusty/openstack-dashboard-9
    exposed: false
    relations:
      cluster:
      - openstack-dashboard
      identity-service:
      - keystone
    units:
      openstack-dashboard/0:
        agent-state: started
        agent-version: 1.20.11.1
        machine: 2/lxc/6
        open-ports:
        - 80/tcp
        - 443/tcp
        public-address: 10.0.4.155
  quantum-gateway:
    charm: cs:trusty/quantum-gateway-10
    exposed: false
    relations:
      amqp:
      - rabbitmq-server
      cluster:
      - quantum-gateway
      quantum-network-service:
      - nova-cloud-controller
      shared-db:
      - mysql
    units:
      quantum-gateway/0:
        agent-state: started
        agent-version: 1.20.11.1
        machine: "3"
        public-address: 10.0.4.10
  rabbitmq-server:
    charm: cs:trusty/rabbitmq-server-26
    exposed: false
    relations:
      amqp:
      - glance
      - glance-simplestreams-sync
      - neutron-api
      - neutron-openvswitch
      - nova-cloud-controller
      - nova-compute
      - quantum-gateway
      cluster:
      - rabbitmq-server
    units:
      rabbitmq-server/0:
        agent-state: started
        agent-version: 1.20.11.1
        machine: 2/lxc/8
        open-ports:
        - 5672/tcp
        public-address: 10.0.4.11

You can also look at a subset of the status for a particular service, for example keystone with:

$ juju status keystone
environment: local
machines:
  "1":
    agent-state: started
    agent-version: 1.20.11.1
    dns-name: 10.0.4.128
    instance-id: ubuntu-local-machine-1
    series: trusty
    containers:
      1/lxc/2:
        agent-state: started
        agent-version: 1.20.11.1
        dns-name: 10.0.4.142
        instance-id: ubuntu-local-machine-1-lxc-2
        series: trusty
        hardware: arch=amd64
    hardware: arch=amd64 cpu-cores=2 mem=6144M root-disk=20480M
services:
  keystone:
    charm: cs:trusty/keystone-12
    exposed: false
    relations:
      cluster:
      - keystone
      identity-service:
      - glance
      - glance-simplestreams-sync
      - neutron-api
      - nova-cloud-controller
      - openstack-dashboard
      shared-db:
      - mysql
    units:
      keystone/0:
        agent-state: started
        agent-version: 1.20.11.1
        machine: 1/lxc/2
        public-address: 10.0.4.142

Monitoring the Installation

When performing an installation you can monitor the executed commands with:

$ tail -f $HOME/.cloud-install/commands.log

...

This provides a lot of debugging output. A streamlined logging is actually possible with automated installation described later.

Uninstalling

As the single server instance is in a LXC container, as the documentation states uninstalling the environment is a rather trivial process that takes only a few seconds.

This will teardown the cloud but leaving userdata available for a subsequent deployment.

$ sudo openstack-install -k
Warning:

This will destroy the host Container housing the OpenStack private cloud. This is a permanent operation.
Proceed? [y/N] Y
Removing static route
Removing host container...
Container is removed.

You can also do a more permanent uninstall of the cloud and packages.

$ sudo openstack-install -u
Warning:

This will uninstall OpenStack and make a best effort to return the system back to its original state.
Proceed? [y/N] Y
Restoring system to last known state.
Ubuntu Openstack Installer Uninstalling ...Single install path.

This does not however seem to cleanup $HOME/.cloud-install. You can safely remove this or move it sideways when re-deploying without any issues.

Installation automation

As described in my original post, the openstack-install script is a cursors-based interactive view. You can automate the installation by defining the needed setup inputs in a separate configuration file and running in headless mode.

$ echo "install_type: Single
openstack_password: openstack" > install.yaml

$ sudo openstack-install --headless --config install.yaml

This has the added benefit providing a more meaningful log of the state of the installation with less verbose information then in the commands.log file.

[INFO  • 06-02 12:02:42 • cloudinstall.install] Running in headless mode.
[INFO  • 06-02 12:02:42 • cloudinstall.install] Performing a Single Install
[INFO  • 06-02 12:02:42 • cloudinstall.task] [TASKLIST] ['Initializing Environment', 'Creating container', 'Bootstrapping Juju']
[INFO  • 06-02 12:02:42 • cloudinstall.task] [TASK] Initializing Environment
[INFO  • 06-02 12:02:42 • cloudinstall.consoleui] Building environment
[INFO  • 06-02 12:02:42 • cloudinstall.single_install] Prepared userdata: {'extra_sshkeys': ['ssh-rsa ...\n'], 'seed_command': ['env', 'pollinate', '-q']}
[INFO  • 06-02 12:02:42 • cloudinstall.single_install] Setting permissions for user rbradfor
[INFO  • 06-02 12:02:43 • cloudinstall.task] [TASK] Creating container
[INFO  • 06-02 12:04:20 • cloudinstall.single_install] Setting DHCP properties for host container.
[INFO  • 06-02 12:04:20 • cloudinstall.single_install] Adding static route for 10.0.4.0/24 via 10.0.3.160
...
[INFO  • 06-02 12:22:50 • cloudinstall.consoleui] Checking availability of nova-cloud-controller: pending
[INFO  • 06-02 12:23:31 • cloudinstall.consoleui] Checking availability of nova-cloud-controller: installed
[INFO  • 06-02 12:23:52 • cloudinstall.consoleui] Checking availability of nova-cloud-controller: started
[INFO  • 06-02 12:24:34 • cloudinstall.consoleui] Checking availability of keystone: started
[INFO  • 06-02 12:24:44 • cloudinstall.consoleui] Checking availability of keystone: started
[INFO  • 06-02 12:24:44 • cloudinstall.consoleui] Checking availability of nova-cloud-controller: started
[INFO  • 06-02 12:27:38 • cloudinstall.consoleui] Checking availability of quantum-gateway: started
[INFO  • 06-02 12:27:38 • cloudinstall.consoleui] Checking availability of nova-cloud-controller: started
[INFO  • 06-02 12:27:38 • cloudinstall.consoleui] Validating network parameters for Neutron
[INFO  • 06-02 12:27:53 • cloudinstall.consoleui] All systems go!=

And 25 minutes later you have an available cloud.

If you attempt to look at the GUI status page with openstack-status you will be given a text based version of messages like.

$ sudo openstack-status
[INFO  • 06-02 12:06:21 • cloudinstall.core] Running openstack-status in headless mode.
[INFO  • 06-02 12:06:21 • cloudinstall.consoleui] Loaded placements from file.
[INFO  • 06-02 12:06:21 • cloudinstall.consoleui] Waiting for machines to start: 3 unknown
[INFO  • 06-02 12:08:20 • cloudinstall.consoleui] Waiting for machines to start: 1 pending, 2 unknown
[INFO  • 06-02 12:08:48 • cloudinstall.consoleui] Waiting for machines to start: 2 pending, 1 unknown
[INFO  • 06-02 12:09:04 • cloudinstall.consoleui] Waiting for machines to start: 1 down (started), 1 pending, 1 unknown
[INFO  • 06-02 12:09:13 • cloudinstall.consoleui] Waiting for machines to start: 1 down (started), 2 pending
[INFO  • 06-02 12:09:20 • cloudinstall.consoleui] Waiting for machines to start: 2 down (started), 1 pending
[INFO  • 06-02 12:09:26 • cloudinstall.consoleui] Waiting for machines to start: 1 pending, 2 started
[INFO  • 06-02 12:09:51 • cloudinstall.consoleui] Waiting for machines to start: 1 down (started), 2 started
[INFO  • 06-02 12:10:44 • cloudinstall.consoleui] Verifying service deployments
[INFO  • 06-02 12:10:44 • cloudinstall.consoleui] Missing ConsoleUI() attribute: set_pending_deploys
[INFO  • 06-02 12:10:44 • cloudinstall.consoleui] Checking if MySQL is deployed
[INFO  • 06-02 12:10:44 • cloudinstall.consoleui] Deploying MySQL to machine lxc:1
[INFO  • 06-02 12:10:49 • cloudinstall.consoleui] Deployed MySQL.
[INFO  • 06-02 12:10:49 • cloudinstall.consoleui] Checking if Juju GUI is deployed
[INFO  • 06-02 12:10:49 • cloudinstall.consoleui] Deploying Juju GUI to machine lxc:1
[INFO  • 06-02 12:11:00 • cloudinstall.consoleui] Deployed Juju GUI.
[INFO  • 06-02 12:11:00 • cloudinstall.consoleui] Checking if Keystone is deployed
[INFO  • 06-02 12:11:00 • cloudinstall.consoleui] Deploying Keystone to machine lxc:1
...

It seems you can trick it into providing both a GUI and text version with the following in another shell session.

$ sed -ie "/headless/d" $HOME/.cloud-install/config.yaml
$ sudo openstack-status

NOTE: You will not get any output until the initial container is completed. This also leaves a .pid file that must be manually cleaned up if you run to soon. The next invocation provides the following message.

$ sudo openstack-status
Another instance of openstack-status is running. If you're sure there are no other instances, please remove ~/.cloud-install/openstack.pid
$ rm $HOME/.cloud-install/openstack.pid

Monitoring the installation progress

The running config.yaml file changes over the duration of the installation.
It’s most basic configuration (when starting with the GUI) is:

$ more $HOME/.cloud-install/config.yaml
current_state: 0
openstack_release: juno

The release is also defined in the $HOME/.cloud-install/openstack_release file.

When starting by passing the configuration as previously mentioned it’s initial state is:

$ more $HOME/.cloud-install/config.yaml
config_file: install.yaml
current_state: 0
headless: true
install_type: Single
openstack_password: openstack
openstack_release: juno

This is updated when the LXC container is installed.

$ more $HOME/.cloud-install/config.yaml
config_file: install.yaml
container_ip: 10.0.3.77
current_state: 0
headless: true
install_type: Single
openstack_password: openstack
openstack_release: juno

And also updated during installation, such as.

$ more $HOME/.cloud-install/config.yaml
config_file: install.yaml
container_ip: 10.0.3.77
current_state: 0
headless: true
install_type: Single
openstack_password: openstack
openstack_release: juno
placements:
  controller:
    assignments:
      LXC:
      - nova-cloud-controller
      - glance
      - glance-simplestreams-sync
      - openstack-dashboard
      - juju-gui
      - keystone
      - mysql
      - neutron-api
      - neutron-openvswitch
      - rabbitmq-server
    constraints:
      cpu-cores: 2
      mem: 6144
      root-disk: 20480
  nova-compute-machine-0:
    assignments:
      BareMetal:
      - nova-compute
    constraints:
      mem: 4096
      root-disk: 40960
  quantum-gateway-machine-0:
    assignments:
      BareMetal:
      - quantum-gateway
    constraints:
      mem: 2048
      root-disk: 20480

When completed the configuration has the following settings.

config_file: install.yaml
container_ip: 10.0.3.77
current_state: 2
deploy_complete: true
install_type: Single
openstack_password: openstack
openstack_release: juno
placements:
...

Problems

When using the GUI installer the first time you quit (using Q), it seems to leave the terminal state wrong. The following will reset this to normal use.

$ stty sane  ^j    # (i.e. Ctrl-J together).

Subsequent uses of openstack-status do not have the same problem.

References

In my next post I am going to talk about the analysis taken to debug errors in the installation, starting with Keystone – hook failed: “config-changed” message I got attempting to install kilo, and hence this more detailed analysis of the installation process components.

Installing Ubuntu OpenStack

The The Canonical Distribution of Ubuntu OpenStack provides a simple installer to run an OpenStack cloud. You can deploy a simple single machine setup with fully containerized services (11 in total), or a multi server installation leveraging MAAS – Metal as a Service and Landscape Autopilot.

Installation

This post describes my experiences with the single machine setup on a 4 core machine with 32GB of RAM with a clean Ubuntu 14.04 LTS OS. The installation requires the following commands to configure the repo, install and configure your OpenStack cloud. In this example, the installed version is 0.22.3.

sudo apt-add-repository -y ppa:cloud-installer/stable
sudo apt-get update
sudo apt-get install -y openstack
sudo openstack-install --version
sudo openstack-install

The final step uses a cusors-based interface and only requires two steps before the installation.

  • Specify a password
  • Specify the install type


The UI provides a progress status of the installation. Initially new containers will start with a Pending status. Following the starting of the Juju GUI container the footer bar shows the URL for the JujuGUI, in my case http://10.0.4.112. Following the starting of the Openstack Dashboard you will then get a Horizon URL also detailed in the footer such as http://10.0.4.74/horizon.


Horizon

The Horizon display is what you generally expect.


JujuGUI

The JujuGUI provides a display of the deployment orchestration via charms. You can also drill down to specific services. An example is for the glance service using the charm cs:trusty/glance-11. This describes the relationships and configuration which are also seen in the GUI. You can also view online the full source code used to create this deployed service.


OpenStack Status

You can view the state of your containerized cloud with openstack-status which is a cursors-based display of the running installation, the same used during the installation. This displays the units deployed, status messages and a footer URL bar that indicates the URL’s of Horizon and JujuGUI. Each time you invoke this it will also check services, as indicated by the [INFO] messages.


Connecting to Containers

The installer will automatically create a SSH key for the user that you use to run the openstack-install command. This enables you to SSH to any of the containers, for example to connect to the MySQL container.

ssh [email protected]
$ mysql -uroot -p`sudo cat /var/lib/mysql/mysql.passwd` -e "SHOW SCHEMAS"
+--------------------+
| Database           |
+--------------------+
| information_schema |
| glance             |
| keystone           |
| mysql              |
| neutron            |
| nova               |
| performance_schema |
+--------------------+

You can use the various OpenStack clients to access OpenStack services. These are not installed by default.

sudo apt-get install -y python-glanceclient python-openstackclient python-novaclient python-keystoneclient
$ source $HOME/.cloud-install/openstack-admin-rc
$ glance image-list
+--------------------------------------+---------------------------------------------------------------+-------------+------------------+-----------+--------+
| ID                                   | Name                                                          | Disk Format | Container Format | Size      | Status |
+--------------------------------------+---------------------------------------------------------------+-------------+------------------+-----------+--------+
| f3cd4ec6-8ce6-4a44-85ec-2f8f066f351b | auto-sync/ubuntu-trusty-14.04-amd64-server-20150528-disk1.img | qcow2       | bare             | 257294848 | active |
+--------------------------------------+---------------------------------------------------------------+-------------+------------------+-----------+--------+

More Information

Read Tracking the Ubuntu OpenStack installation process for more detailed information on monitoring the installation process.

Thanks to the New York OpenStack Group and a presentation by Mark Baker of Canonical who demonstrated MAAS and Landscape AutoPilot installation of OpenStack. Slides of Automating hard things slides.

My thoughts on Architecture and Software Development with MySQL

Yesterday I was able to present to the Portland MySQL Users Group two presentations that are important foundations for effective development with MySQL.

With 26 years of architectural experience in RDBMS and 16 years of MySQL knowledge, my extensive exposure to large and small companies from consulting has lead to these presentations containing common obstacles I have seen an help organization with. All that can be easily avoided. The benefits of improved development and better processes leads to better quality software, better performance and a lower cost of ownership, that is saving companies money.

Thanks to Emily and Daniel for organizing and New Relic for hosting.

Python 3 semantics for integer division

As I refresh my skills in Python 2 to Python 3 semantics I discovered there is a difference in the division operator (i.e. /).

When using integers in Python 2 the result (by default) is an integer. For example.

$ python2
Python 2.7.6 (default, Mar 22 2014, 22:59:56)
>>> 1/2
0
>>> 1/2.0
0.5

In Python 3 the result is a float.

$ python3
Python 3.4.0 (default, Apr 11 2014, 13:05:11)
>>> 1/2
0.5

It has been encouraged in the Porting Python 2 Code to Python 3 documentation to perform the following import.

$ python2
Python 2.7.6 (default, Mar 22 2014, 22:59:56)
>>> from __future__ import division
>>> 1/2
0.5

I was also unaware of the floor operator (i.e. //) as specified in PEP 238.

$ python2
Python 2.7.6 (default, Mar 22 2014, 22:59:56)
>>> from __future__ import division
>>> 1//2
0
>>> 1/2
0.5

I uncovered this by playing with algorithms between versions. This Newton Method for the Square Root was something I was unaware of, and this example failed when using Python 2.

My improved version on the referenced example without an import.

def squareroot(number, precision = 5):
  root = number/2.0
  for i in range(20):
    nroot = (1/2.0)*(root + (number / root))
    #print i, nroot
    if (root - nroot < 1.0/10**precision):
      break
    root = nroot
  return round(nroot, precision)
>>> squareroot(10)
3.16228
>>> squareroot(10,1)
3.2
>>> squareroot(10,2)
3.16
>>> squareroot(10,5)
3.16228
>>> squareroot(10,10)
3.1622776602

Installing Python 3.3 on Ubuntu 14.04.2 LTS

Ubuntu 14.04 by default uses Python 2.7 and 3.4. If you want to install Python 3.3, in my case because various Openstack projects that maintain 3.3 compatibility.

I had a hard time finding what I would consider an official means. These are a third party PPA steps. I welcome comments for any other ways to install multiple Python environments.

$ sudo apt-get install -y python-software-properties
$ sudo add-apt-repository -y ppa:fkrull/deadsnakes
gpg: keyring `/tmp/tmpuljbio98/secring.gpg' created
gpg: keyring `/tmp/tmpuljbio98/pubring.gpg' created
gpg: requesting key DB82666C from hkp server keyserver.ubuntu.com
gpg: /tmp/tmpuljbio98/trustdb.gpg: trustdb created
gpg: key DB82666C: public key "Launchpad Old Python Versions" imported
gpg: Total number processed: 1
gpg:               imported: 1  (RSA: 1)

NOTE: The add repo command prompts for a user response without -y.

$ sudo add-apt-repository ppa:fkrull/deadsnakes

 This PPA has older and newer Python versions for Ubuntu. The packages in the official archives generally don't go back all that far, but people might still need to develop and test against these old Python interpreters. There also was a time when Google App Engine still ran on Python 2.5, but nobody likes to talk about that.

A disclaimer first: I do not guarantee any kind of updates. In particular, I shed all responsibility for security issues in these packages. If you want to use them in a security-or-otherwise-critical environment (say, on a production server), you do so at your own risk.

For Python 2.7 updates for supported Ubuntu releases, see my dedicated 2.7 PPA:

https://launchpad.net/~fkrull/+archive/ubuntu/deadsnakes-python2.7

Reporting Issues
================
Issues can be reported in the master issue tracker at:

https://bitbucket.org/fk/deadsnakes-issues

Donations
=========
If you like what I'm doing here, you can show your appreciation by donating:

https://www.paypal.com/cgi-bin/webscr?cmd=_s-xclick&hosted_button_id=TTTFWBJ2DZK6E

Supported Ubuntu Versions
=========================
Supported — Precise, Trusty, Utopic

Generally, I try to support Ubuntu releases until their official End-of-Life.

Supported Python Versions
=========================
Currently supported releases — 2.3, 2.4, 2.5, 2.6, 2.7, 3.1, 3.2, 3.3, 3.4

Basically, if an Ubuntu version doesn't have an official package for a specific major Python version (be it "any more" or "yet"), look for one in this PPA. However, for a given Python major release, don't expect to find newer point releases if there is already an older point release in the official Ubuntu repositories (i.e., if an Ubuntu release has a package for Python 2.6.4, I won't provide a package with 2.6.5 for that Ubuntu release): newer Python point releases shouldn't add new features or change behaviour, so they're rather pointless (no pun intended) for development and testing; conversely, if that Python point release has a bug that is fixed in a newer release, that's still an issue with the original package and should be taken up with the Ubuntu or Debian maintainer of the package. Besides, making these update packages externally to the original repositories is a bit of a pain.

As an exception, I have updated Python 2.7 packages for several Ubuntu releases in a separate PPA:

https://launchpad.net/~fkrull/+archive/ubuntu/deadsnakes-python2.7

Supported Python Packages
=========================
Using third-party modules packaged for Debian or Ubuntu with the Python interpreters from this repository is a bit of a mixed bag. For Python 2, Python modules from the official repositories will not work, as a consequence of how Python packaging works in Debian. For Python 3 on the other hand, all pure-Python module packages at least should be available; compiled extension modules will not work however.

In general, you're better off installing Python modules using the common Python packaging tools rather than the system package manager. For an introduction into the Python packaging ecosystem and its tools, refer to the Python Packaging User Guide [1].

[1] https://packaging.python.org
 More info: https://launchpad.net/~fkrull/+archive/ubuntu/deadsnakes
Press [ENTER] to continue or ctrl-c to cancel adding it

gpg: keyring `/tmp/tmp1rda6tjx/secring.gpg' created
gpg: keyring `/tmp/tmp1rda6tjx/pubring.gpg' created
gpg: requesting key DB82666C from hkp server keyserver.ubuntu.com
gpg: /tmp/tmp1rda6tjx/trustdb.gpg: trustdb created
gpg: key DB82666C: public key "Launchpad Old Python Versions" imported
gpg: Total number processed: 1
gpg:               imported: 1  (RSA: 1)
OK
$ sudo apt-get update
$ sudo apt-cache show python3.3
Package: python3.3
Priority: optional
Section: python
Installed-Size: 255
Maintainer: Felix Krull 
Architecture: amd64
Version: 3.3.6-4+trusty1
Suggests: python3.3-doc, binutils
Depends: python3.3-minimal (= 3.3.6-4+trusty1), libpython3.3-stdlib (= 3.3.6-4+trusty1), mime-support
Filename: pool/main/p/python3.3/python3.3_3.3.6-4+trusty1_amd64.deb
Size: 136098
MD5sum: 924f7fcd5e84d0938c1ae8e8c5b7f226
SHA1: 8e34edec87644b7c620a98a5f2e5fa54f4cbba67
SHA256: 44bc419559695dd78f9b5e37a9bf7ce586c4d3b1922e896bb15ed9d243cb578c
Description-en: Interactive high-level object-oriented language (version 3.3)
 Python is a high-level, interactive, object-oriented language. Its 3.3 version
 includes an extensive class library with lots of goodies for
 network programming, system administration, sounds and graphics.
Description-md5: d77f2abf1b0095e2e7bf5e21022e3d54
Multi-Arch: allowed
Original-Maintainer: Matthias Klose 

And now you can install the specific version.

$ sudo apt-get install -y python3.3 python3.3-dev

At this time I now have 3 different versions as well as the python and python3 aliases.

$ python --version
Python 2.7.6

$ python3 --version
Python 3.4.0

$ python2.7 --version
Python 2.7.6

$ python3.3 --version
Python 3.3.6

$ python3.4 --version
Python 3.4.0

This enabled me to now use Python 3.3. for my Openstack tox testing which at first pass produces the same error as Python 3.4

$ tox -epy33 --notest

Percona Live Presentation: MySQL Security Essentials

The slides for my MySQL Security Essentials presentation at Percona Live 2015 MySQL Conference and Expo are now available.

In this presentation I discuss just how insecure legacy versions of MySQL are and what are the essential requirements for securing your installation on disk, via network and with user privileges. I provide recommendations for how to manage application access for your most important data asset.

This presentation describes the key security improvements in MySQL 5.6 and MySQL 5.7 as well as additional features provided in MariaDB 10.0 and 10.1 supporting roles and encryption.

I have also included slides for how easy it is to Hack MySQL and examples of denial of service attacks that are possible with even limited MySQL access.

Percona Live Presentation: Improving Performance With Better Indexes

The slides for my Improving Performance With Better Indexes presentation at Percona Live 2015 MySQL Conference and Expo are now available.

In this presentation I discuss how to identify, review and analyze SQL statements in order to create better indexes for your queries. This includes understanding the EXPLAIN syntax and how to create and identify covering and partial column indexes.

This presentation is based on the work with a customer showing the 95% improvement of a key 15 table join query running 15,000 QPS in a 25 billion SQL statements per day infrastructure.

As mentioned, Explaining the MySQL Explain is an additional presentation that goes into more detail for learning how to read Query Execution Plans (QEP) in MySQL.

Updating MySQL on Ubuntu 12.04 LTS to MySQL 5.6

The Ubuntu 12.04.3 LTS release only provides MySQL 5.1 and MySQL 5.5 using the default Ubuntu package manager.

Oracle (owners of the MySQL(tm)) now provide Debian/Ubuntu APT repositories for all GA and DMR versions of MySQL including supporting Ubuntu 12.04.

The following steps demonstrate upgrading from the Ubuntu 5.5 server package to the Oracle 5.6 server package.

Verify MySQL Packages

$ apt-cache search mysql-server
mysql-server - MySQL database server (metapackage depending on the latest version)
mysql-server-5.5 - MySQL database server binaries and system database setup
mysql-server-core-5.5 - MySQL database server binaries
auth2db - Powerful and eye-candy IDS logger, log viewer and alert generator
cacti - Frontend to rrdtool for monitoring systems and services
torrentflux - web based, feature-rich BitTorrent download manager

Verify MySQL on Server

$  dpkg -l | grep mysql
ii  libdbd-mysql-perl                      4.020-1build2                                       Perl5 database interface to the MySQL database
ii  libmysqlclient-dev                     5.5.34-0ubuntu0.12.04.1                             MySQL database development files
ii  libmysqlclient18                       5.5.34-0ubuntu0.12.04.1                             MySQL database client library
ii  mysql-client-5.5                       5.5.31-0ubuntu0.12.04.1                             MySQL database client binaries
ii  mysql-client-core-5.5                  5.5.34-0ubuntu0.12.04.1                             MySQL database core client binaries
ii  mysql-common                           5.5.34-0ubuntu0.12.04.1                             MySQL database common files, e.g. /etc/mysql/my.cnf
ii  mysql-server-5.5                       5.5.31-0ubuntu0.12.04.1                             MySQL database server binaries and system database setup
ii  mysql-server-core-5.5                  5.5.31-0ubuntu0.12.04.1                             MySQL database server binaries
ii  php5-mysqlnd                           5.3.10-1ubuntu3.8                                   MySQL module for php5 (Native Driver)

Results may vary based on dependencies.

Checking the MySQL error log (as it’s the right good practice to always do)

$ sudo tail -50 /var/log/mysql/error.log
150402 16:02:49 [Note] Plugin 'FEDERATED' is disabled.
150402 16:02:49 InnoDB: The InnoDB memory heap is disabled
150402 16:02:49 InnoDB: Mutexes and rw_locks use GCC atomic builtins
150402 16:02:49 InnoDB: Compressed tables use zlib 1.2.3.4
150402 16:02:49 InnoDB: Initializing buffer pool, size = 1.0G
150402 16:02:49 InnoDB: Completed initialization of buffer pool
150402 16:02:49 InnoDB: highest supported file format is Barracuda.
150402 16:02:49  InnoDB: Waiting for the background threads to start
150402 16:02:50 InnoDB: 5.5.31 started; log sequence number 20079278867
150402 16:02:50 [Note] Server hostname (bind-address): '127.0.0.1'; port: 3306
150402 16:02:50 [Note]   - '127.0.0.1' resolves to '127.0.0.1';
150402 16:02:50 [Note] Server socket created on IP: '127.0.0.1'.
150402 16:02:50 [Note] Event Scheduler: Loaded 0 events
150402 16:02:50 [Note] /usr/sbin/mysqld: ready for connections.
Version: '5.5.31-0ubuntu0.12.04.1'  socket: '/var/run/mysqld/mysqld.sock'  port: 3306  (Ubuntu)

A check shows that this is not the most current version available of 5.5 using the Ubuntu packages.

$ apt-cache show mysql-server-5.5
Package: mysql-server-5.5
Priority: optional
Section: database
Installed-Size: 31947
Maintainer: Ubuntu Developers 
Original-Maintainer: Debian MySQL Maintainers 
Architecture: amd64
Source: mysql-5.5
Version: 5.5.41-0ubuntu0.12.04.1
...

Package: mysql-server-5.5
Status: install ok installed
Priority: optional
Section: database
Installed-Size: 31950
Maintainer: Ubuntu Developers 
Architecture: amd64
Source: mysql-5.5
Version: 5.5.31-0ubuntu0.12.04.1
...

Just to be consistent with keeping current versions, you may choose to update MySQL 5.5 to the current available version.

$ sudo apt-get install mysql-server-5.5
...

Installing Oracle APT Packaging

The recommended documented way to move to using the Oracle repo is:

cd /tmp
# See https://dev.mysql.com/downloads/repo/apt/ for your right distro version
wget https://dev.mysql.com/get/mysql-apt-config_0.3.3-2ubuntu12.04_all.deb
sudo dpkg -i mysql-apt-config*.deb

This unfortunately uses a cursors based interface which is not something you automate for production systems and not the approach I would suggest.

So doing what this does

echo "deb http://repo.mysql.com/apt/ubuntu/ precise mysql-apt-config
deb http://repo.mysql.com/apt/ubuntu/ precise mysql-5.6" | sudo tee /etc/apt/sources.list.d/mysql.list
curl -s http://ronaldbradford.com/mysql/mysql.gpg | sudo apt-key add -
sudo apt-get update

Now we can look at available versions.


$ apt-cache search mysql-server
mysql-server-5.5 - MySQL database server binaries and system database setup
mysql-server-core-5.5 - MySQL database server binaries
auth2db - Powerful and eye-candy IDS logger, log viewer and alert generator
cacti - Frontend to rrdtool for monitoring systems and services
torrentflux - web based, feature-rich BitTorrent download manager
mysql-community-server - MySQL Server
mysql-server - MySQL Server meta package depending on latest version

This is where life gets a little confusing. Because Ubuntu supported MySQL 5.1 (as mysql-server) and MySQL 5.5 (as mysql-server-5.5) it can be misleading.

$ apt-cache show mysql-server
Package: mysql-server
Source: mysql-community
Version: 5.6.23-1ubuntu12.04
Architecture: amd64
Maintainer: MySQL Release Engineering 
Installed-Size: 46
Depends: mysql-community-server (= 5.6.23-1ubuntu12.04)
Homepage: http://www.mysql.com/
Priority: optional
Section: database
Filename: pool/mysql-5.6/m/mysql-community/mysql-server_5.6.23-1ubuntu12.04_amd64.deb
Size: 11644
SHA256: 1cb166cd230d2a4daca761ea80f2f34ee1fc0c92aaae972c914d81746f235d63
SHA1: 63548c852d5faeda751fbf038c0799fbbeac9905
MD5sum: da2f709a29a7cac97c834e6e69929891
Description: MySQL Server meta package depending on latest version
 The MySQL(TM) software delivers a very fast, multi-threaded, multi-user,
 and robust SQL (Structured Query Language) database server. MySQL Server
 is intended for mission-critical, heavy-load production systems as well
 as for embedding into mass-deployed software. MySQL is a trademark of
 Oracle. This is a meta package that depends on the latest mysql server
 package available in the repository.

Package: mysql-server
Priority: optional
Section: database
Installed-Size: 114
Maintainer: Ubuntu Developers 
Original-Maintainer: Debian MySQL Maintainers 
Architecture: all
Source: mysql-5.5
Version: 5.5.41-0ubuntu0.12.04.1
...

We are looking to ensure the Maintainer is the Official Release.

Upgrading to MySQL 5.6

sudo service mysql stop
ps -ef | grep mysql
sudo apt-get install -y mysql-server
$ sudo apt-get install -y mysql-server
...
The following extra packages will be installed:
  mysql-client mysql-common mysql-community-client mysql-community-server
The following packages will be REMOVED:
  mysql-client-5.5 mysql-client-core-5.5 mysql-server-5.5 mysql-server-core-5.5
The following NEW packages will be installed:
  mysql-client mysql-community-client mysql-community-server mysql-server
The following packages will be upgraded:
  mysql-common
...
Configuration file `/etc/mysql/my.cnf'
 ==> Modified (by you or by a script) since installation.
 ==> Package distributor has shipped an updated version.
   What would you like to do about it ?  Your options are:
    Y or I  : install the package maintainer's version
    N or O  : keep your currently-installed version
      D     : show the differences between the versions
      Z     : start a shell to examine the situation
 The default action is to keep your current version.
*** my.cnf (Y/I/N/O/D/Z) [default=N] ? N
...
Installing new version of config file /etc/apparmor.d/usr.sbin.mysqld ...
2015-04-02 16:53:07 0 [Warning] Using unique option prefix key_buffer instead of key_buffer_size is deprecated and will be removed in a future release. Please use the full name instead.
2015-04-02 16:53:07 0 [Warning] TIMESTAMP with implicit DEFAULT value is deprecated. Please use --explicit_defaults_for_timestamp server option (see documentation for more details).
150402 16:53:14 mysqld_safe Can't log to error log and syslog at the same time.  Remove all --log-error configuration options for --syslog to take effect
...

You may think the process is completed, but it is not. Always, Always check the error log. Have you checked your MySQL error log today?

$ sudo tail -300 /var/log/mysql/error.log
...
2015-04-02 16:53:14 20429 [Warning] Buffered warning: Changed limits: table_cache: 431 (requested 2000)

2015-04-02 16:53:14 20429 [Warning] Using unique option prefix myisam-recover instead of myisam-recover-options is deprecated and will be removed in a future release. Please use the full name instead.
2015-04-02 16:53:14 20429 [Note] Plugin 'FEDERATED' is disabled.
2015-04-02 16:53:14 20429 [Note] InnoDB: Using atomics to ref count buffer pool pages
2015-04-02 16:53:14 20429 [Note] InnoDB: The InnoDB memory heap is disabled
2015-04-02 16:53:14 20429 [Note] InnoDB: Mutexes and rw_locks use GCC atomic builtins
2015-04-02 16:53:14 20429 [Note] InnoDB: Memory barrier is not used
2015-04-02 16:53:14 20429 [Note] InnoDB: Compressed tables use zlib 1.2.3.4
2015-04-02 16:53:14 20429 [Note] InnoDB: Using Linux native AIO
2015-04-02 16:53:14 20429 [Note] InnoDB: Not using CPU crc32 instructions
2015-04-02 16:53:14 20429 [Note] InnoDB: Initializing buffer pool, size = 1.0G
2015-04-02 16:53:15 20429 [Note] InnoDB: Completed initialization of buffer pool
2015-04-02 16:53:15 20429 [Note] InnoDB: Highest supported file format is Barracuda.
2015-04-02 16:53:15 20429 [Note] InnoDB: 128 rollback segment(s) are active.
2015-04-02 16:53:15 20429 [Note] InnoDB: Waiting for purge to start
2015-04-02 16:53:15 20429 [Note] InnoDB: 5.6.23 started; log sequence number 20079286519
2015-04-02 16:53:15 20429 [Warning] No existing UUID has been found, so we assume that this is the first time that this server has been started. Generating a new UUID: 487fda28-d97a-11e4-9254-e0cb4e3feb73.
2015-04-02 16:53:15 20429 [Note] Server hostname (bind-address): '127.0.0.1'; port: 3306
2015-04-02 16:53:15 20429 [Note]   - '127.0.0.1' resolves to '127.0.0.1';
2015-04-02 16:53:15 20429 [Note] Server socket created on IP: '127.0.0.1'.
2015-04-02 16:53:15 20429 [ERROR] Column count of mysql.events_waits_current is wrong. Expected 19, found 16. Created with MySQL 50541, now running 50623. Please use mysql_upgrade to fix this error.
2015-04-02 16:53:15 20429 [ERROR] Column count of mysql.events_waits_history is wrong. Expected 19, found 16. Created with MySQL 50541, now running 50623. Please use mysql_upgrade to fix this error.
2015-04-02 16:53:15 20429 [ERROR] Column count of mysql.events_waits_history_long is wrong. Expected 19, found 16. Created with MySQL 50541, now running 50623. Please use mysql_upgrade to fix this error.
2015-04-02 16:53:15 20429 [ERROR] Native table 'performance_schema'.'events_waits_summary_by_host_by_event_name' has the wrong structure
2015-04-02 16:53:15 20429 [ERROR] Incorrect definition of table performance_schema.events_waits_summary_by_thread_by_event_name: expected column 'THREAD_ID' at position 0 to have type bigint(20), found type int(11).
2015-04-02 16:53:15 20429 [ERROR] Native table 'performance_schema'.'events_waits_summary_by_user_by_event_name' has the wrong structure
2015-04-02 16:53:15 20429 [ERROR] Native table 'performance_schema'.'events_waits_summary_by_account_by_event_name' has the wrong structure
2015-04-02 16:53:15 20429 [ERROR] Column count of mysql.file_summary_by_event_name is wrong. Expected 23, found 5. Created with MySQL 50541, now running 50623. Please use mysql_upgrade to fix this error.
2015-04-02 16:53:15 20429 [ERROR] Column count of mysql.file_summary_by_instance is wrong. Expected 25, found 6. Created with MySQL 50541, now running 50623. Please use mysql_upgrade to fix this error.
2015-04-02 16:53:15 20429 [ERROR] Native table 'performance_schema'.'host_cache' has the wrong structure
2015-04-02 16:53:15 20429 [ERROR] Incorrect definition of table performance_schema.mutex_instances: expected column 'LOCKED_BY_THREAD_ID' at position 2 to have type bigint(20), found type int(11).
2015-04-02 16:53:15 20429 [ERROR] Native table 'performance_schema'.'objects_summary_global_by_type' has the wrong structure
2015-04-02 16:53:15 20429 [ERROR] Incorrect definition of table performance_schema.rwlock_instances: expected column 'WRITE_LOCKED_BY_THREAD_ID' at position 2 to have type bigint(20), found type int(11).
2015-04-02 16:53:15 20429 [ERROR] Native table 'performance_schema'.'setup_actors' has the wrong structure
2015-04-02 16:53:15 20429 [ERROR] Native table 'performance_schema'.'setup_objects' has the wrong structure
2015-04-02 16:53:15 20429 [ERROR] Native table 'performance_schema'.'table_io_waits_summary_by_index_usage' has the wrong structure
2015-04-02 16:53:15 20429 [ERROR] Native table 'performance_schema'.'table_io_waits_summary_by_table' has the wrong structure
2015-04-02 16:53:15 20429 [ERROR] Native table 'performance_schema'.'table_lock_waits_summary_by_table' has the wrong structure
2015-04-02 16:53:15 20429 [ERROR] Column count of mysql.threads is wrong. Expected 14, found 3. Created with MySQL 50541, now running 50623. Please use mysql_upgrade to fix this error.
2015-04-02 16:53:15 20429 [ERROR] Native table 'performance_schema'.'events_stages_current' has the wrong structure
2015-04-02 16:53:15 20429 [ERROR] Native table 'performance_schema'.'events_stages_history' has the wrong structure
2015-04-02 16:53:15 20429 [ERROR] Native table 'performance_schema'.'events_stages_history_long' has the wrong structure
...

Completing the MySQL 5.6 Upgrade

A MySQL upgrade of the meta schema is necessary.

$ sudo mysql_upgrade -uroot -p
Enter password:
Looking for 'mysql' as: mysql
Looking for 'mysqlcheck' as: mysqlcheck
Running 'mysqlcheck' with connection arguments: '--port=3306' '--socket=/var/run/mysqld/mysqld.sock'
Warning: Using a password on the command line interface can be insecure.
Running 'mysqlcheck' with connection arguments: '--port=3306' '--socket=/var/run/mysqld/mysqld.sock'
Warning: Using a password on the command line interface can be insecure.
mysql.columns_priv                                 OK
mysql.db                                           OK
mysql.event                                        OK
mysql.func                                         OK
mysql.general_log                                  OK
mysql.help_category                                OK
mysql.help_keyword                                 OK
mysql.help_relation                                OK
mysql.help_topic                                   OK
mysql.host                                         OK
mysql.ndb_binlog_index                             OK
mysql.plugin                                       OK
mysql.proc                                         OK
mysql.procs_priv                                   OK
mysql.proxies_priv                                 OK
mysql.servers                                      OK
mysql.slow_log                                     OK
mysql.tables_priv                                  OK
mysql.time_zone                                    OK
mysql.time_zone_leap_second                        OK
mysql.time_zone_name                               OK
mysql.time_zone_transition                         OK
mysql.time_zone_transition_type                    OK
mysql.user                                         OK
Running 'mysql_fix_privilege_tables'...
Warning: Using a password on the command line interface can be insecure.
Running 'mysqlcheck' with connection arguments: '--port=3306' '--socket=/var/run/mysqld/mysqld.sock'
Warning: Using a password on the command line interface can be insecure.
Running 'mysqlcheck' with connection arguments: '--port=3306' '--socket=/var/run/mysqld/mysqld.sock'
Warning: Using a password on the command line interface can be insecure.
...
OK
$ sudo service mysql restart
 * Stopping MySQL Community Server 5.6.23
....
 * MySQL Community Server 5.6.23 is stopped
 * Re-starting MySQL Community Server 5.6.23
150402 17:06:17 mysqld_safe Can't log to error log and syslog at the same time.  Remove all --log-error configuration options for --syslog to take effect.
......
 * MySQL Community Server 5.6.23 is started
$ sudo tail -300 /var/log/mysql/error.log
...
2015-04-02 17:06:15 20429 [Note] /usr/sbin/mysqld: Shutdown complete

150402 17:06:15 mysqld_safe mysqld from pid file /var/run/mysqld/mysqld.pid ended
150402 17:06:17 mysqld_safe Starting mysqld daemon with databases from /var/lib/mysql
2015-04-02 17:06:17 0 [Warning] Using unique option prefix key_buffer instead of key_buffer_size is deprecated and will be removed in a future release. Please use the full name instead.
2015-04-02 17:06:17 0 [Warning] TIMESTAMP with implicit DEFAULT value is deprecated. Please use --explicit_defaults_for_timestamp server option (see documentation for more details).
2015-04-02 17:06:17 20994 [Warning] Buffered warning: Changed limits: max_open_files: 1024 (requested 5000)

2015-04-02 17:06:17 20994 [Warning] Buffered warning: Changed limits: table_cache: 431 (requested 2000)

2015-04-02 17:06:17 20994 [Warning] Using unique option prefix myisam-recover instead of myisam-recover-options is deprecated and will be removed in a future release. Please use the full name instead.
2015-04-02 17:06:17 20994 [Note] Plugin 'FEDERATED' is disabled.
2015-04-02 17:06:17 20994 [Note] InnoDB: Using atomics to ref count buffer pool pages
2015-04-02 17:06:17 20994 [Note] InnoDB: The InnoDB memory heap is disabled
2015-04-02 17:06:17 20994 [Note] InnoDB: Mutexes and rw_locks use GCC atomic builtins
2015-04-02 17:06:17 20994 [Note] InnoDB: Memory barrier is not used
2015-04-02 17:06:17 20994 [Note] InnoDB: Compressed tables use zlib 1.2.3.4
2015-04-02 17:06:17 20994 [Note] InnoDB: Using Linux native AIO
2015-04-02 17:06:17 20994 [Note] InnoDB: Not using CPU crc32 instructions
2015-04-02 17:06:17 20994 [Note] InnoDB: Initializing buffer pool, size = 1.0G
2015-04-02 17:06:17 20994 [Note] InnoDB: Completed initialization of buffer pool
2015-04-02 17:06:17 20994 [Note] InnoDB: Highest supported file format is Barracuda.
2015-04-02 17:06:17 20994 [Note] InnoDB: 128 rollback segment(s) are active.
2015-04-02 17:06:17 20994 [Note] InnoDB: Waiting for purge to start
2015-04-02 17:06:17 20994 [Note] InnoDB: 5.6.23 started; log sequence number 20081020877
2015-04-02 17:06:17 20994 [Note] Server hostname (bind-address): '127.0.0.1'; port: 3306
2015-04-02 17:06:17 20994 [Note]   - '127.0.0.1' resolves to '127.0.0.1';
2015-04-02 17:06:17 20994 [Note] Server socket created on IP: '127.0.0.1'.
2015-04-02 17:06:17 20994 [Note] Event Scheduler: Loaded 0 events
2015-04-02 17:06:17 20994 [Note] /usr/sbin/mysqld: ready for connections.
Version: '5.6.23'  socket: '/var/run/mysqld/mysqld.sock'  port: 3306  MySQL Community Server (GPL)

Correcting errors

As you can see there are several warnings/errors when starting MySQL.

The first is

 mysqld_safe Can't log to error log and syslog at the same time.  Remove all --log-error configuration options for --syslog to take effect.

We solve this with

$ sudo rm -f /etc/mysql/conf.d/mysqld_safe_syslog.cnf
$ sudo service mysql restart
 * Stopping MySQL Community Server 5.6.23
....
 * MySQL Community Server 5.6.23 is stopped
 * Re-starting MySQL Community Server 5.6.23
......
 * MySQL Community Server 5.6.23 is started

This is an Ubuntu default that conflicts with the my.cnf log_error were are familiar with in monitoring the MySQL error log. You can read my opinion on this in The correct approach to rolling MySQL logs

The second is

2015-04-02 17:06:17 0 [Warning] Using unique option prefix key_buffer instead of key_buffer_size is deprecated and will be removed in a future release. Please use the full name instead.

We solve this with

sudo sed -ie "s/^key_buffer[^_]/key_buffer_size/" /etc/mysql/my.cnf

Next

2015-04-02 17:18:06 22123 [Warning] Using unique option prefix myisam-recover instead of myisam-recover-options is deprecated and will be removed in a future release. Please use the full name instead.

We solve this with

sudo sed -ie "s/^myisam-recover[^-]/myisam-recover-options/" /etc/mysql/my.cnf

The warnings are interesting, and will part of the following post on MySQL 5.6 configuration changes discussed in the next point.

2015-04-02 17:22:08 22626 [Warning] Buffered warning: Changed limits: max_open_files: 1024 (requested 5000)
2015-04-02 17:22:08 22626 [Warning] Buffered warning: Changed limits: table_cache: 431 (requested 2000)

Leveraging MySQL 5.6 benefits

We may now have a MySQL 5.6 installation however we are far from utilizing the benefits of MySQL 5.6 fully. In a subsequent post I will talk about the configuration options we need to now consider, both new options such as innodb_purge_threads and important improvements such as sync_binlog. There are far greater complex changes including innodb_file_per_table, master_info_repository and relay_log_info_repository and then changes in defaults such as performance_schema

Validating MySQL version numbers

As part of a MySQL 5.5 to MySQL 5.6 upgrade across several Ubuntu servers of varying distros an audit highlighted a trivial but interesting versioning identification error in Ubuntu’s packaging of MySQL.

Ubuntu 12.04 LTS

$ sudo dpkg -l | grep mysql-server-5.5
ii  mysql-server-5.5   5.5.41-0ubuntu0.12.04.1  ...
$ mysql -uroot -p -e "SELECT VERSION()"
+-------------------------+
| VERSION()               |
+-------------------------+
| 5.5.41-0ubuntu0.12.04.1 |
+-------------------------+

But when you look at the mysql --version it does NOT say 5.5.41.

$ mysql --version
mysql  Ver 14.14 Distrib 5.5.34, for debian-linux-gnu (x86_64) using readline 6.2

Ubuntu 14.04 LTS

On 14.04 I get expected results.

$ sudo dpkg -l | grep mysql-server-5.5
ii  mysql-server-5.5       5.5.41-0ubuntu0.14.04.1   ...
rbradfor@rubble:~$ mysql -uroot -p -e "SELECT VERSION()"
+-------------------------+
| VERSION()               |
+-------------------------+
| 5.5.41-0ubuntu0.14.04.1 |
+-------------------------+
$ mysql --version
mysql  Ver 14.14 Distrib 5.5.41, for debian-linux-gnu (x86_64) using readline 6.3

Dynamic recreation of InnoDB redo logs

MySQL 5.6 will now automatically recreate the InnoDB redo log files during a MySQL restart if the size (or number) of these logs changes, i.e. a change to innodb_log_file_size. See Changing the Number or Size of InnoDB Log Files which states “If InnoDB detects that the innodb_log_file_size differs from the redo log file size, it will write a log checkpoint, close and remove the old log files, create new log files at the requested size, and open the new log files.”

Before MySQL 5.6 it was necessary to stop MySQL and remove the InnoDB log files manually before restarting MySQL.

The error log shows:

tail -f /mysql/log/error.log
...
2015-03-28 21:51:25 3767 [Warning] InnoDB: Resizing redo log from 2*3072 to 2*65536 pages, LSN=1626017
2015-03-28 21:51:25 3767 [Warning] InnoDB: Starting to delete and rewrite log files.
2015-03-28 21:51:25 3767 [Note] InnoDB: Setting log file ./ib_logfile101 size to 1024 MB
InnoDB: Progress in MB: 100 200 300 400 500 600 700 800 900 1000
2015-03-28 21:51:28 3767 [Note] InnoDB: Setting log file ./ib_logfile1 size to 1024 MB
InnoDB: Progress in MB: 100 200 300 400 500 600 700 800 900 1000
2015-03-28 21:51:31 3767 [Note] InnoDB: Renaming log file ./ib_logfile101 to ./ib_logfile0
2015-03-28 21:51:31 3767 [Warning] InnoDB: New log files created, LSN=1626017
...

It was however odd that MySQL had indicated it had successfully started but the underlying Redo log files were not complete and in-place as seen by the following directory listings.

$ sudo service mysql start
......
 * MySQL Community Server 5.6.23 is started
$
$ ls -lh /var/lib/mysql/
total 1.9G
-rw-rw---- 1 mysql mysql   56 Mar 28 19:42 auto.cnf
-rw-rw---- 1 mysql mysql  12M Mar 28 21:51 ibdata1
-rw-rw---- 1 mysql mysql 902M Mar 28 21:51 ib_logfile1
-rw-rw---- 1 mysql mysql 1.0G Mar 28 21:51 ib_logfile101
drwxr-x--- 2 mysql mysql 4.0K Mar 28 19:42 mysql
drwx------ 2 mysql mysql 4.0K Mar 28 19:42 performance_schema
$ ls -lh /var/lib/mysql/
total 2.1G
-rw-rw---- 1 mysql mysql   56 Mar 28 19:42 auto.cnf
-rw-rw---- 1 mysql mysql  12M Mar 28 21:51 ibdata1
    -rw-rw---- 1 mysql mysql 1.0G Mar 28 21:51 ib_logfile0 -rw-rw---- 1 mysql mysql 1.0G Mar 28 21:51 ib_logfile1 drwxr-x--- 2 mysql mysql 4.0K Mar 28 19:42 mysql drwx------ 2 mysql mysql 4.0K Mar 28 19:42 performance_schema