Announcing InstanceHunt

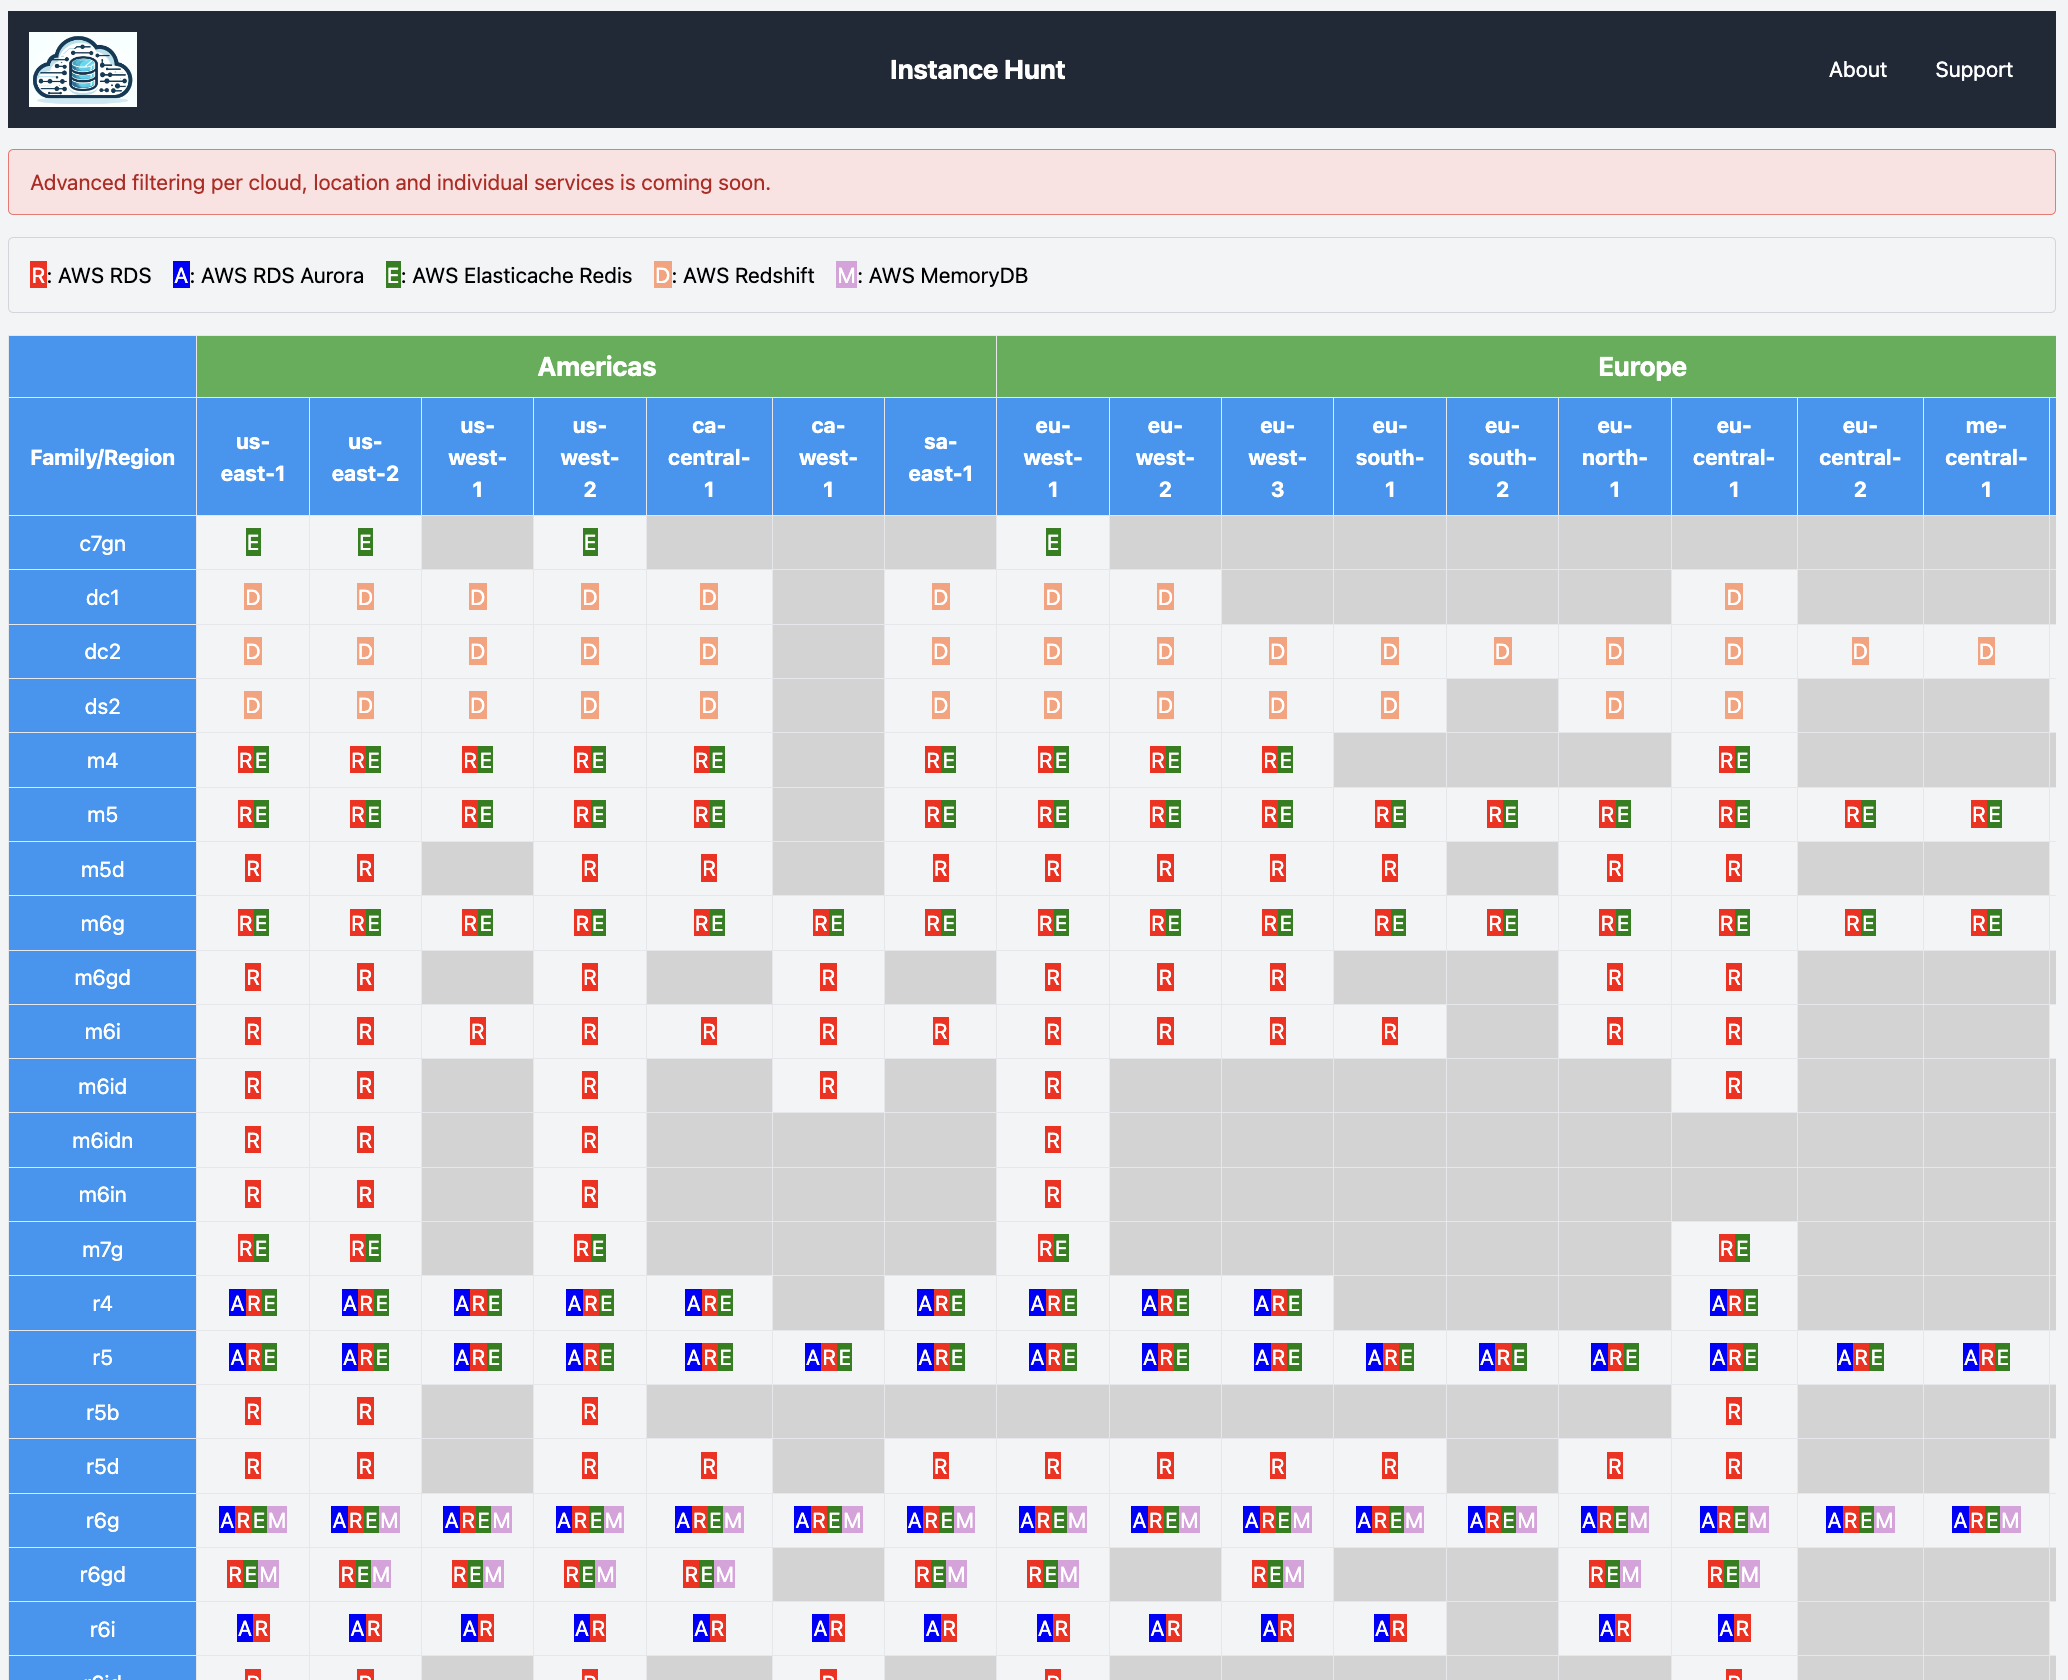
InstanceHunt identifies the instance (families/types/classes) available for a cloud service across all the regions of that cloud.

The initial version is a working example of several AWS database services. Future releases will enable advanced filtering and will cover other service categories (e.g. compute) as well as GCP and Azure cloud platforms, as well as providing the full list of instance types within families within the service matrix.

For a few days investment this MVP is a usable service, complete with adding new regions the same day, for example ca-central-1 data was available the day of release. It is interesting and can answer questions like what regions the new generation 7 instance families are available? What consistent instance types can use use across Europe regions? Where is MemoryDB not available?

Feature requests are welcome. From today’s reading, being able to show a feature of a service may be also a useful future matrix, e.g. AWS Aurora Serverless Data API now available in Serverless v2, but only one of two engines and only in a few regions.

China regions and AWS Gov Cloud regions are coming soon.

InstanceHunt - Find what instances you can use for your cloud services

AWS RDS Aurora wish list

I’ve had this list on a post-it note on my monitor for all of 2022. I figured it was time to write it down, and reuse the space.

In summary, AWS suffers from the same problem that almost every other product does. It sacrifices improved security for backward compatibility of functionality. IMO this is not in the best practices of a data ecosystem that is under constant attack.

  • Storage should be encrypted by default. When you launch an RDS cluster its storage is not encrypted. This goes against their own AWS Well-Architected Framework Section 2 – Security.
  • Plain text passwords. To launch a cluster you must specify a password in plain text on the command line, again not security best practice. At least change this to using a known secret from AWS secrets manager.
  • TLS for administrative accounts should be the only option. The root user should only be REQUIRE SSL (MySQL syntax).
  • Expanding on the AWS secrets manager usage for passwords, there should not need to be lambda code and cloudwatch cron event for rotation, it should just be automatically built in.
  • The awscli has this neat wait command that will block until you can execute the next statement in a series of sequential events to prepare and launch a cluster, but it doesn’t work for create-db-cluster. You have to build in your own manual “wait” until “available” process.
  • In my last position, I was unable to enforce TLS communications to the database from the application. This insecure practice is a more touchy situation, however, there needs to be some way to ensure security best practices over application developer laziness in the future.
  • AWS has internal special flags that only AWS support can set when say you have a bug in a version. Call it a per-client feature flag. However, there is no visibility into what is set, which account, which cluster, etc. Transparency is of value so that the customer knows to get that special flag unset after minor upgrades.
  • When you launch a new RDS Cluster, for example, MySQL 2.x, you get the oldest version, back earlier in the year it was like 2.7.2, even when 2.10.1 was released. AWS should be using a default version when only an engine is specified as a more current version. I would advocate the latest version is not the automatic choice, but it’s better to be more current.
  • the ALTER SYSTEM CRASH functionality is great, but it’s incomplete. You cannot for example crash a global cluster, forcing a region-specific failover. If you have a disaster resiliency plan that is multi-region it’s impossible to actually test it. You can emulate a controlled failover, but this is a different use case to a real failover (aka Dec 2021)
  • Use arn when it’s required not id. This goes back to my earlier point over maximum compatibility over usability, but when a --db-instance-identifier, or --db-instance-identifier requires the value to be the ARN, then the parameter should be specific. IMO –identifier is what you use for that argument, e.g. --db-cluster-identifier. When you specify for example --replication-source-identifier this must be (as per docs) “The Amazon Resource Name (ARN) of the source DB instance or DB cluster if this DB cluster is created as a read replica.” It should then be --replication-source-arn. There are a number of different occurrences of this situation.

#WDILTW – RTFM, then RTFM again, then improve it

This week I learned two valuable aspects of Terraform I did not know.

The first is Terraform State Import. While I use terraform state to list and show state and even remove state, I was unaware you could import from a created AWS resource. It’s not actually an argument to the “terraform state” syntax, instead its “terraform import” and likely why I do not see it when I look at terraform state syntax.

% terraform state
Usage: terraform [global options] state  [options] [args]

  This command has subcommands for advanced state management.

  These subcommands can be used to slice and dice the Terraform state.
  This is sometimes necessary in advanced cases. For your safety, all
  state management commands that modify the state create a timestamped
  backup of the state prior to making modifications.

  The structure and output of the commands is specifically tailored to work
  well with the common Unix utilities such as grep, awk, etc. We recommend
  using those tools to perform more advanced state tasks.

Subcommands:
    list                List resources in the state
    mv                  Move an item in the state
    pull                Pull current state and output to stdout
    push                Update remote state from a local state file
    replace-provider    Replace provider in the state
    rm                  Remove instances from the state

I am not an expert in Terraform, and looking at the command help output shown above did not give me reference to look elsewhere, but just reading the manual can help you to learn a new feature. If you do not know a product, reading documentation and examples can be an ideal way to get started in a self-paced way.

The second is Meta-Arguments. I use lifecycle, and to be honest I have learned and forgotten about count. Count was something I was able to use to solve a very nasty cross-region kinesis stream issue, reminding me of a syntax I had since forgotten. Using coalesce and conditional expressions (aka ternary operator) can help in modules, for example.

resource "aws_rds_cluster" "demo" {
  ...
  global_cluster_identifier       = var.has_global_cluster ? local.global_cluster_identifier : ""
  master_username                 = var.has_global_cluster ? "" : var.master_username
  db_cluster_parameter_group_name = coalesce(var.db_cluster_parameter_group_name , local.db_cluster_parameter_group_name)
  ...      

However to stop the creation of the object completely, use count.

resource "aws_???" "demo_???" {
  count = var.filter_condition ? 1 : 0
  ...

And just when I thought I’d read about Meta-Arguments, I hit a new never before seen problem. Now if I’d read the summary resources page about Meta-Arguments, and looked the very next section I would have been able to likely solve this new error without having to RTFM a second time.

module.?.?.aws_rds_cluster.default: Still creating... [1h59m53s elapsed]

Error: Error waiting for RDS Cluster state to be "available": timeout while waiting for state to become 'available' (last state: 'creating', timeout: 2h0m0s)

on .terraform/modules/?/main.tf line 306, in resource "aws_rds_cluster" "default":

306: resource "aws_rds_cluster" "default" {

I did not know there was a 2 hour timeout, and I did not know you can change that with

timeouts {
    create = "4h"
    delete = "4h"
  }
}

On a number of occasions I have found documentation to not be complete or accurate online. If you find this, then submit a request to get it fixed, must sources include a link at the bottom to recommend improvements. I have had good success with submitting improvements to the AWS documentation.

Understanding AWS RDS Aurora Capabilities

The RDS Aurora MySQL/PostgreSQL capabilities of AWS extend the High Availability (HA) capabilities of RDS read replicas and Multi-AZ. In this presentation I discuss the different capabilities and HA configurations with RDS Aurora including:

  • RDS Aurora Cluster single instance
  • RDS Aurora Cluster multiple instances (writer + 1 or more readers)
  • RDS Aurora Cluster multi-master
  • RDS Aurora Global Cluster
  • RDS Aurora Cluster options for multi-regions

Each option has its relative merits and limitations. Each will depend on your business requirements, global needs and budget.

Upcoming Percona Live 2021 Presentations

I am pleased to have been selected to present at Percona Live 2021 May 12-13. My presentations include talks on AWS RDS Aurora and QLDB managed services.

Understanding AWS RDS Aurora Capabilities

The RDS Aurora MySQL/PostgreSQL capabilities of AWS extend the HA capabilities of RDS read replicas and Multi-AZ.

In this presentation we will discuss the different capabilities and HA configurations with RDS Aurora including:

* RDS Cluster single instance
* RDS Cluster multiple instances (writer + 1 or more readers)
* RDS Cluster multi-master
* RDS Global Cluster
* RDS Cluster options for multi-regions

Each option has its relative merits and limitations. Each will depend on your business requirements, global needs and budget.

This presentation will include setup, monitoring and failover evaluations for the attendee with the goal to provide a feature matrix of when/how to consider each option as well as provide some details of the subtle differences Aurora provides.

This presentation is not going to go into the technical details of RDS Aurora’s underlying infrastructure or a feature by feature comparison of AWS RDS to AWS RDS Aurora.

A QLDB Cheatsheet for MySQL Users

Amazons new ledger database (QLDB) is an auditors best friend and lives up to the stated description of “Amazon QLDB can be used to track each and every application data change and maintains a complete and verifiable history of changes over time.”

This presentation will go over what was done to take a MySQL application that provided auditing activity changes for key data, and how it is being migrated to QLDB.

While QLDB does use a SQL-format for DML, and you can perform the traditional INSERT/UPDATE/DELETE/SELECT. The ability to extend these statements to manipulate Amazon Ion data (a superset of JSON) gives you improved data manipulation, and for example the FROM SQL statement.

Get a blow by blow comparison of MySQL structures (multiple tables and lots of columns) and SQL converted into a single QLDB table, with immutable, and cryptographically verifiable transaction log. No more triggers, duplicated tables, extra auditing for abuse of binary log activity.

We also cover the simplicity of using X Protocol and JSON output for data migration, and the complexity of AWS RDS not supporting X Protocol

#WDILTW – Creating examples can be hard

This week I was evaluating AWS QLDB. Specifically the verifiable history of changes to determine how to simplify present processes that perform auditing via CDC. This is not the first time I have looked at QLDB so there was nothing that new to learn.

What I found was that creating a workable solution with an existing application is hard. Even harder is creating an example to publish in this blog (and the purpose of this post).

First some background.

Using MySQL as the source of information, how can you leverage QLDB? It’s easy to stream data from MySQL Aurora, and it’s easy to stream data from QLDB, but it not that easy to place real-time data into QLDB. AWS DMS is a good way to move data from a source to a target, previously my work has included MySQL to MySQL, MySQL to Redshift, and MySQL to Kinesis, however there is no QLDB target.

Turning the problem upside down, and using QLDB as the source of information, and streaming to MySQL for compatibility seemed a way forward.

After setting up the QLDB Ledger and an example table, it was time to populate with existing data. The documented reference example looked very JSON compatible. Side bar, it is actually Amazon Ion a superset of JSON.

INSERT INTO Person
<< {
    'FirstName' : 'Raul',
    'LastName' : 'Lewis',
    'DOB' : `1963-08-19T`,
    'GovId' : 'LEWISR261LL',
    'GovIdType' : 'Driver License',
    'Address' : '1719 University Street, Seattle, WA, 98109'
},
{
    'FirstName' : 'Brent',
    'LastName' : 'Logan',
    'DOB' : `1967-07-03T`,
    'GovId' : 'LOGANB486CG',
    'GovIdType' : 'Driver License',
    'Address' : '43 Stockert Hollow Road, Everett, WA, 98203'
}

Now, MySQL offers with the X Protocol. This is something that lefred has evangelized for many years, I have seen presented many times, but finally I had a chance to use. The MySQL Shell JSON output looked ideal.

{
    "ID": 1523,
    "Name": "Wien",
    "CountryCode": "AUT",
    "District": "Wien",
    "Info": {
        "Population": 1608144
    }
}
{
    "ID": 1524,
    "Name": "Graz",
    "CountryCode": "AUT",
    "District": "Steiermark",
    "Info": {
        "Population": 240967
    }
}

And now, onto some of the things I learned this week.
Using AWS RDS Aurora MySQL is the first stumbling block, X Protocol is not supported. As this was a example, simple, mysqldump some reference data and load it into a MySQL 8 instance, and extract into JSON, so as to potentially emulate a pipeline.

Here is my experiences of trying to refactor into a demo to write up.

Launch a MySQL Docker container as per my standard notes. Harmless, right?

MYSQL_ROOT_PASSWORD="$(date | md5sum | cut -c1-20)#"
echo $MYSQL_ROOT_PASSWORD
docker run --name=qldb-mysql -p3306:3306 -v mysql-volume:/var/lib/mysql -e MYSQL_ROOT_PASSWORD=$MYSQL_ROOT_PASSWORD -d mysql/mysql-server:latest
docker logs qldb-mysql
docker exec -it qldb-mysql /bin/bash

As it's a quick demo, I shortcut credentials to make using the mysql client easier. NOTE: as I always generate a new password each container, it's included here.

# echo "[mysql]
user=root
password='ab6ea7b0436cbc0c0d49#' > .my.cnf

# mysql 
ERROR 1045 (28000): Access denied for user 'root'@'localhost' (using password: NO)

What the? Did I make a mistake, I test manually and check

# mysql -u root -p

# cat .my.cnf

Nothing wrong there. Next check

# pwd
/
bash-4.2# grep root /etc/passwd
root:x:0:0:root:/root:/bin/bash
operator:x:11:0:operator:/root:/sbin/nologin

And there is the first Dockerism. I don't live in Docker, so these 101 learnings would be known. First I really thing using "root" by default is a horrible idea. And when you shell in, you are not dropped into the home directory? Solved, we move on.

# mv /.my.cnf /root/.my.cnf

Mock and example as quickly as I can think.

# mysql

mysql> create schema if not exists demo;
Query OK, 1 row affected (0.00 sec)

mysql> use demo;
Database changed
mysql> create table sample(id int unsigned not null auto_increment, name varchar(30) not null, location varchar(30) not null, domain varchar(50) null, primary key(id));
Query OK, 0 rows affected (0.03 sec)
mysql> show create table sample;

mysql> insert into sample values (null,'Demo Row','USA',null), (null,'Row 2','AUS','news.com.au'), (null,'Kiwi','NZ', null);
Query OK, 3 rows affected (0.00 sec)
Records: 3  Duplicates: 0  Warnings: 0

mysql> select * from sample;
+----+----------+----------+-------------+
| id | name     | location | domain      |
+----+----------+----------+-------------+
|  1 | Demo Row | USA      | NULL        |
|  2 | Row 2    | AUS      | news.com.au |
|  3 | Kiwi     | NZ       | NULL        |
+----+----------+----------+-------------+
3 rows in set (0.00 sec)

Cool, now to look at it in Javascript using MySQL Shell. Hurdle 2.

# mysqlsh
MySQL Shell 8.0.22

Copyright (c) 2016, 2020, Oracle and/or its affiliates.
Oracle is a registered trademark of Oracle Corporation and/or its affiliates.
Other names may be trademarks of their respective owners.

 MySQL  JS > var session=mysqlx.getSession('root:ab6ea7b0436cbc0c0d49#@localhost')
mysqlx.getSession: Argument #1: Invalid URI: Illegal character [#] found at position 25 (ArgumentError)


What the, it doesn't like the password format. I'm not a Javascript person, and well this is an example for blogging, which is not what was actually setup, so do it the right way, create a user.

# mysql

mysql> create user demo@localhost identified by 'qldb';
Query OK, 0 rows affected (0.01 sec)

mysql> grant ALL ON sample.* to demo@localhost;
Query OK, 0 rows affected, 1 warning (0.01 sec)

mysql> SHOW GRANTS FOR demo@localhost;
+----------------------------------------------------------+
| Grants for demo@localhost                                |
+----------------------------------------------------------+
| GRANT USAGE ON *.* TO `demo`@`localhost`                 |
| GRANT ALL PRIVILEGES ON `sample`.* TO `demo`@`localhost` |
+----------------------------------------------------------+
2 rows in set (0.00 sec)

Back into the MySQL Shell, and hurdle 3.

MySQL  JS > var session=mysqlx.getSession('demo:qldb@localhost')
mysqlx.getSession: Access denied for user 'demo'@'127.0.0.1' (using password: YES) (MySQL Error 1045)

Did I create the creds wrong, verify. No my password is correct.

#  mysql -udemo -pqldb -e "SELECT NOW()"
mysql: [Warning] Using a password on the command line interface can be insecure.
+---------------------+
| NOW()               |
+---------------------+
| 2021-03-06 23:15:26 |
+---------------------+

I don't have time to debug this, User take 2.

mysql> drop user demo@localhost;
Query OK, 0 rows affected (0.00 sec)

mysql> create user demo@'%' identified by 'qldb';
Query OK, 0 rows affected (0.01 sec)

mysql> grant all on demo.* to demo@'%'
    -> ;
Query OK, 0 rows affected (0.00 sec)

mysql> show grants;
+--
| Grants for root@localhost                                                                                                                                                                                                                                                                                                                                                                                                                                                                                                                                                                                                   |
+---
| GRANT SELECT, INSERT, UPDATE, DELETE, CREATE, DROP, RELOAD, SHUTDOWN, PROCESS, FILE, REFERENCES, INDEX, ALTER, SHOW DATABASES, SUPER, CREATE TEMPORARY TABLES, LOCK TABLES, EXECUTE, REPLICATION SLAVE, REPLICATION CLIENT, CREATE VIEW, SHOW VIEW, CREATE ROUTINE, ALTER ROUTINE, CREATE USER, EVENT, TRIGGER, CREATE TABLESPACE, CREATE ROLE, DROP ROLE ON *.* TO `root`@`localhost` WITH GRANT OPTION                                                                                                                                                                                                                    |
| GRANT APPLICATION_PASSWORD_ADMIN,AUDIT_ADMIN,BACKUP_ADMIN,BINLOG_ADMIN,BINLOG_ENCRYPTION_ADMIN,CLONE_ADMIN,CONNECTION_ADMIN,ENCRYPTION_KEY_ADMIN,FLUSH_OPTIMIZER_COSTS,FLUSH_STATUS,FLUSH_TABLES,FLUSH_USER_RESOURCES,GROUP_REPLICATION_ADMIN,INNODB_REDO_LOG_ARCHIVE,INNODB_REDO_LOG_ENABLE,PERSIST_RO_VARIABLES_ADMIN,REPLICATION_APPLIER,REPLICATION_SLAVE_ADMIN,RESOURCE_GROUP_ADMIN,RESOURCE_GROUP_USER,ROLE_ADMIN,SERVICE_CONNECTION_ADMIN,SESSION_VARIABLES_ADMIN,SET_USER_ID,SHOW_ROUTINE,SYSTEM_USER,SYSTEM_VARIABLES_ADMIN,TABLE_ENCRYPTION_ADMIN,XA_RECOVER_ADMIN ON *.* TO `root`@`localhost` WITH GRANT OPTION |
| GRANT PROXY ON ''@'' TO 'root'@'localhost' WITH GRANT OPTION                                                                                                                                                                                                                                                                                                                                                                                                                                                                                                                                                                |
+---
3 rows in set (0.00 sec)

mysql> show grants for demo@'%';
+--------------------------------------------------+
| Grants for demo@%                                |
+--------------------------------------------------+
| GRANT USAGE ON *.* TO `demo`@`%`                 |
| GRANT ALL PRIVILEGES ON `demo`.* TO `demo`@`%`   |
+--------------------------------------------------+
2 rows in set (0.00 sec)

Right, initially I showed grants of not new user, but note to self, I should checkout the MySQL 8 Improved grants. I wonder how RDS MySQL 8 handles these, and how Aurora MySQL 8 will (when it ever drops, that's another story).

Third try is a charm, so nice to also see queries with 0.0000 execution granularity.

 MySQL  JS > var session=mysqlx.getSession('demo:qldb@localhost')
 MySQL  JS > var sql='SELECT * FROM demo.sample'
 MySQL  JS > session.sql(sql)
+----+----------+----------+-------------+
| id | name     | location | domain      |
+----+----------+----------+-------------+
|  1 | Demo Row | USA      | NULL        |
|  2 | Row 2    | AUS      | news.com.au |
|  3 | Kiwi     | NZ       | NULL        |
+----+----------+----------+-------------+
3 rows in set (0.0006 sec)

Get that now in JSON output. NOTE: There are 3 different JSON formats, this matched what I needed.

bash-4.2# mysqlsh
MySQL Shell 8.0.22

Copyright (c) 2016, 2020, Oracle and/or its affiliates.
Oracle is a registered trademark of Oracle Corporation and/or its affiliates.
Other names may be trademarks of their respective owners.

Type '\help' or '\?' for help; '\quit' to exit.
 MySQL  JS > var session=mysqlx.getSession('demo:qldb@localhost')
 MySQL  JS > var sql='SELECT * FROM demo.sample'
 MySQL  JS > shell.options.set('resultFormat','json/array')
 MySQL  JS > session.sql(sql)
[
{"id":1,"name":"Demo Row","location":"USA","domain":null},
{"id":2,"name":"Row 2","location":"AUS","domain":"news.com.au"},
{"id":3,"name":"Kiwi","location":"NZ","domain":null}
]
3 rows in set (0.0006 sec)

Ok, that works in interactive interface, I need it scripted.

# vi
bash: vi: command not found
# yum install vi
Loaded plugins: ovl
http://repo.mysql.com/yum/mysql-connectors-community/el/7/x86_64/repodata/repomd.xml: [Errno 14] HTTP Error 403 - Forbidden
Trying other mirror.
...

And another downer of Docker containers, other tools or easy ways to install them, again I want to focus on the actual example, and not all this preamble, so

# echo "var session=mysqlx.getSession('demo:qldb@localhost')
var sql='SELECT * FROM demo.sample'
shell.options.set('resultFormat','json/array')
session.sql(sql)" > dump.js


# mysqlsh < dump.js

What the? Hurdle 4. Did I typo this as well, I check the file, and cut/paste it and get what I expect.

# cat dump.js
var session=mysqlx.getSession('demo:qldb@localhost')
var sql='SELECT * FROM demo.sample'
shell.options.set('resultFormat','json/array')
session.sql(sql)
# mysqlsh
MySQL Shell 8.0.22

Copyright (c) 2016, 2020, Oracle and/or its affiliates.
Oracle is a registered trademark of Oracle Corporation and/or its affiliates.
Other names may be trademarks of their respective owners.

Type '\help' or '\?' for help; '\quit' to exit.
 MySQL  JS > var session=mysqlx.getSession('demo:qldb@localhost')
 MySQL  JS > var sql='SELECT * FROM demo.sample'
 MySQL  JS > shell.options.set('resultFormat','json/array')
 MySQL  JS > session.sql(sql)
[
{"id":1,"name":"Demo Row","location":"USA","domain":null},
{"id":2,"name":"Row 2","location":"AUS","domain":"news.com.au"},
{"id":3,"name":"Kiwi","location":"NZ","domain":null}
]
3 rows in set (0.0022 sec)

This is getting crazy.

# echo '[
> {"id":1,"name":"Demo Row","location":"USA","domain":null},
> {"id":2,"name":"Row 2","location":"AUS","domain":"news.com.au"},
> {"id":3,"name":"Kiwi","location":"NZ","domain":null}
> ]' > sample.json
bash-4.2# jq . sample.json
bash: jq: command not found

Oh the docker!!!!. Switching back to my EC2 instance now.

$ echo '[
> {"id":1,"name":"Demo Row","location":"USA","domain":null},
> {"id":2,"name":"Row 2","location":"AUS","domain":"news.com.au"},
> {"id":3,"name":"Kiwi","location":"NZ","domain":null}
> ]' > sample.json
$ jq . sample.json
[
  {
    "id": 1,
    "name": "Demo Row",
    "location": "USA",
    "domain": null
  },
  {
    "id": 2,
    "name": "Row 2",
    "location": "AUS",
    "domain": "news.com.au"
  },
  {
    "id": 3,
    "name": "Kiwi",
    "location": "NZ",
    "domain": null
  }
]

I am now way of the time I would like to spend on this weekly post, and it's getting way to long, and I'm nowhere near showing what I actually want. Still we trek on.

Boy, this stock EC2 image uses version 1, we need I'm sure V2, and well command does not work!!!!

$  aws qldb list-ledgers
ERROR:
$ aws --version

$ curl "https://awscli.amazonaws.com/awscli-exe-linux-x86_64.zip" -o "awscliv2.zip"
$ unzip awscliv2.zip
$ sudo ./aws/install
$ export PATH=/usr/local/bin:$PATH
$ aws --version

Can I finally get a ledger now.

$ aws qldb create-ledger --name demo --tags JIRA=DEMO-5826,Owner=RonaldBradford --permissions-mode ALLOW_ALL --no-deletion-protection
 
{
    "Name": "demo",
    "Arn": "arn:aws:qldb:us-east-1:999:ledger/demo",
    "State": "CREATING",
    "CreationDateTime": "2021-03-06T22:46:41.760000+00:00",
    "DeletionProtection": false
}

$  aws qldb list-ledgers

{
    "Ledgers": [
        {
            "Name": "xx",
            "State": "ACTIVE",
            "CreationDateTime": "2021-03-05T20:12:44.611000+00:00"
        },
        {
            "Name": "demo",
            "State": "ACTIVE",
            "CreationDateTime": "2021-03-06T22:46:41.760000+00:00"
        }
    ]
}

$ aws qldb describe-ledger --name demo
{
    "Name": "demo",
    "Arn": "arn:aws:qldb:us-east-1:999:ledger/demo",
    "State": "ACTIVE",
    "CreationDateTime": "2021-03-06T22:46:41.760000+00:00",
    "DeletionProtection": false
}

Oh the Python 2, and the lack of user packaging, more crud of getting an example.

$ pip install pyqldb==3.1.0
ERROR

$ echo "alias python=python3
alias pip=pip3" >> ~/.bash_profile
source ~/.bash_profile
$ pip --version
pip 9.0.3 from /usr/lib/python3.6/site-packages (python 3.6)

$ python --version
Python 3.6.8

$ pip install pyqldb==3.1.0

ERROR

$ sudo pip install pyqldb==3.1.0

Yeah!, after all that, my example code works and data is inserted.

$ cat demo.py
from pyqldb.config.retry_config import RetryConfig
from pyqldb.driver.qldb_driver import QldbDriver

# Configure retry limit to 3
retry_config = RetryConfig(retry_limit=3)

# Initialize the driver
print("Initializing the driver")
qldb_driver = QldbDriver("demo", retry_config=retry_config)


def create_table(transaction_executor, table):

    print("Creating table {}".format(table))
    transaction_executor.execute_statement("Create TABLE {}".format(table))

def create_index(transaction_executor, table, column):
    print("Creating index {}.{}".format(table, column))
    transaction_executor.execute_statement("CREATE INDEX ON {}({})".format(table,column))


def insert_record(transaction_executor, table, values):
    print("Inserting into {}".format(table))
    transaction_executor.execute_statement("INSERT INTO {} ?".format(table),  values)


table="sample"
column="id"
qldb_driver.execute_lambda(lambda executor: create_table(executor, table))
qldb_driver.execute_lambda(lambda executor: create_index(executor, table, column))


record1 = { 'id': "1",
            'name': "Demo Row",
            'location': "USA",
            'domain':  ""
        }

qldb_driver.execute_lambda(lambda x: insert_record(x, table, record1))
$ python demo.py
Initializing the driver
Creating table sample
Creating index sample.id
Inserting into sample

One vets in the AWS Console, but you cannot show that in text in this blog, so goes to find a simple client and there is qldbshell

What the? I installed it and it complains about pyqldb.driver.pooled_qldb_driver. I literally used that in the last example.

$ pip3 install qldbshell
Collecting qldbshell
  Downloading PermissionError: [Errno 13] Permission denied: '/usr/local/lib/python3.6/site-packages/amazon.ion-0.7.0-py3.6-nspkg.pth' -> '/tmp/pip-p8j4d45d-uninstall/usr/local/lib/python3.6/site-packages/amazon.ion-0.7.0-py3.6-nspkg.pth'

During handling of the above exception, another exception occurred:

Traceback (most recent call last):
  File "/usr/lib/python3.6/site-packages/pip/basecommand.py", line 215, in main
    status = self.run(options, args)
  File "/usr/lib/python3.6/site-packages/pip/commands/install.py", line 365, in run
    strip_file_prefix=options.strip_file_prefix,
  File "/usr/lib/python3.6/site-packages/pip/req/req_set.py", line 783, in install
    requirement.uninstall(auto_confirm=True)
  File "/usr/lib/python3.6/site-packages/pip/req/req_install.py", line 754, in uninstall
    paths_to_remove.remove(auto_confirm)
  File "/usr/lib/python3.6/site-packages/pip/req/req_uninstall.py", line 115, in remove
    renames(path, new_path)
  File "/usr/lib/python3.6/site-packages/pip/utils/__init__.py", line 267, in renames
    shutil.move(old, new)
  File "/usr/lib64/python3.6/shutil.py", line 565, in move
    os.unlink(src)
PermissionError: [Errno 13] Permission denied: '/usr/local/lib/python3.6/site-packages/amazon.ion-0.7.0-py3.6-nspkg.pth'
[centos@ip-10-204-101-224] ~
$ sudo pip3 install qldbshell
WARNING: Running pip install with root privileges is generally not a good idea. Try `pip3 install --user` instead.
Collecting qldbshell
Requirement already satisfied: urllib3<1.27,>=1.25.4 in /usr/local/lib/python3.6/site-packages (from botocore<1.21.0,>=1.20.21->boto3>=1.9.237->qldbshell)
Installing collected packages: amazon.ion, qldbshell
  Found existing installation: amazon.ion 0.7.0
    Uninstalling amazon.ion-0.7.0:
      Successfully uninstalled amazon.ion-0.7.0
  Running setup.py install for amazon.ion ... done
  Running setup.py install for qldbshell ... done
Successfully installed amazon.ion-0.5.0 qldbshell-1.2.0


$ sudo pip3 install qldbshell

$ qldbshell
Traceback (most recent call last):
  File "/usr/local/bin/qldbshell", line 11, in 
    load_entry_point('qldbshell==1.2.0', 'console_scripts', 'qldbshell')()
  File "/usr/lib/python3.6/site-packages/pkg_resources/__init__.py", line 476, in load_entry_point
    return get_distribution(dist).load_entry_point(group, name)
  File "/usr/lib/python3.6/site-packages/pkg_resources/__init__.py", line 2700, in load_entry_point
    return ep.load()
  File "/usr/lib/python3.6/site-packages/pkg_resources/__init__.py", line 2318, in load
    return self.resolve()
  File "/usr/lib/python3.6/site-packages/pkg_resources/__init__.py", line 2324, in resolve
    module = __import__(self.module_name, fromlist=['__name__'], level=0)
  File "/usr/local/lib/python3.6/site-packages/qldbshell/__main__.py", line 25, in 
    from pyqldb.driver.pooled_qldb_driver import PooledQldbDriver
ModuleNotFoundError: No module named 'pyqldb.driver.pooled_qldb_driver'
$ pip list qldbshell
DEPRECATION: The default format will switch to columns in the future. You can use --format=(legacy|columns) (or define a format=(legacy|columns) in your pip.conf under the [list] section) to disable this warning.
amazon.ion (0.5.0)
boto3 (1.17.21)
botocore (1.20.21)
ionhash (1.1.0)
jmespath (0.10.0)
pip (9.0.3)
prompt-toolkit (3.0.16)
pyqldb (3.1.0)
python-dateutil (2.8.1)
qldbshell (1.2.0)
s3transfer (0.3.4)
setuptools (39.2.0)
six (1.15.0)
urllib3 (1.26.3)

So, uninstalled and re-installed and voila, my data.

$ qldbshell
usage: qldbshell [-h] [-v] [-s QLDB_SESSION_ENDPOINT] [-r REGION] [-p PROFILE]
                 -l LEDGER
qldbshell: error: the following arguments are required: -l/--ledger
$ qldbshell -l demo

Welcome to the Amazon QLDB Shell version 1.2.0
Use 'start' to initiate and interact with a transaction. 'commit' and 'abort' to commit or abort a transaction.
Use 'start; statement 1; statement 2; commit; start; statement 3; commit' to create transactions non-interactively.
Use 'help' for the help section.
All other commands will be interpreted as PartiQL statements until the 'exit' or 'quit' command is issued.

qldbshell >

qldbshell > SELECT * FROM sample;                                                                                                                           
INFO:
{
 id: "1",
 name: "Demo Row",
 location: "USA",
 domain: ""
}
INFO: (0.1718s)

qldbshell > \q                                                                                                                                              
WARNING: Error while executing query: An error occurred (BadRequestException) when calling the SendCommand operation: Lexer Error: at line 1, column 1: invalid character at, '\' [U+5c];
INFO: (0.1134s)
qldbshell > exit                                                                                                                                            
Exiting QLDB Shell

Right \q is a mysqlism of the client, need to rewire myself.

Now, I have a ledger, I created an example table, mocked a row of data and verified. Now I can just load my sample data in JSON I created earlier right? Wrong!!!

$ cat load.py
import json
from pyqldb.config.retry_config import RetryConfig
from pyqldb.driver.qldb_driver import QldbDriver

# Configure retry limit to 3
retry_config = RetryConfig(retry_limit=3)

# Initialize the driver
print("Initializing the driver")
qldb_driver = QldbDriver("demo", retry_config=retry_config)

def insert_record(transaction_executor, table, values):
  print("Inserting into {}".format(table))
  transaction_executor.execute_statement("INSERT INTO {} ?".format(table),  values)


table="sample"

with open('sample.json') as f:
  data=json.load(f)

qldb_driver.execute_lambda(lambda x: insert_record(x, table, data))

$ python load.py
Traceback (most recent call last):
  File "load.py", line 2, in 
    from pyqldb.config.retry_config import RetryConfig
ModuleNotFoundError: No module named 'pyqldb'
[centos@ip-10-204-101-224] ~

Oh sweet, I'd installed that, and used it, and re-installed it.

$ pip list | grep pyqldb
DEPRECATION: The default format will switch to columns in the future. You can use --format=(legacy|columns) (or define a format=(legacy|columns) in your pip.conf under the [list] section) to disable this warning.
[centos@ip-10-204-101-224] ~
$ sudo pip3 install pyqldb
WARNING: Running pip install with root privileges is generally not a good idea. Try `pip3 install --user` instead.
Collecting pyqldb
Requirement already satisfied: boto3<2,>=1.16.56 in /usr/local/lib/python3.6/site-packages (from pyqldb)
Requirement already satisfied: botocore<2,>=1.19.56 in /usr/local/lib/python3.6/site-packages (from pyqldb)
Requirement already satisfied: ionhash<2,>=1.1.0 in /usr/local/lib/python3.6/site-packages (from pyqldb)
Requirement already satisfied: six in /usr/local/lib/python3.6/site-packages (from amazon.ion<1,>=0.7.0->pyqldb)
Requirement already satisfied: s3transfer<0.4.0,>=0.3.0 in /usr/local/lib/python3.6/site-packages (from boto3<2,>=1.16.56->pyqldb)
Requirement already satisfied: jmespath<1.0.0,>=0.7.1 in /usr/local/lib/python3.6/site-packages (from boto3<2,>=1.16.56->pyqldb)
Requirement already satisfied: python-dateutil<3.0.0,>=2.1 in /usr/local/lib/python3.6/site-packages (from botocore<2,>=1.19.56->pyqldb)
Requirement already satisfied: urllib3<1.27,>=1.25.4 in /usr/local/lib/python3.6/site-packages (from botocore<2,>=1.19.56->pyqldb)
Installing collected packages: amazon.ion, pyqldb
  Found existing installation: amazon.ion 0.5.0
    Uninstalling amazon.ion-0.5.0:
      Successfully uninstalled amazon.ion-0.5.0
  Running setup.py install for amazon.ion ... done
  Running setup.py install for pyqldb ... done
Successfully installed amazon.ion-0.7.0 pyqldb-3.1.0

Load one more time.


$ cat load.py
import json
from pyqldb.config.retry_config import RetryConfig
from pyqldb.driver.qldb_driver import QldbDriver

# Configure retry limit to 3
retry_config = RetryConfig(retry_limit=3)

# Initialize the driver
print("Initializing the driver")
qldb_driver = QldbDriver("demo", retry_config=retry_config)

def insert_record(transaction_executor, table, values):
  print("Inserting into {}".format(table))
  transaction_executor.execute_statement("INSERT INTO {} ?".format(table),  values)


table="sample"

with open('sample.json') as f:
  data=json.load(f)

qldb_driver.execute_lambda(lambda x: insert_record(x, table, data))

$ python load.py
Initializing the driver
Inserting into sample

And done, I've got my JSON extracted MySQL 8 data in QLDB. I go to vett it in the client, and boy, didn't expect yet another package screw up. Clearly, these 2 AWS python packages are incompatible. That's a venv need, but I'm now at double my desired time to show this.

$ qldbshell -l demo
Traceback (most recent call last):
  File "/usr/local/bin/qldbshell", line 11, in 
    load_entry_point('qldbshell==1.2.0', 'console_scripts', 'qldbshell')()
  File "/usr/lib/python3.6/site-packages/pkg_resources/__init__.py", line 476, in load_entry_point
    return get_distribution(dist).load_entry_point(group, name)
  File "/usr/lib/python3.6/site-packages/pkg_resources/__init__.py", line 2700, in load_entry_point
    return ep.load()
  File "/usr/lib/python3.6/site-packages/pkg_resources/__init__.py", line 2318, in load
    return self.resolve()
  File "/usr/lib/python3.6/site-packages/pkg_resources/__init__.py", line 2324, in resolve
    module = __import__(self.module_name, fromlist=['__name__'], level=0)
  File "/usr/local/lib/python3.6/site-packages/qldbshell/__main__.py", line 25, in 
    from pyqldb.driver.pooled_qldb_driver import PooledQldbDriver
ModuleNotFoundError: No module named 'pyqldb.driver.pooled_qldb_driver'
[centos@ip-10-204-101-224] ~
$ pip list | grep qldbshell
DEPRECATION: The default format will switch to columns in the future. You can use --format=(legacy|columns) (or define a format=(legacy|columns) in your pip.conf under the [list] section) to disable this warning.
qldbshell (1.2.0)


$ sudo pip uninstall qldbshell pyqldb

$ sudo pip install qldbshell
WARNING: Running pip install with root privileges is generally not a good idea. Try `pip3 install --user` instead.
Collecting qldbshell
  Downloading Requirement already satisfied: boto3>=1.9.237 in /usr/local/lib/python3.6/site-packages (from qldbshell)
Requirement already satisfied: amazon.ion<0.6.0,>=0.5.0 in /usr/local/lib/python3.6/site-packages (from qldbshell)
Requirement already satisfied: prompt_toolkit<3.1.0,>=3.0.5 in /usr/local/lib/python3.6/site-packages (from qldbshell)
Requirement already satisfied: ionhash~=1.1.0 in /usr/local/lib/python3.6/site-packages (from qldbshell)
Requirement already satisfied: s3transfer<0.4.0,>=0.3.0 in /usr/local/lib/python3.6/site-packages (from boto3>=1.9.237->qldbshell)
Requirement already satisfied: botocore<1.21.0,>=1.20.21 in /usr/local/lib/python3.6/site-packages (from boto3>=1.9.237->qldbshell)
Requirement already satisfied: jmespath<1.0.0,>=0.7.1 in /usr/local/lib/python3.6/site-packages (from boto3>=1.9.237->qldbshell)
Requirement already satisfied: six in /usr/local/lib/python3.6/site-packages (from amazon.ion<0.6.0,>=0.5.0->qldbshell)
Requirement already satisfied: wcwidth in /usr/local/lib/python3.6/site-packages (from prompt_toolkit<3.1.0,>=3.0.5->qldbshell)
Requirement already satisfied: python-dateutil<3.0.0,>=2.1 in /usr/local/lib/python3.6/site-packages (from botocore<1.21.0,>=1.20.21->boto3>=1.9.237->qldbshell)
Requirement already satisfied: urllib3<1.27,>=1.25.4 in /usr/local/lib/python3.6/site-packages (from botocore<1.21.0,>=1.20.21->boto3>=1.9.237->qldbshell)
Installing collected packages: qldbshell
  Running setup.py install for qldbshell ... done
Successfully installed qldbshell-1.2.0

Can I see my data now


$ qldbshell -l demo

Welcome to the Amazon QLDB Shell version 1.2.0
Use 'start' to initiate and interact with a transaction. 'commit' and 'abort' to commit or abort a transaction.
Use 'start; statement 1; statement 2; commit; start; statement 3; commit' to create transactions non-interactively.
Use 'help' for the help section.
All other commands will be interpreted as PartiQL statements until the 'exit' or 'quit' command is issued.

qldbshell > select * from sample;                                                                                                                           
INFO:
{
 id: 1,
 name: "Demo Row",
 location: "USA",
 domain: null
},
{
 id: 1,
 name: "Demo Row",
 location: "USA",
 domain: null
},
{
 id: "1",
 name: "Demo Row",
 location: "USA",
 domain: ""
},
{
 id: 3,
 name: "Kiwi",
 location: "NZ",
 domain: null
},
{
 id: 2,
 name: "Row 2",
 location: "AUS",
 domain: "news.com.au"
},
{
 id: 3,
 name: "Kiwi",
 location: "NZ",
 domain: null
},
{
 id: 2,
 name: "Row 2",
 location: "AUS",
 domain: "news.com.au"
}
INFO: (0.0815s)

And yes, data, I see it's duplicated, so I must have in between the 10 steps run twice. This does highlight a known limitation of QLDB, no unique constraints.

But wait, that data is not really correct, I don't want null. Goes back to the JSON to see the MySQL shell gives that.

$ jq . sample.json
[
  {
    "id": 1,
    "name": "Demo Row",
    "location": "USA",
    "domain": null
  },
...

At some point I also got this load error, but by now I've given up documenting how to do something, in order to demonstrate something.

NameError: name 'null' is not defined

One has to wrap the only nullable column with IFNULL(subdomain,'') as subdomain and redo all those steps again. This is not going to be practical having to wrap all columns in a wider table with IFNULL.

However, having exhausted all this time for what was supposed to be a quiet weekend few hours, my post is way to long, and I've learned "Creating examples can be hard".

#WDILTW – What can I run from my AWS Aurora database

When you work with AWS Aurora you have limited admin privileges. There are some different grants for MySQL including SELECT INTO S3 and LOAD FROM S3 that replace the loss of functionality to SELECT INTO OUTFILE and mysqldump/mysqlimport using a delimited format. While I know and use lambda capabilities, I have never executed anything with INVOKE LAMDBA directly from the database.

This week I found out about INVOKE COMPREHEND (had to look that product up), and INVOKE SAGEMAKER (which I used independently). These are machine learning capabilities that enable you to build custom integrations using Comprehend and SageMaker. I did not have any chance to evaluate these capabilities so I am unable to share any use cases or experiences. There are two built-in comprehend functions aws_comprehend_detect_sentiment() and aws_comprehend_detect_sentiment_confidence(), a likely future starting place. Sagemaker is invoked as an extension of a CREATE FUNCTION that provides the ALIAS AWS_SAGEMAKER_INVOKE_ENDPOINT syntax.

Also available are some MySQL status variables including Aurora_ml_logical_response_cnt, Aurora_ml_actual_request_cnt, Aurora_ml_actual_response_cnt, Aurora_ml_cache_hit_cnt, Aurora_ml_single_request_cnt.

Some googling found an interesting simple example, calculating the positive/negative sentiment and confidence of sentences of text. I could see this as useful for analyzing comments. I’ve included the example from this site here to encourage my readers to take a look as I plan to do. Post IAM configuration I will be really curious to evaluate the responsiveness of this example. Is this truly a batch only operation or could you return some meaningful response timely?

This also lead to bookmarking for reading https://awsauroralabsmy.com/, https://github.com/aws-samples/amazon-aurora-labs-for-mysql/ and https://squidfunk.github.io/mkdocs-material/ all from this one page.

#WDILTW – AWS RDS Proxy

This week I was evaluating AWS RDS Proxy. If you are familiar with the Relational Database Service (RDS) and use MySQL or Postgres, this is an additional option to consider.

Proxies in general by the name accept incoming requests and perform some management before those requests are forwarded to the ultimate target.

RDS proxy takes incoming database connections and can perform several capabilities including collection pooling and capping the total database connections with each configured proxy holding a percentage of the total connections for the target cluster. The proxy can handle routing only for writer instances (at this time) to minimize a planned or unplanned failover. The RDS proxy however does not address the underlying problem of too many connections to the database, it just adds another layer, that is or may be more configurable or tunable than an application requesting connections.

The RDS Proxy is automatically Highly Available (HA). You can determine this by looking at the host IPs of the MySQL processlist. I have yet to identify any other means of seeing if a connection is a proxy connection at the database level if you are using the same credentials. RDS Proxy does give you the ability via Secrets Manager to connect as a different user. You can specify a connection initialization query. I used a SET variable so that application could determine if it was using a Proxy however that is of little benefit in server connection management.

The RDS proxy can enforce TLS, something which in my opinion should always be used for application to data store communications, but historically has been overlooked at practically every company I have worked for or consulted to. Just because you are communicating within a VPC does not protect your communications from actors within your VPC. I can remember at a prior employment the disappointment of cross-region replication that was encrypted being dropped because it was too hard to migrate or manage. That shows an all too common problem of laziness over security.

If you are new to a particular technology the age of the Internet gives you search capabilities to find numerous articles. If you search for anything AWS you will generally always get as the top results the official pages, it takes some digging to find other articles. Prior to this lesson I had only read about RDS Proxy, I had never actually setup one.

When anybody is learning something new, I like to say your value add is not to just read an article, but reproduce and then adapt or enhance. This Amazon example is no different. Repeating each step showed multiple errors in syntax which I can contribute back as comments. If this was open source code, you could contribute a pull request (PR). The good news is the first example of configuring a proxy includes by GUI and CLI commands. I always like to do my work on the command line, even the first iteration. You cannot scale a human moving a mouse around and clicking. What I found however was that the official AWS CLI lacked a key component of the proxy setup around group targets. The UI provides a capability that the CLI did not. Another discrepancy was when I was making modifications to the proxy in the GUI I would get an error, but I could make that change via the CLI. These discrepancies are an annoyance for consistency and first evaluation.

So what was the outcome of my evaluation? First I was able to demonstrate I could add a proxy to an existing cluster in one of our test environments and direct traffic from a mysql client thru the proxy to the target database. I was able to use Secrets Manager (SSM) to enforce credentials for authorization. I did not look into Identity Access Management (IAM) roles support. I was able to benchmark with sysbench simulated load to compare latency of the proxy traffic versus direct traffic. I have simplified my examples so that anybody can run these tests themselves for simple validation.

I could enforce TLS communications for the mysql client testing, however our company internal http proxy caused the usual self signed certificate issues with sysbench, something I really need to master. Surprisingly I looked at what options sysbench gave me for SSL options (side bar we should always refer to this as TLS instead of SSL), but the defined options for the installed recent version are still using the ssl name. The scope of options differed from the source code online so a question as to why? That’s the great thing about open source, you can read the code. You may have even met the author at a conference presentation.

Where the evaluation hit a business impact was in comparative performance. I am still awaiting an AWS support response to my evaluation.

What’s next is to get an application team to evaluate end to end database operations, easily done as Route 53 DNS is used for endpoint communications.
Where I got stuck was incorporating the setup of RDS proxy within Terraform We currently use version 12. While there was the aws_db_proxy module, I needed an updated version of the aws provider to our environment. The official Hashicorp documentation of the resource really does not highlight the complexity necessary to create a proxy. While you will have already configured a VPC, and subnets, even Ingres security groups and secrets which all parts necessary for RDS cluster, you need a number of integrated pieces.

You will need an IAM role for your proxy, but that role requires a policy to use KMS to get the secrets you wish to use for authorization. This interdependency of KMS and secret ARNs make is difficult to easily launch a RDS proxy as you would an RDS aurora cluster. Still it’s a challenge for something else to do. The added complexity is the RDS proxy also needs an authorization argument, for example the –auth argument in the AWS CLI. I see this as a complexity for management of RDS users that you wish to also be configured for use in the proxy.

As with any evaluation or proof of concept (POC) the devil is in the details. How do you monitor your new resources, what logging is important to know, what types of errors can happen, and how do you address these.

Another issue I had was the RDS proxy required a new version of the AWS client in order to run RDS commands such as describe-db-proxies. That adds an additional administrative dependency to be rolled out.

Proxies for MySQL have been around for decades, I can remember personally working on the earliest version of MySQL Proxy at MySQL Inc back in 2007. The gold standard if you use MySQL, is ProxySQL by Sysown’s René Cannaò. This is a topic for a different discussion.

Checkout my code for this work.

Reading

Another reason to avoid RDS

My list of reasons for never using or recommending Amazon’s MySQL RDS service grows every time I experience problems with customers. This was an interesting and still unresolved issue.

ERROR 126 (HY000): Incorrect key file for table '/rdsdbdata/tmp/#sql_5b7_1.MYI'; try to repair it

You may see this is a MyISAM table. The MySQL database is version 5.5, all InnoDB tables and is very small 100MB in total size.
What is happening is that MySQL is generating a temporary table, and this table is being written to disk. I am unable to change the code to improve the query causing this disk I/O.

What I can not understand and have no ability to diagnose is why this error occurs sometimes and generally when the database is under additional system load. With RDS you have no visibility of the server running the production database. While you have SQL access, an API for managing MySQL configuration options (I also add not all MySQL variables), and limited system statistics via a graphical interface, all information about the system performance, disk configuration etc is hidden and not accessible. This is a frustrating limitation of using RDS.

NOTE: While I cannot recommend RDS, I am very happy with AWS EC2 services when correctly configured. For a cloud based MySQL solution I would definitely recommend greater control over your MySQL database using EC2 and EBS.