Oracle OpenStack leveraging MySQL Cluster and Docker

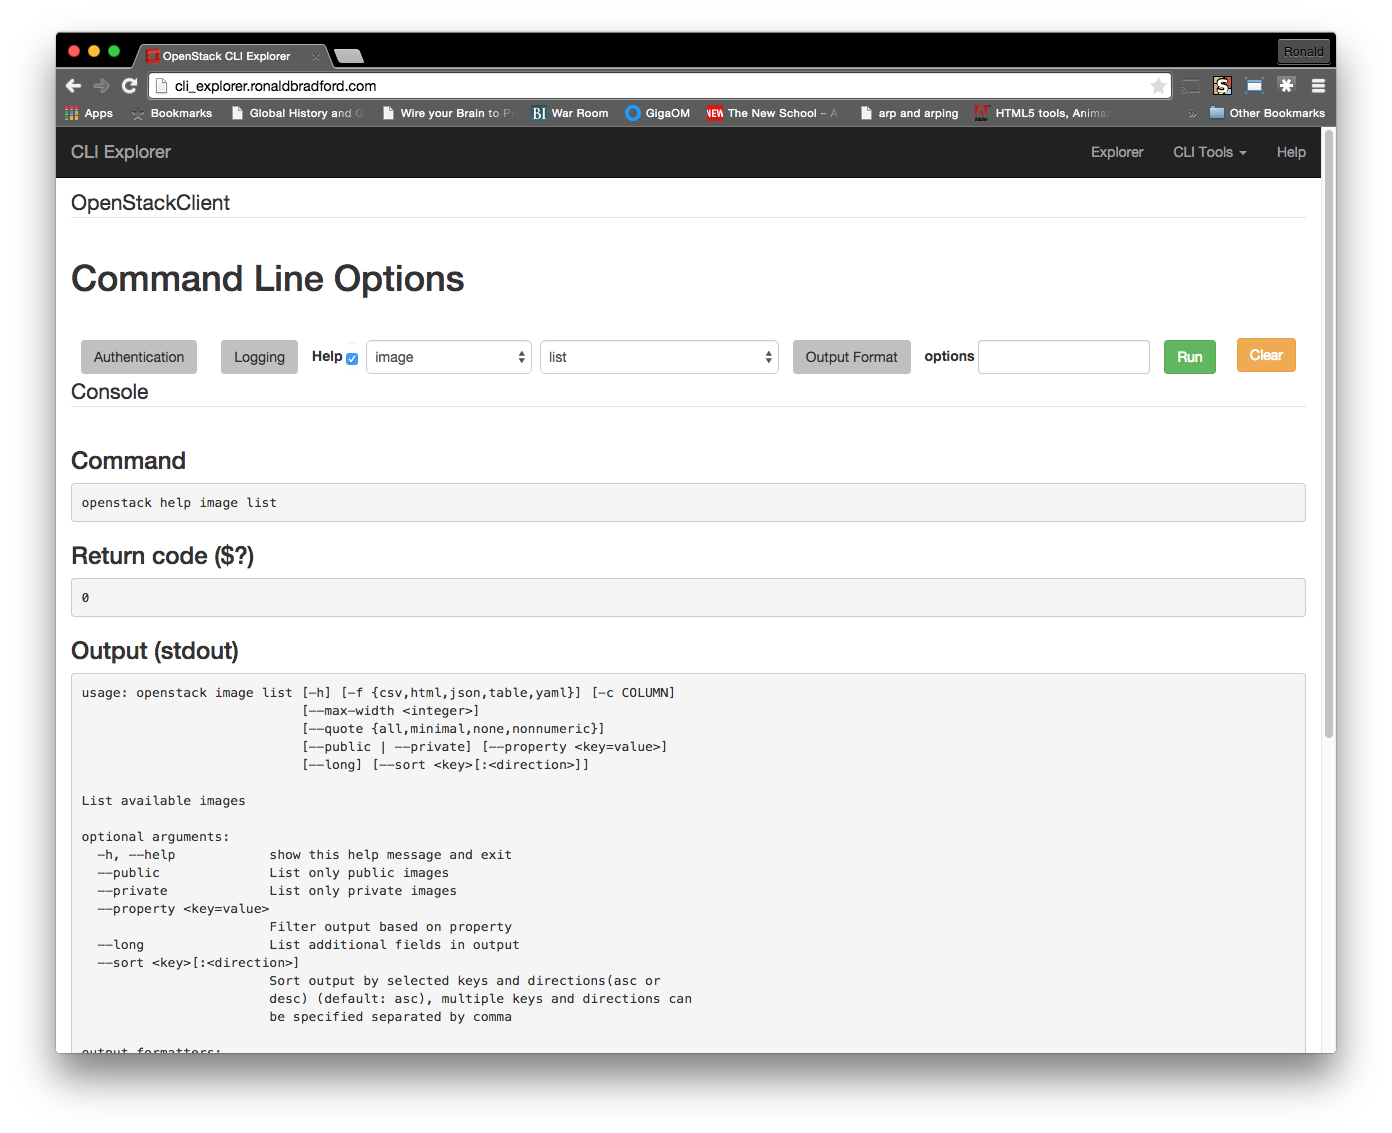
At Oracle Openworld this year, Oracle OpenStack Release 2 was announced. This Kilo based distribution included some new deployment features not see in other OpenStack distros including the use of Kolla, Docker and MySQL Cluster. The press release states “First commercially available OpenStack implementation completely packaged as Docker instances”.

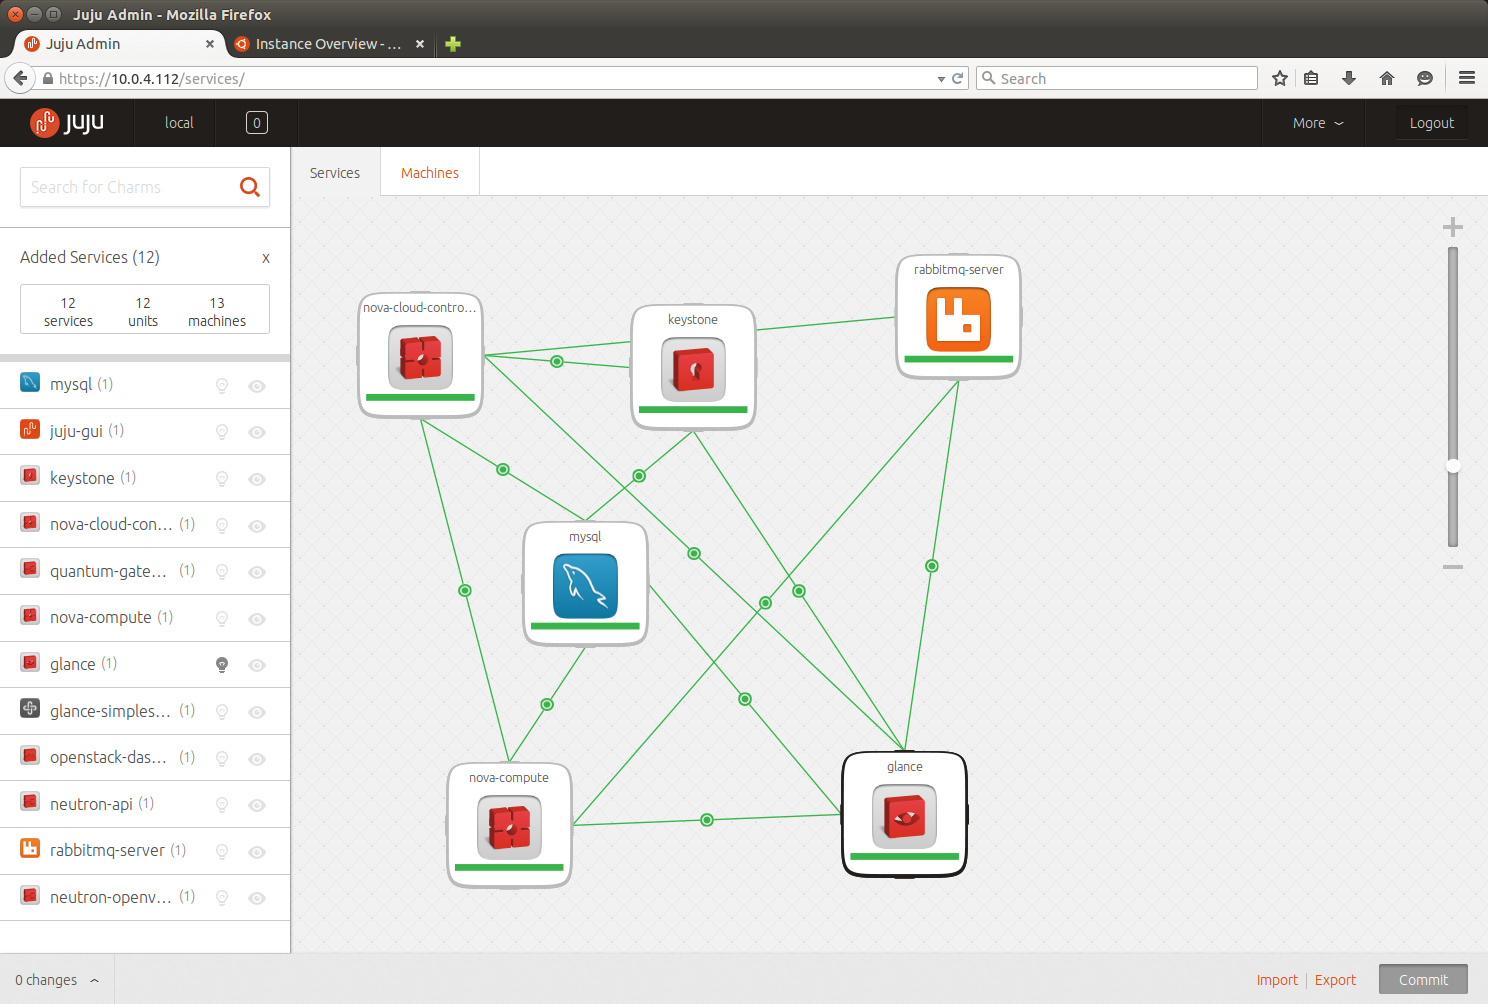
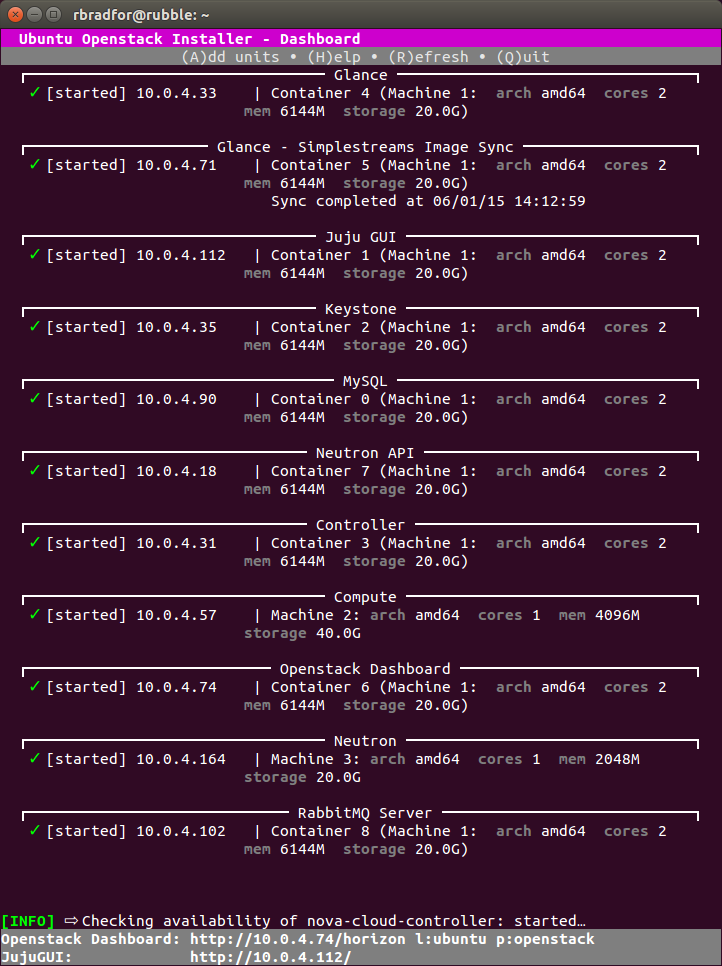
Using Docker to containerize each component of services is a very convenient means of dev/test/prod management. Your single node developer environment gets HA automatically, you can easily deploy to two or more management nodes varying services, and they look and act just like your production environment. I have often struggled with developing in OpenStack either with single project environments, creating a devstack, a previously installed 3 node physical server deployment which takes up room and power in my office, and also comparing other single node solutions including Canonical and Mirantis. I am often left to using online services such as Mirantis Express, TryStack and HP Cloud to more easily evaluate the end product, but without any access to the operating cloud under the covers.

It is an interesting move to using MySQL Cluster. I liked this announcement. This is a very robust Master/Master MySQL compatible product that starts with a High Availability implemented through a shared nothing architecture. You get the benefit of dynamic adding of data shards as your system grows. However MySQL Cluster is a very different product under the covers. For those familiar with managing MySQL server a different set of skills are required, starting with the concept of a management node, data nodes and SQL nodes and the different ways to manage, monitor and triage. MySQL Cluster is effectively an in-memory solution so this will require some additional sizing considerations especially for production deployments. Your backup/recovery/disaster recovery strategy will also change. All of this administration exists for MySQL Cluster, it is just different. If you only use MySQL server these are new skills to master. As an expert in MySQL server and having not used MySQL Cluster for at least 7 years, I cannot provide an insights for example of the use of common monitoring tools (including newer SaaS offerings). Still, MySQL Cluster is an extremely stable and production ready product, that scales to millions of QPS easily. Using this as a HA solution gives you a rock solid base which is what you need first.

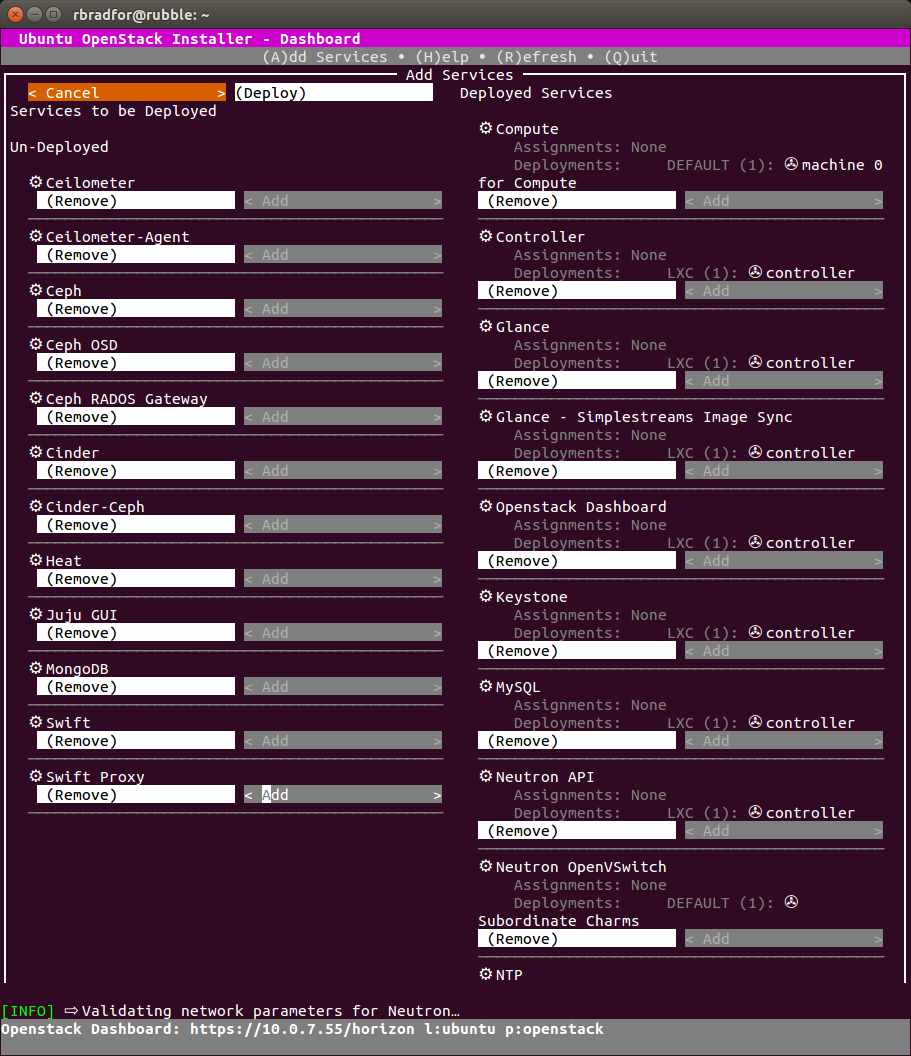
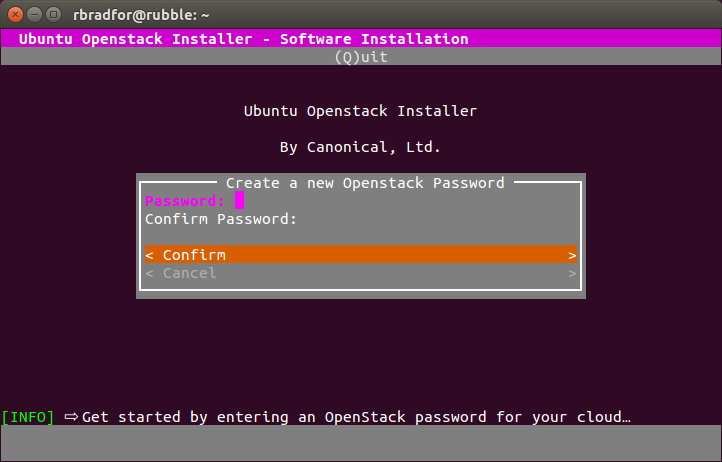
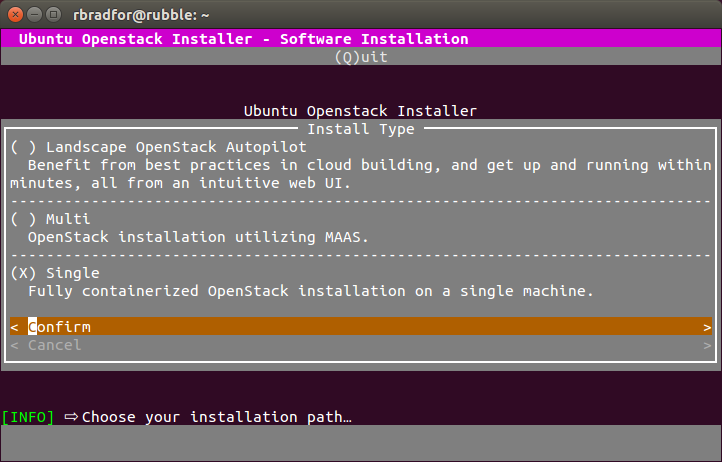
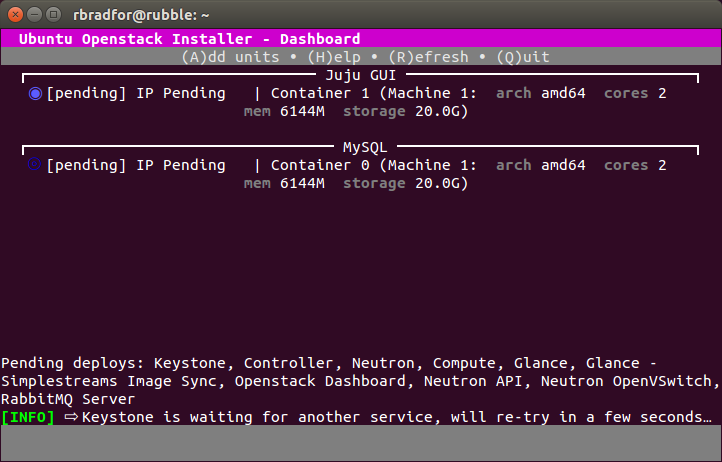
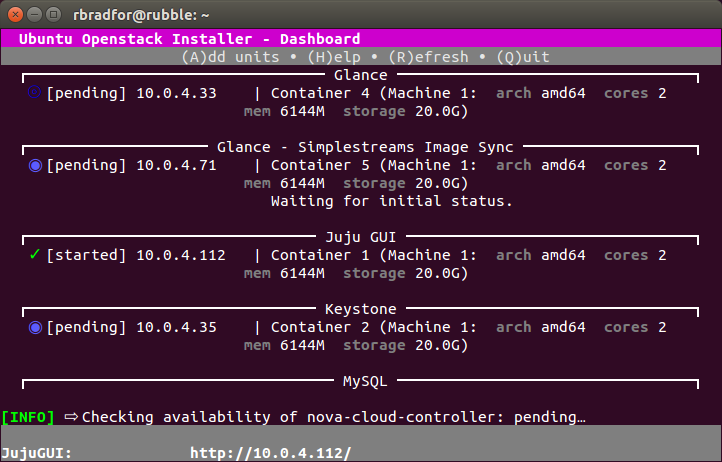
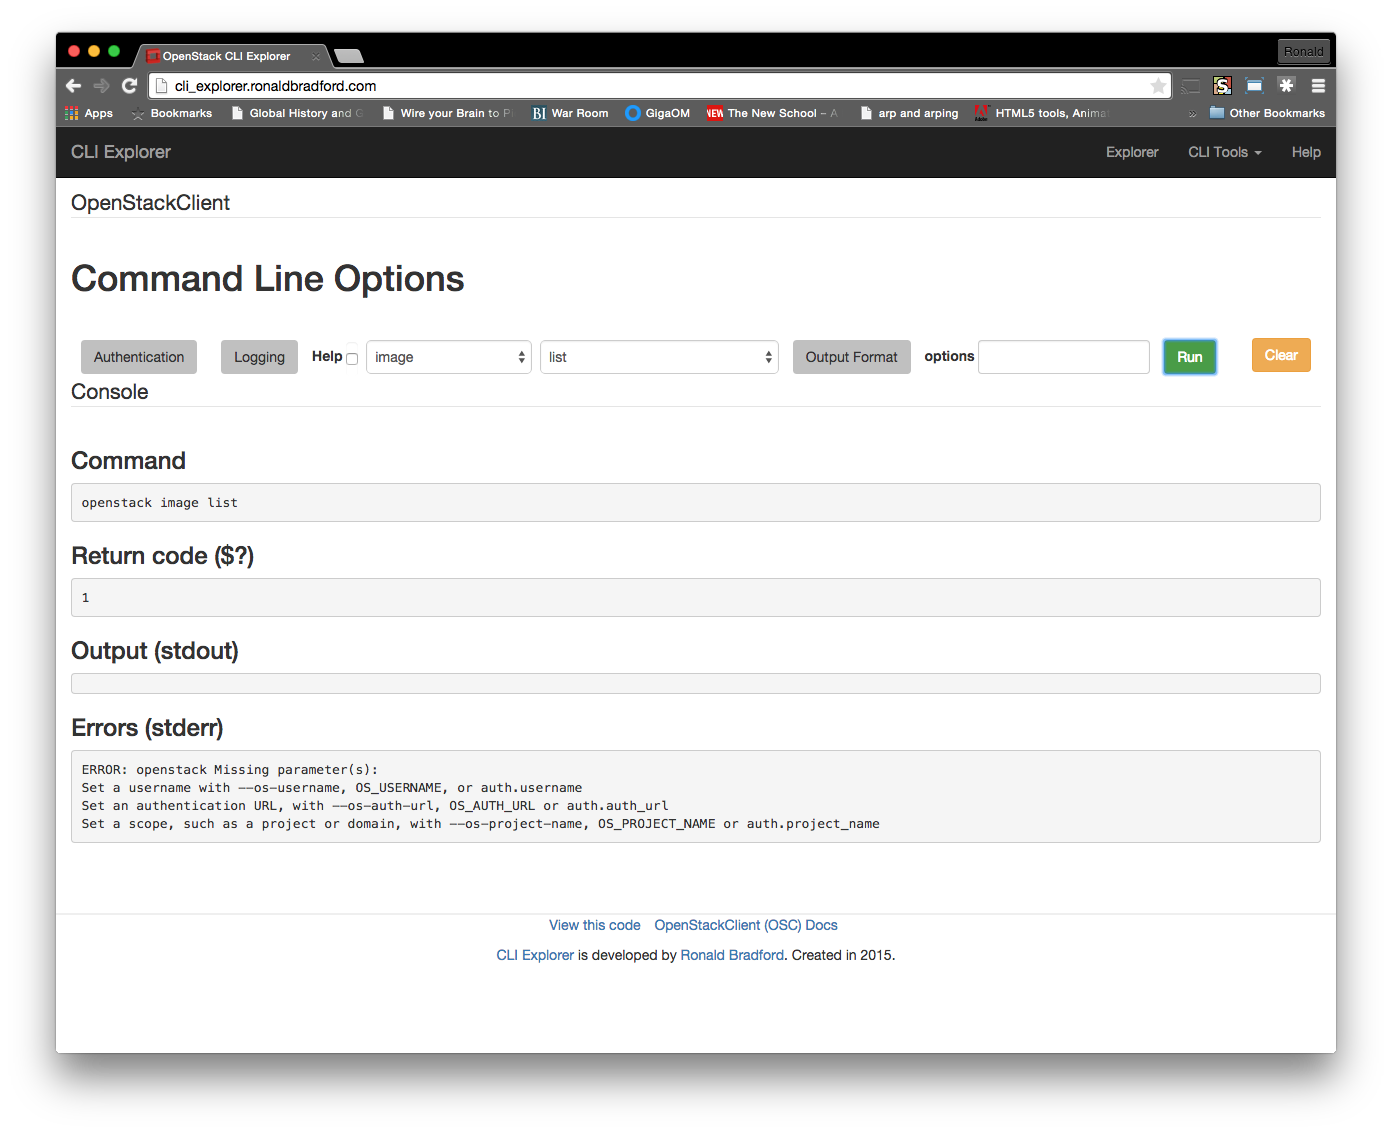
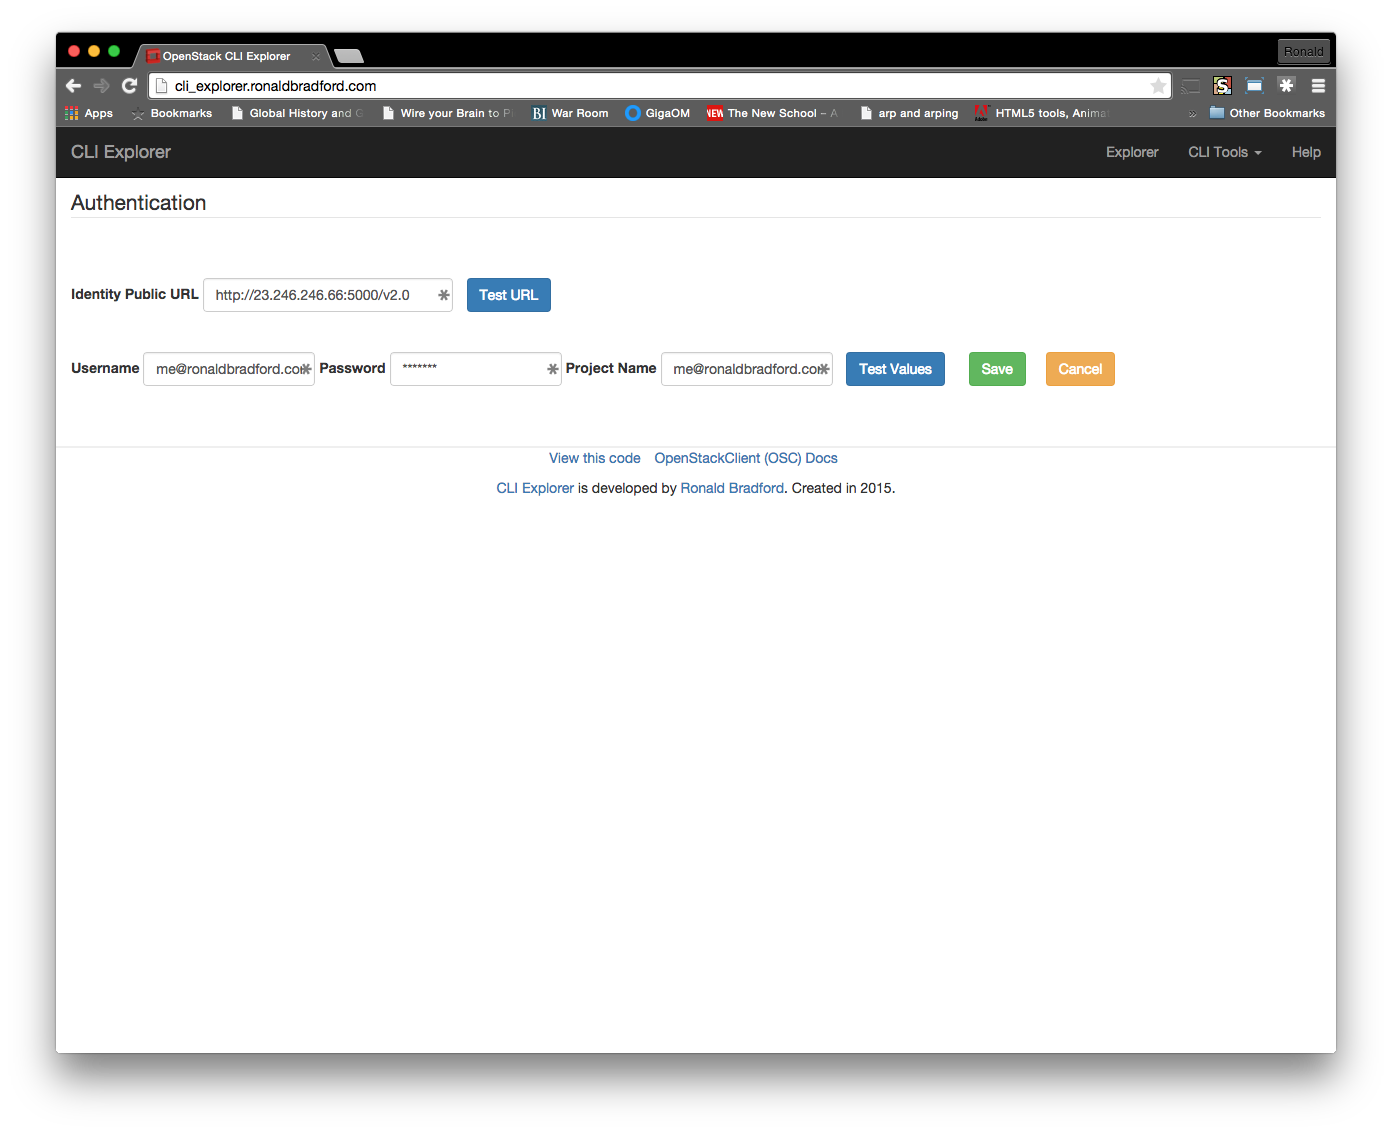
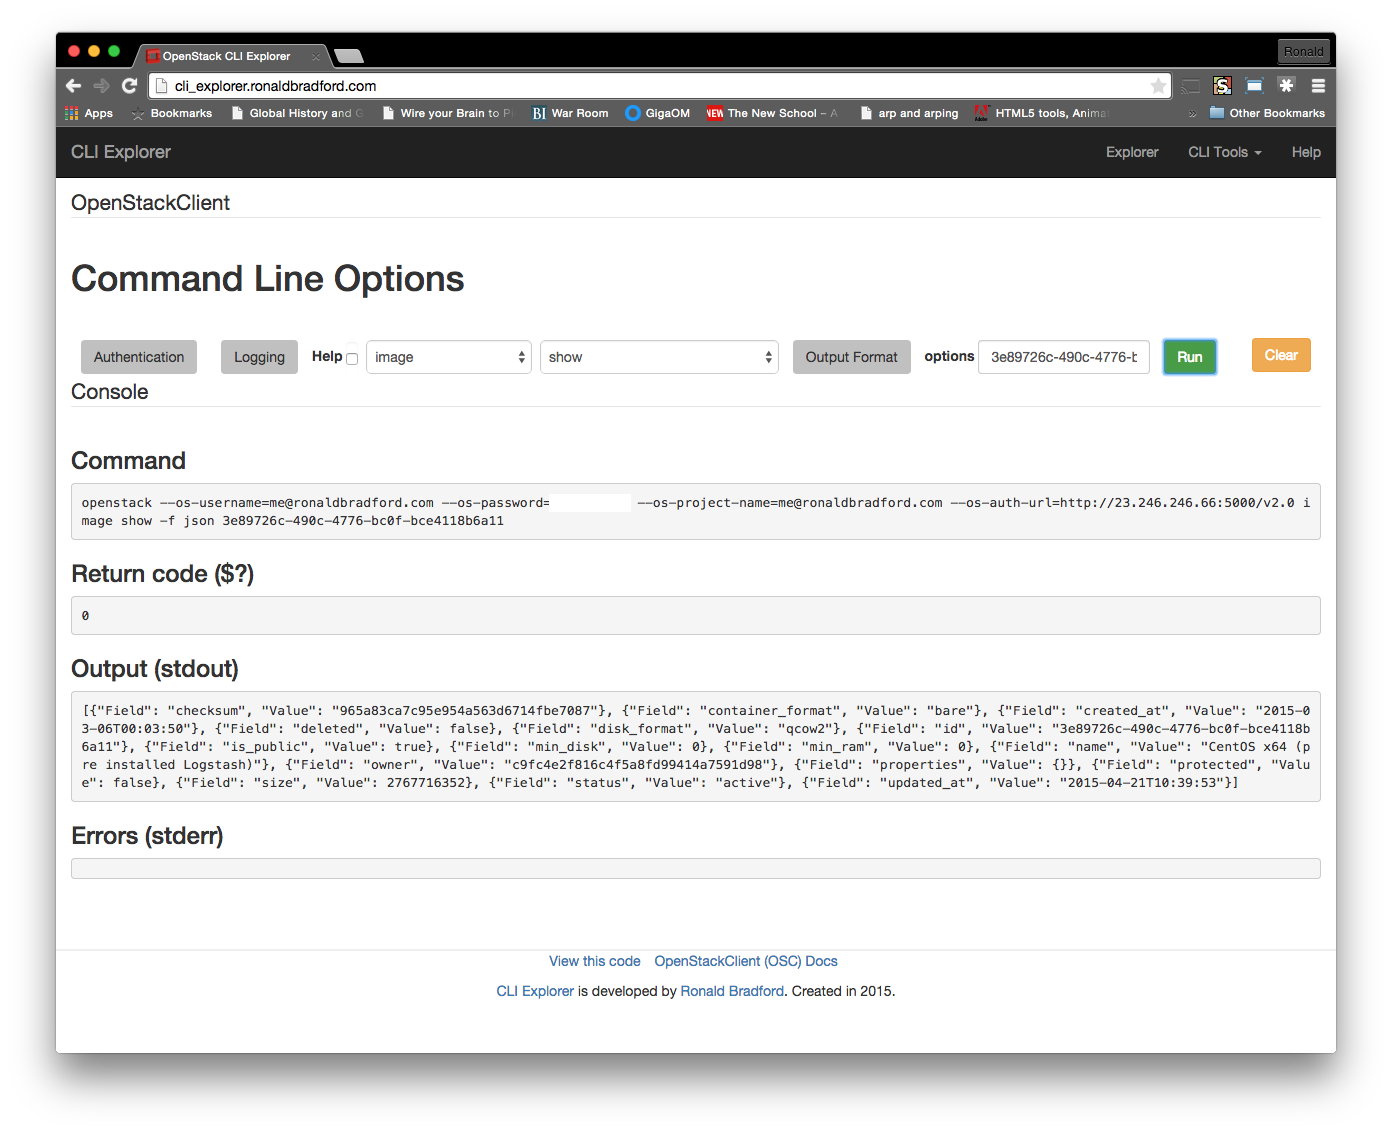
While I attended a number of sessions and took the Hands On Lab for Oracle OpenStack the proof is having a running local environment. My next post will talk about my experiences installing.

References

Managing MySQL Version Upgrades Presentation

The following presentation was given at the Oracle Technology Network (OTN) Latin America 2015 tour events in Uruguay, Argentina, Chile and Peru.

In this presentation I talk about the various versions and means of installing and upgrading MySQL including:

  • MySQL version history from 3.23 to 5.7.8
  • Historical installation options
  • Recommended use of Oracle yum repository for current version
  • The installation and upgrade process, and errors that occur
  • Compatibility changes between MySQL 5.5 and MySQL 5.6 including
    • Reserved words (and their true impact)
    • Legacy TIMESTAMP usage
    • FULLTEXT indexes
    • The query optimizer
    • Clear text password warnings and security improvements
  • Important configuration differences
  • Other recommendations
  • The use of replication

Testing and Verifying your MySQL Backup Strategy Presentation

This past week I have been the sole MySQL representative on the Oracle Technology Network (OTN) Latin America 2015 tour events in Uruguay, Argentina, Chile and Peru.

In this presentation I talk about the important steps for testing and verifying your MySQL backup strategy to ensure your business continuity in any disaster recovery situation. This includes:

  • Overview of the primary product options
  • Backup and recovery strategy considerations
  • Technical requirements
  • Common problems observed
  • What about a failover strategy

Deploying Ubuntu OpenStack Kilo

My previous Ubuntu OpenStack setup has been using the Juno release. I received some installation problems for Kilo using the stable repo and so I switched to using the experimental repo. This comes with a number of surface changes.

  • The interactive installation asks for the installation type first, and password second.
  • The IP range of installed OpenStack services changes from 10.0.4.x to 10.0.7.x.
  • Juju GUI is no longer installed by default. You need to specifically add this as a service after initial installation.
  • The GUI displays additional information during installation.
  • The LXC container name changes from uoi-bootstrap to openstack-single-<user>.

Uninstall any existing environment

Remove any existing installed OpenStack cloud.

sudo openstack-install -k
sudo openstack-install -u

NOTE: Be sure to remove your existing cloud before upgrading. Failing to do so will mean you need to manually cleanup some things with:

sudo lxc-stop --name uoi-bootstrap
sudo lxc-destroy --name uoi-bootstrap
rm -rf $HOME/.cloud_install

Update the OpenStack installer

Upgrade Ubuntu OpenStack with the following commands. In my environment this installed version 0.99.14.

sudo apt-add-repository ppa:cloud-installer/experimental
sudo apt-get update
sudo apt-get upgrade openstack

Install OpenStack Kilo

Installing an Ubuntu OpenStack environment still uses the openstack-install command with an additional argument.

sudo openstack-install --upstream-ppa

NOTE: Updated 6/18/15 When using the experimental repo with version 0.99.12 or earlier you must specify the --extra-ppa argument and value, i.e. sudo openstack-install –extra-ppa ppa:cloud-installer/experimental. Thanks stokachu for pointing this out.

Adding Services

After setting up a Kilo cloud using Ubuntu OpenStack I was able to successfully add a Swift component. Something else that was not quite working as expected in stable.

References

Writing and testing unit tests in OpenStack

The following outlines an approach of identifying and improving unit tests in an OpenStack project.

Obtain the source code

You can obtain a copy of current source code for an OpenStack project at http://git.openstack.org. Active projects are categorized into openstack, openstack-dev, openstack-infra and stackforge.

NOTE: While you can find OpenStack projects on GitHub, these are just a mirror of the source repositories.

In this example I am going to use the Magnum project.

$ git clone git://git.openstack.org/openstack/magnum 
$ cd magnum

Run the current tests

The first step should be to run the current tests to verify the current code. This is to become familiar with the habit, especially if you may have made modifications and are returning to looking at your code. This will also create a virtual environment, which you will want to use later to test your changes.

$ tox -e py27

Should this fail, you may want to ensure all OpenStack developer dependencies are inplace on your OS.

Identify unit tests to work on

You can use the code coverage of unit tests to determine possible places to start adding to existing unit tests. The following command will produce a HTML report in the /cover directory of your project.

$ tox -e cover

This output will look similar to this example coverage output for Magnum. You can also produce a text based version with:

$ coverage report -m 

I will use this text version as a later verification.

Working on a specific unit test

Drilling down on any individual test file you will get an indication of code that does not have unit test coverage. For example in magnum/common/utils:

Once you have found a place to work with and you have identified the corresponding unit test file in the magnum/tests/unit sub-directory, in this example I am working on on magnum/tests/unit/common/test_utils.py, you will want to run this individual unit test in the virtual environment you previously created.

$ source .tox/py27/bin/activate
$ testr run test_utils -- -f

You can now start working on making your changes in whatever editor you wish. You may want to also work interactively in python initially to test and verify classes and methods especially if you are unfamiliar with how the code functions. For example, using the identical import found in test_utils.py for the test coverage I started with these simple checks.

(py27)$ python
Python 2.7.6 (default, Mar 22 2014, 22:59:56)
[GCC 4.8.2] on linux2
Type "help", "copyright", "credits" or "license" for more information.
>>> from magnum.common import utils
>>> utils.is_valid_ipv4('10.0.0.1') == True
True
>>> utils.is_valid_ipv4('') == False
True

I then created some appropriate unit tests for these two methods based on this interactive validation. These tests show that I not only test for valid values, I also test various boundary contains for invalid values including blank, character and out of range values of IP addresses.

    def test_valid_ipv4(self):
        self.assertTrue(utils.is_valid_ipv4('10.0.0.1'))
        self.assertTrue(utils.is_valid_ipv4('255.255.255.255'))

    def test_invalid_ipv4(self):
        self.assertFalse(utils.is_valid_ipv4(''))
        self.assertFalse(utils.is_valid_ipv4('x.x.x.x'))
        self.assertFalse(utils.is_valid_ipv4('256.256.256.256'))
        self.assertFalse(utils.is_valid_ipv4(
                         'AA42:0000:0000:0000:0202:B3FF:FE1E:8329'))

    def test_valid_ipv6(self):
        self.assertTrue(utils.is_valid_ipv6(
                        'AA42:0000:0000:0000:0202:B3FF:FE1E:8329'))
        self.assertTrue(utils.is_valid_ipv6(
                        'AA42::0202:B3FF:FE1E:8329'))

    def test_invalid_ipv6(self):
        self.assertFalse(utils.is_valid_ipv6(''))
        self.assertFalse(utils.is_valid_ipv6('10.0.0.1'))
        self.assertFalse(utils.is_valid_ipv6('AA42::0202:B3FF:FE1E:'))

After making these changes you want to run and verify your modified test works as previously demonstrated.

$ testr run test_utils -- -f
running=OS_STDOUT_CAPTURE=${OS_STDOUT_CAPTURE:-1} \
OS_STDERR_CAPTURE=${OS_STDERR_CAPTURE:-1} \
OS_TEST_TIMEOUT=${OS_TEST_TIMEOUT:-160} \
${PYTHON:-python} -m subunit.run discover -t ./ ${OS_TEST_PATH:-./magnum/tests/unit} --list  -f
running=OS_STDOUT_CAPTURE=${OS_STDOUT_CAPTURE:-1} \
OS_STDERR_CAPTURE=${OS_STDERR_CAPTURE:-1} \
OS_TEST_TIMEOUT=${OS_TEST_TIMEOUT:-160} \
${PYTHON:-python} -m subunit.run discover -t ./ ${OS_TEST_PATH:-./magnum/tests/unit}  --load-list /tmp/tmpDMP50r -f
Ran 59 (+1) tests in 0.824s (-0.016s)
PASSED (id=19)

If your tests fail you will see a FAILED message like. I find it useful to write a failing test intentionally just to validate the actual testing process is working.


${PYTHON:-python} -m subunit.run discover -t ./ ${OS_TEST_PATH:-./magnum/tests/unit}  --load-list /tmp/tmpsZlk3i -f
======================================================================
FAIL: magnum.tests.unit.common.test_utils.UtilsTestCase.test_invalid_ipv6
tags: worker-0
----------------------------------------------------------------------
Empty attachments:
  stderr
  stdout

Traceback (most recent call last):
  File "magnum/tests/unit/common/test_utils.py", line 98, in test_invalid_ipv6
    self.assertFalse(utils.is_valid_ipv6('AA42::0202:B3FF:FE1E:832'))
  File "/home/rbradfor/os/openstack/magnum/.tox/py27/local/lib/python2.7/site-packages/unittest2/case.py", line 672, in assertFalse
    raise self.failureException(msg)
AssertionError: True is not false
Ran 55 (-4) tests in 0.805s (-0.017s)
FAILED (id=20, failures=1 (+1))

Confirming your new unit tests

You can verify this has improved coverage percentage by re-running the coverage commands. I use the text based version as an easy way to see a decrease in the number of lines not covered.

Before

$ coverage report -m | grep "common/utils"
magnum/common/utils    273     94     76     38    62%   92-94, 105-134, 151-157, 208-211, 215-218, 241-259, 267-270, 275-279, 325, 349-384, 442, 449-453, 458-459, 467, 517-518, 530-531, 544
$ tox -e cover

After

$ coverage report -m | grep "common/utils"
magnum/common/utils    273     86     76     38    64%   92-94, 105-134, 151-157, 241-259, 267-270, 275-279, 325, 349-384, 442, 449-453, 458-459, 467, 517-518, 530-531, 544

I can see 8 lines of improvement which I can also verify if I look at the html version.

Before

After

Additional Testing

Make sure you run a full test before committing. This runs all tests in multiple Python versions and runs the PEP8 code style validation for your modified unit tests.

$ tox -e py27

Here are some examples of PEP8 problems with my improvements to the unit tests.

pep8 runtests: commands[0] | flake8
./magnum/tests/unit/common/test_utils.py:88:80: E501 line too long (88 > 79 characters)
./magnum/tests/unit/common/test_utils.py:91:80: E501 line too long (87 > 79 characters)
...
./magnum/tests/unit/common/test_utils.py:112:32: E231 missing whitespace after ','
./magnum/tests/unit/common/test_utils.py:113:32: E231 missing whitespace after ','
./magnum/tests/unit/common/test_utils.py:121:30: E231 missing whitespace after ','
...

Submitting your work

In order for your time and effort to be included in the OpenStack project there are a number of key details you need to follow that I outlined in contributing to OpenStack. Specifically these documents are important.

You do not have to be familiar with the procedures in order to look at the code, and even look at improving the code. You will need to follow the steps as outlined in these links if you want to contribute your code. Remember if you are new, the best access to help is to jump onto the IRC channel of the project you are interested in.

This example along with additions for several other methods was submitted (See patch). It was reviewed and ultimately approved.

References

Some additional information about the tools and processes can be found in these OpenStack documentation and wiki pages.

Contributing to OpenStack

Following my first OpenStack Summit in Vancouver 4/2015 it was time to become involved with contributing to OpenStack.

I have lurked around the mailing lists and several IRC channels for a few weeks and familiarized myself with OpenStack in varying forms including devstack, the free hosted Mirantis Express and the VM version, Ubuntu OpenStack, and even building my own 3 physical server cloud from second hand hardware purchased on eBay.

There are several resources available however I suggest you start with this concise presentation I attended at the summit by Adrian Otto on “7 Habits of Highly Effective Contributors” (slides, video).

You should also look at contributions from existing developers by looking at current code being submitted for review at https://review.openstack.org. I spent several weeks just looking at submissions, and I look at new submissions most days. While it does not always make sense (including a lot initially) its important to look at the full scope of all the projects. It is extremely valuable to look at how the review process works, how others comment on contributions, and look at the types of patches and code changes that are being contributed. There are a number of ways of not doing it right which can be discouraging when you first start contributing. The following links are vital to read, and re-read.

Individual projects also have various information, for example Magnum’s Ways to Contribute.

The benefit of observing for some time is you can be better prepared when you start to contribute. I was also new to how unit testing and automated testing worked in Python (about 7th on my list of known languages), and so learning about running OpenStack tests with tox and understanding the different OpenStack tox configs were valuable lessons, helped by feedback of OpenStack developers on the mailing list and IRC (If you have not looked at the 7 Habits presentation, now is a great time).

I took the time to find areas of interest and value which become more apparent after attending my first Design Summit. I even committed to assist in a design priority in the Magnum project as a result of my learning about how unit testing worked.

And if you write about your experiences another thing you can do is Add your blog to Planet OpenStack. I have received great feedback from the OpenStack community when writing about my first experiences.

Tracking the Ubuntu OpenStack installation process

Following on from Installing Ubuntu OpenStack the following steps help you navigate around the single server installation, monitoring and debugging the installation process.

Configuration

The initial execution of the installer will create a default config.yaml file that defines the container and OpenStack services. After a successful installation this looks like:

$ more $HOME/.cloud-install/config.yaml
container_ip: 10.0.3.149
current_state: 2
deploy_complete: true
install_type: Single
openstack_password: openstack
openstack_release: juno
placements:
  controller:
    assignments:
      LXC:
      - nova-cloud-controller
      - glance
      - glance-simplestreams-sync
      - openstack-dashboard
      - juju-gui
      - keystone
      - mysql
      - neutron-api
      - neutron-openvswitch
      - rabbitmq-server
    constraints:
      cpu-cores: 2
      mem: 6144
      root-disk: 20480
  nova-compute-machine-0:
    assignments:
      BareMetal:
      - nova-compute
    constraints:
      mem: 4096
      root-disk: 40960
  quantum-gateway-machine-0:
    assignments:
      BareMetal:
      - quantum-gateway
    constraints:
      mem: 2048
      root-disk: 20480

This file changes during the installation process which I described later.

The LXC Container

The single server installation is managed within a single LXC container. You can obtain details of and connect to the container with the following.

$ sudo lxc-ls --fancy
----------------------------------------------------------------------------
uoi-bootstrap  RUNNING  10.0.3.149, 10.0.4.1, 192.168.122.1  -     YES      

$ sudo lxc-info --name uoi-bootstrap
Name:           uoi-bootstrap
State:          RUNNING
PID:            19623
IP:             10.0.3.149
IP:             10.0.4.1
IP:             192.168.122.1
CPU use:        27692.85 seconds
BlkIO use:      63.94 GiB
Memory use:     24.29 GiB
KMem use:       0 bytes
Link:           vethC0E9US
 TX bytes:      507.43 MiB
 RX bytes:      1.43 GiB
 Total bytes:   1.93 GiB

$ sudo lxc-attach --name uoi-bootstrap

You can also connect to the server directly. As I prefer to NEVER configure or connect to a server as root this is how I access the LXC container.

$ ssh [email protected]

Juju Status

When connected to the LXC container you can then look at the status of the Juju orchestration with.

$ export JUJU_HOME=~/.cloud-install/juju

$ juju status
environment: local
machines:
  "0":
    agent-state: started
    agent-version: 1.20.11.1
    dns-name: localhost
    instance-id: localhost
    series: trusty
    state-server-member-status: has-vote
  "1":
    agent-state: started
    agent-version: 1.20.11.1
    dns-name: 10.0.4.62
    instance-id: ubuntu-local-machine-1
    series: trusty
    hardware: arch=amd64 cpu-cores=1 mem=4096M root-disk=40960M
  "2":
    agent-state: started
    agent-version: 1.20.11.1
    dns-name: 10.0.4.77
    instance-id: ubuntu-local-machine-2
    series: trusty
    containers:
      2/lxc/0:
        agent-state: started
        agent-version: 1.20.11.1
        dns-name: 10.0.4.147
        instance-id: ubuntu-local-machine-2-lxc-0
        series: trusty
        hardware: arch=amd64
      2/lxc/1:
        agent-state: started
        agent-version: 1.20.11.1
        dns-name: 10.0.4.15
        instance-id: ubuntu-local-machine-2-lxc-1
        series: trusty
        hardware: arch=amd64
      2/lxc/2:
        agent-state: started
        agent-version: 1.20.11.1
        dns-name: 10.0.4.135
        instance-id: ubuntu-local-machine-2-lxc-2
        series: trusty
        hardware: arch=amd64
      2/lxc/3:
        agent-state: started
        agent-version: 1.20.11.1
        dns-name: 10.0.4.133
        instance-id: ubuntu-local-machine-2-lxc-3
        series: trusty
        hardware: arch=amd64
      2/lxc/4:
        agent-state: started
        agent-version: 1.20.11.1
        dns-name: 10.0.4.119
        instance-id: ubuntu-local-machine-2-lxc-4
        series: trusty
        hardware: arch=amd64
      2/lxc/5:
        agent-state: started
        agent-version: 1.20.11.1
        dns-name: 10.0.4.88
        instance-id: ubuntu-local-machine-2-lxc-5
        series: trusty
        hardware: arch=amd64
      2/lxc/6:
        agent-state: started
        agent-version: 1.20.11.1
        dns-name: 10.0.4.155
        instance-id: ubuntu-local-machine-2-lxc-6
        series: trusty
        hardware: arch=amd64
      2/lxc/7:
        agent-state: started
        agent-version: 1.20.11.1
        dns-name: 10.0.4.36
        instance-id: ubuntu-local-machine-2-lxc-7
        series: trusty
        hardware: arch=amd64
      2/lxc/8:
        agent-state: started
        agent-version: 1.20.11.1
        dns-name: 10.0.4.11
        instance-id: ubuntu-local-machine-2-lxc-8
        series: trusty
        hardware: arch=amd64
    hardware: arch=amd64 cpu-cores=2 mem=6144M root-disk=20480M
  "3":
    agent-state: started
    agent-version: 1.20.11.1
    dns-name: 10.0.4.10
    instance-id: ubuntu-local-machine-3
    series: trusty
    hardware: arch=amd64 cpu-cores=1 mem=2048M root-disk=20480M
  "4":
    agent-state: started
    agent-version: 1.20.11.1
    dns-name: 10.0.4.96
    instance-id: ubuntu-local-machine-4
    series: trusty
    hardware: arch=amd64 cpu-cores=1 mem=512M root-disk=8192M
  "5":
    agent-state: started
    agent-version: 1.20.11.1
    dns-name: 10.0.4.140
    instance-id: ubuntu-local-machine-5
    series: trusty
    hardware: arch=amd64 cpu-cores=1 mem=512M root-disk=8192M
  "6":
    agent-state: started
    agent-version: 1.20.11.1
    dns-name: 10.0.4.197
    instance-id: ubuntu-local-machine-6
    series: trusty
    hardware: arch=amd64 cpu-cores=1 mem=512M root-disk=8192M
services:
  glance:
    charm: cs:trusty/glance-11
    exposed: false
    relations:
      amqp:
      - rabbitmq-server
      cluster:
      - glance
      identity-service:
      - keystone
      image-service:
      - nova-cloud-controller
      - nova-compute
      object-store:
      - swift-proxy
      shared-db:
      - mysql
    units:
      glance/0:
        agent-state: started
        agent-version: 1.20.11.1
        machine: 2/lxc/4
        open-ports:
        - 9292/tcp
        public-address: 10.0.4.119
  glance-simplestreams-sync:
    charm: local:trusty/glance-simplestreams-sync-0
    exposed: false
    relations:
      amqp:
      - rabbitmq-server
      identity-service:
      - keystone
    units:
      glance-simplestreams-sync/0:
        agent-state: started
        agent-version: 1.20.11.1
        machine: 2/lxc/5
        public-address: 10.0.4.88
  juju-gui:
    charm: cs:trusty/juju-gui-16
    exposed: false
    units:
      juju-gui/0:
        agent-state: started
        agent-version: 1.20.11.1
        machine: 2/lxc/1
        open-ports:
        - 80/tcp
        - 443/tcp
        public-address: 10.0.4.15
  keystone:
    charm: cs:trusty/keystone-12
    exposed: false
    relations:
      cluster:
      - keystone
      identity-service:
      - glance
      - glance-simplestreams-sync
      - neutron-api
      - nova-cloud-controller
      - openstack-dashboard
      - swift-proxy
      shared-db:
      - mysql
    units:
      keystone/0:
        agent-state: started
        agent-version: 1.20.11.1
        machine: 2/lxc/2
        public-address: 10.0.4.135
  mysql:
    charm: cs:trusty/mysql-12
    exposed: false
    relations:
      cluster:
      - mysql
      shared-db:
      - glance
      - keystone
      - neutron-api
      - nova-cloud-controller
      - nova-compute
      - quantum-gateway
    units:
      mysql/0:
        agent-state: started
        agent-version: 1.20.11.1
        machine: 2/lxc/0
        public-address: 10.0.4.147
  neutron-api:
    charm: cs:trusty/neutron-api-6
    exposed: false
    relations:
      amqp:
      - rabbitmq-server
      cluster:
      - neutron-api
      identity-service:
      - keystone
      neutron-api:
      - nova-cloud-controller
      neutron-plugin-api:
      - neutron-openvswitch
      shared-db:
      - mysql
    units:
      neutron-api/0:
        agent-state: started
        agent-version: 1.20.11.1
        machine: 2/lxc/7
        open-ports:
        - 9696/tcp
        public-address: 10.0.4.36
  neutron-openvswitch:
    charm: cs:trusty/neutron-openvswitch-2
    exposed: false
    relations:
      amqp:
      - rabbitmq-server
      neutron-plugin:
      - nova-compute
      neutron-plugin-api:
      - neutron-api
    subordinate-to:
    - nova-compute
  nova-cloud-controller:
    charm: cs:trusty/nova-cloud-controller-51
    exposed: false
    relations:
      amqp:
      - rabbitmq-server
      cloud-compute:
      - nova-compute
      cluster:
      - nova-cloud-controller
      identity-service:
      - keystone
      image-service:
      - glance
      neutron-api:
      - neutron-api
      quantum-network-service:
      - quantum-gateway
      shared-db:
      - mysql
    units:
      nova-cloud-controller/0:
        agent-state: started
        agent-version: 1.20.11.1
        machine: 2/lxc/3
        open-ports:
        - 3333/tcp
        - 8773/tcp
        - 8774/tcp
        - 9696/tcp
        public-address: 10.0.4.133
  nova-compute:
    charm: cs:trusty/nova-compute-14
    exposed: false
    relations:
      amqp:
      - rabbitmq-server
      cloud-compute:
      - nova-cloud-controller
      compute-peer:
      - nova-compute
      image-service:
      - glance
      neutron-plugin:
      - neutron-openvswitch
      shared-db:
      - mysql
    units:
      nova-compute/0:
        agent-state: started
        agent-version: 1.20.11.1
        machine: "1"
        public-address: 10.0.4.62
        subordinates:
          neutron-openvswitch/0:
            upgrading-from: cs:trusty/neutron-openvswitch-2
            agent-state: started
            agent-version: 1.20.11.1
            public-address: 10.0.4.62
  openstack-dashboard:
    charm: cs:trusty/openstack-dashboard-9
    exposed: false
    relations:
      cluster:
      - openstack-dashboard
      identity-service:
      - keystone
    units:
      openstack-dashboard/0:
        agent-state: started
        agent-version: 1.20.11.1
        machine: 2/lxc/6
        open-ports:
        - 80/tcp
        - 443/tcp
        public-address: 10.0.4.155
  quantum-gateway:
    charm: cs:trusty/quantum-gateway-10
    exposed: false
    relations:
      amqp:
      - rabbitmq-server
      cluster:
      - quantum-gateway
      quantum-network-service:
      - nova-cloud-controller
      shared-db:
      - mysql
    units:
      quantum-gateway/0:
        agent-state: started
        agent-version: 1.20.11.1
        machine: "3"
        public-address: 10.0.4.10
  rabbitmq-server:
    charm: cs:trusty/rabbitmq-server-26
    exposed: false
    relations:
      amqp:
      - glance
      - glance-simplestreams-sync
      - neutron-api
      - neutron-openvswitch
      - nova-cloud-controller
      - nova-compute
      - quantum-gateway
      cluster:
      - rabbitmq-server
    units:
      rabbitmq-server/0:
        agent-state: started
        agent-version: 1.20.11.1
        machine: 2/lxc/8
        open-ports:
        - 5672/tcp
        public-address: 10.0.4.11

You can also look at a subset of the status for a particular service, for example keystone with:

$ juju status keystone
environment: local
machines:
  "1":
    agent-state: started
    agent-version: 1.20.11.1
    dns-name: 10.0.4.128
    instance-id: ubuntu-local-machine-1
    series: trusty
    containers:
      1/lxc/2:
        agent-state: started
        agent-version: 1.20.11.1
        dns-name: 10.0.4.142
        instance-id: ubuntu-local-machine-1-lxc-2
        series: trusty
        hardware: arch=amd64
    hardware: arch=amd64 cpu-cores=2 mem=6144M root-disk=20480M
services:
  keystone:
    charm: cs:trusty/keystone-12
    exposed: false
    relations:
      cluster:
      - keystone
      identity-service:
      - glance
      - glance-simplestreams-sync
      - neutron-api
      - nova-cloud-controller
      - openstack-dashboard
      shared-db:
      - mysql
    units:
      keystone/0:
        agent-state: started
        agent-version: 1.20.11.1
        machine: 1/lxc/2
        public-address: 10.0.4.142

Monitoring the Installation

When performing an installation you can monitor the executed commands with:

$ tail -f $HOME/.cloud-install/commands.log

...

This provides a lot of debugging output. A streamlined logging is actually possible with automated installation described later.

Uninstalling

As the single server instance is in a LXC container, as the documentation states uninstalling the environment is a rather trivial process that takes only a few seconds.

This will teardown the cloud but leaving userdata available for a subsequent deployment.

$ sudo openstack-install -k
Warning:

This will destroy the host Container housing the OpenStack private cloud. This is a permanent operation.
Proceed? [y/N] Y
Removing static route
Removing host container...
Container is removed.

You can also do a more permanent uninstall of the cloud and packages.

$ sudo openstack-install -u
Warning:

This will uninstall OpenStack and make a best effort to return the system back to its original state.
Proceed? [y/N] Y
Restoring system to last known state.
Ubuntu Openstack Installer Uninstalling ...Single install path.

This does not however seem to cleanup $HOME/.cloud-install. You can safely remove this or move it sideways when re-deploying without any issues.

Installation automation

As described in my original post, the openstack-install script is a cursors-based interactive view. You can automate the installation by defining the needed setup inputs in a separate configuration file and running in headless mode.

$ echo "install_type: Single
openstack_password: openstack" > install.yaml

$ sudo openstack-install --headless --config install.yaml

This has the added benefit providing a more meaningful log of the state of the installation with less verbose information then in the commands.log file.

[INFO  • 06-02 12:02:42 • cloudinstall.install] Running in headless mode.
[INFO  • 06-02 12:02:42 • cloudinstall.install] Performing a Single Install
[INFO  • 06-02 12:02:42 • cloudinstall.task] [TASKLIST] ['Initializing Environment', 'Creating container', 'Bootstrapping Juju']
[INFO  • 06-02 12:02:42 • cloudinstall.task] [TASK] Initializing Environment
[INFO  • 06-02 12:02:42 • cloudinstall.consoleui] Building environment
[INFO  • 06-02 12:02:42 • cloudinstall.single_install] Prepared userdata: {'extra_sshkeys': ['ssh-rsa ...\n'], 'seed_command': ['env', 'pollinate', '-q']}
[INFO  • 06-02 12:02:42 • cloudinstall.single_install] Setting permissions for user rbradfor
[INFO  • 06-02 12:02:43 • cloudinstall.task] [TASK] Creating container
[INFO  • 06-02 12:04:20 • cloudinstall.single_install] Setting DHCP properties for host container.
[INFO  • 06-02 12:04:20 • cloudinstall.single_install] Adding static route for 10.0.4.0/24 via 10.0.3.160
...
[INFO  • 06-02 12:22:50 • cloudinstall.consoleui] Checking availability of nova-cloud-controller: pending
[INFO  • 06-02 12:23:31 • cloudinstall.consoleui] Checking availability of nova-cloud-controller: installed
[INFO  • 06-02 12:23:52 • cloudinstall.consoleui] Checking availability of nova-cloud-controller: started
[INFO  • 06-02 12:24:34 • cloudinstall.consoleui] Checking availability of keystone: started
[INFO  • 06-02 12:24:44 • cloudinstall.consoleui] Checking availability of keystone: started
[INFO  • 06-02 12:24:44 • cloudinstall.consoleui] Checking availability of nova-cloud-controller: started
[INFO  • 06-02 12:27:38 • cloudinstall.consoleui] Checking availability of quantum-gateway: started
[INFO  • 06-02 12:27:38 • cloudinstall.consoleui] Checking availability of nova-cloud-controller: started
[INFO  • 06-02 12:27:38 • cloudinstall.consoleui] Validating network parameters for Neutron
[INFO  • 06-02 12:27:53 • cloudinstall.consoleui] All systems go!=

And 25 minutes later you have an available cloud.

If you attempt to look at the GUI status page with openstack-status you will be given a text based version of messages like.

$ sudo openstack-status
[INFO  • 06-02 12:06:21 • cloudinstall.core] Running openstack-status in headless mode.
[INFO  • 06-02 12:06:21 • cloudinstall.consoleui] Loaded placements from file.
[INFO  • 06-02 12:06:21 • cloudinstall.consoleui] Waiting for machines to start: 3 unknown
[INFO  • 06-02 12:08:20 • cloudinstall.consoleui] Waiting for machines to start: 1 pending, 2 unknown
[INFO  • 06-02 12:08:48 • cloudinstall.consoleui] Waiting for machines to start: 2 pending, 1 unknown
[INFO  • 06-02 12:09:04 • cloudinstall.consoleui] Waiting for machines to start: 1 down (started), 1 pending, 1 unknown
[INFO  • 06-02 12:09:13 • cloudinstall.consoleui] Waiting for machines to start: 1 down (started), 2 pending
[INFO  • 06-02 12:09:20 • cloudinstall.consoleui] Waiting for machines to start: 2 down (started), 1 pending
[INFO  • 06-02 12:09:26 • cloudinstall.consoleui] Waiting for machines to start: 1 pending, 2 started
[INFO  • 06-02 12:09:51 • cloudinstall.consoleui] Waiting for machines to start: 1 down (started), 2 started
[INFO  • 06-02 12:10:44 • cloudinstall.consoleui] Verifying service deployments
[INFO  • 06-02 12:10:44 • cloudinstall.consoleui] Missing ConsoleUI() attribute: set_pending_deploys
[INFO  • 06-02 12:10:44 • cloudinstall.consoleui] Checking if MySQL is deployed
[INFO  • 06-02 12:10:44 • cloudinstall.consoleui] Deploying MySQL to machine lxc:1
[INFO  • 06-02 12:10:49 • cloudinstall.consoleui] Deployed MySQL.
[INFO  • 06-02 12:10:49 • cloudinstall.consoleui] Checking if Juju GUI is deployed
[INFO  • 06-02 12:10:49 • cloudinstall.consoleui] Deploying Juju GUI to machine lxc:1
[INFO  • 06-02 12:11:00 • cloudinstall.consoleui] Deployed Juju GUI.
[INFO  • 06-02 12:11:00 • cloudinstall.consoleui] Checking if Keystone is deployed
[INFO  • 06-02 12:11:00 • cloudinstall.consoleui] Deploying Keystone to machine lxc:1
...

It seems you can trick it into providing both a GUI and text version with the following in another shell session.

$ sed -ie "/headless/d" $HOME/.cloud-install/config.yaml
$ sudo openstack-status

NOTE: You will not get any output until the initial container is completed. This also leaves a .pid file that must be manually cleaned up if you run to soon. The next invocation provides the following message.

$ sudo openstack-status
Another instance of openstack-status is running. If you're sure there are no other instances, please remove ~/.cloud-install/openstack.pid
$ rm $HOME/.cloud-install/openstack.pid

Monitoring the installation progress

The running config.yaml file changes over the duration of the installation.
It’s most basic configuration (when starting with the GUI) is:

$ more $HOME/.cloud-install/config.yaml
current_state: 0
openstack_release: juno

The release is also defined in the $HOME/.cloud-install/openstack_release file.

When starting by passing the configuration as previously mentioned it’s initial state is:

$ more $HOME/.cloud-install/config.yaml
config_file: install.yaml
current_state: 0
headless: true
install_type: Single
openstack_password: openstack
openstack_release: juno

This is updated when the LXC container is installed.

$ more $HOME/.cloud-install/config.yaml
config_file: install.yaml
container_ip: 10.0.3.77
current_state: 0
headless: true
install_type: Single
openstack_password: openstack
openstack_release: juno

And also updated during installation, such as.

$ more $HOME/.cloud-install/config.yaml
config_file: install.yaml
container_ip: 10.0.3.77
current_state: 0
headless: true
install_type: Single
openstack_password: openstack
openstack_release: juno
placements:
  controller:
    assignments:
      LXC:
      - nova-cloud-controller
      - glance
      - glance-simplestreams-sync
      - openstack-dashboard
      - juju-gui
      - keystone
      - mysql
      - neutron-api
      - neutron-openvswitch
      - rabbitmq-server
    constraints:
      cpu-cores: 2
      mem: 6144
      root-disk: 20480
  nova-compute-machine-0:
    assignments:
      BareMetal:
      - nova-compute
    constraints:
      mem: 4096
      root-disk: 40960
  quantum-gateway-machine-0:
    assignments:
      BareMetal:
      - quantum-gateway
    constraints:
      mem: 2048
      root-disk: 20480

When completed the configuration has the following settings.

config_file: install.yaml
container_ip: 10.0.3.77
current_state: 2
deploy_complete: true
install_type: Single
openstack_password: openstack
openstack_release: juno
placements:
...

Problems

When using the GUI installer the first time you quit (using Q), it seems to leave the terminal state wrong. The following will reset this to normal use.

$ stty sane  ^j    # (i.e. Ctrl-J together).

Subsequent uses of openstack-status do not have the same problem.

References

In my next post I am going to talk about the analysis taken to debug errors in the installation, starting with Keystone – hook failed: “config-changed” message I got attempting to install kilo, and hence this more detailed analysis of the installation process components.

Installing Ubuntu OpenStack

The The Canonical Distribution of Ubuntu OpenStack provides a simple installer to run an OpenStack cloud. You can deploy a simple single machine setup with fully containerized services (11 in total), or a multi server installation leveraging MAAS – Metal as a Service and Landscape Autopilot.

Installation

This post describes my experiences with the single machine setup on a 4 core machine with 32GB of RAM with a clean Ubuntu 14.04 LTS OS. The installation requires the following commands to configure the repo, install and configure your OpenStack cloud. In this example, the installed version is 0.22.3.

sudo apt-add-repository -y ppa:cloud-installer/stable
sudo apt-get update
sudo apt-get install -y openstack
sudo openstack-install --version
sudo openstack-install

The final step uses a cusors-based interface and only requires two steps before the installation.

  • Specify a password
  • Specify the install type


The UI provides a progress status of the installation. Initially new containers will start with a Pending status. Following the starting of the Juju GUI container the footer bar shows the URL for the JujuGUI, in my case http://10.0.4.112. Following the starting of the Openstack Dashboard you will then get a Horizon URL also detailed in the footer such as http://10.0.4.74/horizon.


Horizon

The Horizon display is what you generally expect.


JujuGUI

The JujuGUI provides a display of the deployment orchestration via charms. You can also drill down to specific services. An example is for the glance service using the charm cs:trusty/glance-11. This describes the relationships and configuration which are also seen in the GUI. You can also view online the full source code used to create this deployed service.


OpenStack Status

You can view the state of your containerized cloud with openstack-status which is a cursors-based display of the running installation, the same used during the installation. This displays the units deployed, status messages and a footer URL bar that indicates the URL’s of Horizon and JujuGUI. Each time you invoke this it will also check services, as indicated by the [INFO] messages.


Connecting to Containers

The installer will automatically create a SSH key for the user that you use to run the openstack-install command. This enables you to SSH to any of the containers, for example to connect to the MySQL container.

ssh [email protected]
$ mysql -uroot -p`sudo cat /var/lib/mysql/mysql.passwd` -e "SHOW SCHEMAS"
+--------------------+
| Database           |
+--------------------+
| information_schema |
| glance             |
| keystone           |
| mysql              |
| neutron            |
| nova               |
| performance_schema |
+--------------------+

You can use the various OpenStack clients to access OpenStack services. These are not installed by default.

sudo apt-get install -y python-glanceclient python-openstackclient python-novaclient python-keystoneclient
$ source $HOME/.cloud-install/openstack-admin-rc
$ glance image-list
+--------------------------------------+---------------------------------------------------------------+-------------+------------------+-----------+--------+
| ID                                   | Name                                                          | Disk Format | Container Format | Size      | Status |
+--------------------------------------+---------------------------------------------------------------+-------------+------------------+-----------+--------+
| f3cd4ec6-8ce6-4a44-85ec-2f8f066f351b | auto-sync/ubuntu-trusty-14.04-amd64-server-20150528-disk1.img | qcow2       | bare             | 257294848 | active |
+--------------------------------------+---------------------------------------------------------------+-------------+------------------+-----------+--------+

More Information

Read Tracking the Ubuntu OpenStack installation process for more detailed information on monitoring the installation process.

Thanks to the New York OpenStack Group and a presentation by Mark Baker of Canonical who demonstrated MAAS and Landscape AutoPilot installation of OpenStack. Slides of Automating hard things slides.

Understanding OpenStack developer dependencies

While reviewing the OpenStack keystone codebase on an existing VM used with devstack I came across a dependency problem with Python pbr. Python Build Reasonableness (pbr) is actually a result of work on OpenStack. Additional info can be found at Openstack pbr.

On one server machine I had this package installed. At this time I do not know what process actually installed the pbr package.

$ sudo dpkg -l | grep pbr
ii  python-pbr        0.7.0-0ubuntu2      all          inject useful and sensible default behaviors into setuptools - Python 2.x

This is incompatible with current code from several OpenStack projects, keystone and python-openstackclient being two I am working with when reviewing the projects requirements in requirements.txt.

$ grep pbr requirements.txt
pbr>=0.6,!=0.7,<1.0

As seen here, 0.7 is specifically excluded. When updating this machine with the required versions to run the checked out code I ran into the following problem.

$ sudo -H pip install -r requirements.txt

...
  Found existing installation: pbr 0.7.0
    Uninstalling pbr-0.7.0:
...
     OSError: [Errno 13] Permission denied: '/usr/lib/python2.7/dist-packages/pbr/version.py'

This lead me to determine I need to run multiple separate VMs. Dedicated VMs for devstack installations when I'm testing things, and a dedicated VM for source development. I later determined the best action was to do development on my host machine installing these developer dependencies and always running any deployed versions in VMs.

Minimum requirements

Using a stock Ubuntu 14.04 LTS server installation I took the time to iteratively check the needed dependencies

# Git needed to retrieve OpenStack code
sudo apt-get install -y git-core

# Python is installed by default on an Ubuntu Server

# install easy_install
sudo apt-get install python-setuptools

# install pip - Package Management System   Uses Python Package Index (PyPI)
sudo easy_install pip

# Install tox - Python automated and standardized testing
sudo -H pip install tox

# Python Developer Libraries
sudo apt-get install -y python-dev

# Openstack developer dependencies
sudo apt-get install -y libffi-dev libssl-dev libldap2-dev libffi-dev libsasl2-dev libxslt1-dev libxml2-dev

With the necessary dependencies met, the following builds a working keystone developer virtual environment.

git clone git://git.openstack.org/openstack/keystone
cd keystone
tox -e py27 --notest

Required Dependencies

Certain projects do a good job of defining the required OS dependencies such as keystone.

To validate these requirements the following is an iterative process of determining the compilation error message and needed package dependency.

  • For missing #include <ffi.h> install libffi-dev
  • For missing #include <openssl/aes.h> install libssl-dev
  • For missing #include "lber.h" install libldap2-dev
  • For missing #include <ffi.h> install libffi-dev
  • For missing #include <sasl.h> install libsasl2-dev
  • For missing #include "libxml/xmlversion.h" install libxslt1-dev which requires libxml2-dev

For setting up a development environment libsqlite3-dev was not initially needed. This does not mean it's needed later for testing purposes.

The benefit of attending the OpenStack Summit

I attended my first OpenStack Summit in Vancouver 4/2015. While I have used various cloud computing technologies for eight years and presented cloud content at events such as Cloud Expo, this was my first involvement with OpenStack.

It was the essential experience to become more familiar with the technology, the ecosystem, the contributors and the process of how OpenStack software evolves.

If you are new to OpenStack I would strongly advise you to read about and play with OpenStack so that you have a basic knowledge of some of the core projects. The conference can then provide the accelerated learning to help guide you where to find a possible home in the ecosystem. OpenStack is a large and complex product with many different projects. Having being involved in the mailing list and IRC for a few weeks prior to the conference I was able to interact with core OpenStack developers and PTL’s. This made it much easier to introduce myself at the conference to meet people face to face.

If you missed it, there are many of the Vancouver Summit Videos online.

During the summit which included conference sessions for attendees was the Design Summit. This is where the individual projects discuss the “design” of the next release of OpenStack. This includes talks on the features projects are hoping to include. These sessions are very informative to see just how the OpenStack ecosystem improves and develops the product. I found these to be highly valuable. Not being a seasoned developer in OpenStack this also enabled me to evaluate a range of different projects. I would encourage you to be open-minded and attend design sessions in multiple projects to see how individual teams work, and to find areas of interest. My design summit experience including attending sessions on Keystone, Magnum, OpenStackClient, Infra, Tempest and Rally for example.

My thoughts on Architecture and Software Development with MySQL

Yesterday I was able to present to the Portland MySQL Users Group two presentations that are important foundations for effective development with MySQL.

With 26 years of architectural experience in RDBMS and 16 years of MySQL knowledge, my extensive exposure to large and small companies from consulting has lead to these presentations containing common obstacles I have seen an help organization with. All that can be easily avoided. The benefits of improved development and better processes leads to better quality software, better performance and a lower cost of ownership, that is saving companies money.

Thanks to Emily and Daniel for organizing and New Relic for hosting.

Learning the OpenStackClient (OSC)

As a way to navigate the extent of the CLI options for nova, keystone, glance and also openstack commands I came up with an educational approach.

While still early development the goal is to provide a Beginner/Intermediate/Expert views exposing various commands and options to help the user learn in a controlled way.

This initial V0.5 version provides all the glue to test commands against an OpenStack Cloud.

The tool is designed to be self explaining if you have the most basic understanding the OSC. Starting with Help gives you an overview of the options.

As this runs on my webserver, the default operation works great to display help syntax and error conditions. It also connects to a functioning OpenStack Cloud. In my first example it works with Mirantis Express. I intend to provide a means to install within a devstack installation.

Home Page

Help

Running your first command (using help)

Running your first command (producing error output)

Adding Authentication

Listing Images

Show details of an Image in JSON format

Python 3 semantics for integer division

As I refresh my skills in Python 2 to Python 3 semantics I discovered there is a difference in the division operator (i.e. /).

When using integers in Python 2 the result (by default) is an integer. For example.

$ python2
Python 2.7.6 (default, Mar 22 2014, 22:59:56)
>>> 1/2
0
>>> 1/2.0
0.5

In Python 3 the result is a float.

$ python3
Python 3.4.0 (default, Apr 11 2014, 13:05:11)
>>> 1/2
0.5

It has been encouraged in the Porting Python 2 Code to Python 3 documentation to perform the following import.

$ python2
Python 2.7.6 (default, Mar 22 2014, 22:59:56)
>>> from __future__ import division
>>> 1/2
0.5

I was also unaware of the floor operator (i.e. //) as specified in PEP 238.

$ python2
Python 2.7.6 (default, Mar 22 2014, 22:59:56)
>>> from __future__ import division
>>> 1//2
0
>>> 1/2
0.5

I uncovered this by playing with algorithms between versions. This Newton Method for the Square Root was something I was unaware of, and this example failed when using Python 2.

My improved version on the referenced example without an import.

def squareroot(number, precision = 5):
  root = number/2.0
  for i in range(20):
    nroot = (1/2.0)*(root + (number / root))
    #print i, nroot
    if (root - nroot < 1.0/10**precision):
      break
    root = nroot
  return round(nroot, precision)
>>> squareroot(10)
3.16228
>>> squareroot(10,1)
3.2
>>> squareroot(10,2)
3.16
>>> squareroot(10,5)
3.16228
>>> squareroot(10,10)
3.1622776602

Disabling the temporary authorization token in devstack keystone

While building my own OpenStack cloud on physical servers I realized that Keystone uses a temporary authorization token in the Create the service entity and API endpoint and Create projects, users, and roles steps.

The Verify operation step makes reference to removing this mechanism however my current devstack installations have not done this.

To verify this I use the SERVICE_TOKEN as defined in my devstack/local.conf and the Keystone Admin URL.

$ openstack --os-token=aaaaaaaa-bbbb-cccc-dddd-eeeeeeeeeeee --os-url=http://controller:35357/v2.0 user list
+----------------------------------+----------------------------------+
| ID                               | Name                             |
+----------------------------------+----------------------------------+
| 554209509f5b47e286e0379bcbf66762 | admin                            |
| 59ac0457a80d449c9dac3b66848f2b5b | demo                             |
| 8aab962698f9460692efb8d3aab35886 | verify_tempest_config-1304647972 |
| 8b602467cd9045888687987067cbd3f6 | alt_demo                         |
| a134c3b33e94475fb5398643dd816053 | glance                           |
| c68c68579ec0437094a14dfbc4728224 | cinder                           |
| e65bd34ca85a429ea5c56bf980f77d67 | nova                             |
+----------------------------------+----------------------------------+

Removing the configuration settings as documented from /etc/keystone/keystone-paste.ini as documented DOES NOT disable this level of access.

NOTE: This edit removes the admin_token_auth option from the pipeline setting in the [pipeline:public_api], [pipeline:admin_api] and [pipeline:api_v3] sections.

$ sudo sed -ie "s/ admin_token_auth / /" /etc/keystone/keystone-paste.ini
$ openstack --os-token=aaaaaaaa-bbbb-cccc-dddd-eeeeeeeeeeee --os-url=http://controller:35357/v2.0 user list
+----------------------------------+----------------------------------+
| ID                               | Name                             |
+----------------------------------+----------------------------------+
| 554209509f5b47e286e0379bcbf66762 | admin                            |
| 59ac0457a80d449c9dac3b66848f2b5b | demo                             |
| 8aab962698f9460692efb8d3aab35886 | verify_tempest_config-1304647972 |
| 8b602467cd9045888687987067cbd3f6 | alt_demo                         |
| a134c3b33e94475fb5398643dd816053 | glance                           |
| c68c68579ec0437094a14dfbc4728224 | cinder                           |
| e65bd34ca85a429ea5c56bf980f77d67 | nova                             |
+----------------------------------+----------------------------------+

An additional (and not presently documented step) of restarting apache is needed to invalidate this access.

$ sudo service apache2 restart
$ openstack --os-token=aaaaaaaa-bbbb-cccc-dddd-eeeeeeeeeeee --os-url=http://controller:35357/v2.0 user list
ERROR: openstack Could not find token: aaaaaaaa-bbbb-cccc-dddd-eeeeeeeeeeee (Disable debug mode to suppress these details.) (HTTP 401) (Request-ID: req-617961b7-012a-4d61-bdfb-aa738b8f788f)

The results for the command as shown can be produced by using the user/password credentials with the Keystone public URL.

$ openstack --os-username=admin --os-password=passwd --os-project-name=admin --os-auth-url=http://localhost:5000/ user list
+----------------------------------+----------------------------------+
| ID                               | Name                             |
+----------------------------------+----------------------------------+
| 554209509f5b47e286e0379bcbf66762 | admin                            |
| 59ac0457a80d449c9dac3b66848f2b5b | demo                             |
| 8aab962698f9460692efb8d3aab35886 | verify_tempest_config-1304647972 |
| 8b602467cd9045888687987067cbd3f6 | alt_demo                         |
| a134c3b33e94475fb5398643dd816053 | glance                           |
| c68c68579ec0437094a14dfbc4728224 | cinder                           |
| e65bd34ca85a429ea5c56bf980f77d67 | nova                             |
+----------------------------------+----------------------------------+

Understanding the different Openstack tox configs

Openstack projects use tox to manage virtual environments and run unit tests which I talked about here.

In this example I am using the oslo.config repo to look at the various tox configs in openstack use. The Governance Project Testing Interface is a starting point to read about project guidelines.

Get the current codebase

$ git clone git://git.openstack.org/openstack/oslo.config
$ cd oslo.config/
$ git rev-parse HEAD
7b1e157aeea426c58e3d4c9a76a231f0e5bc8241

The last line helps me identify the specific git commit I am working with. When moving between branches or when looking at a repo that may be a few days old, if I need to recreate this exact codebase all I need is this. For example, to look at a prior version at 3ab403925e9cb2928ba8e893c4d0f4a6f4b27d7 for example.

$ git checkout 3ab403925e9cb2928ba8e893c4d0f4a6f4b27d72
Note: checking out '3ab403925e9cb2928ba8e893c4d0f4a6f4b27d72'.
...
HEAD is now at 3ab4039... Merge "Added Raw Value Loading to Test Fixture"
$ git rev-parse HEAD
3ab403925e9cb2928ba8e893c4d0f4a6f4b27d72

To revert back to the current repo master.

$ git checkout master
Previous HEAD position was 3ab4039... Merge "Added Raw Value Loading to Test Fixture"
Switched to branch 'master'
Your branch is up-to-date with 'origin/master'.
$ git rev-parse HEAD
7b1e157aeea426c58e3d4c9a76a231f0e5bc8241

NOTE: You don’t need to specify the full commit hash. In this example 3ab4039 also works.

tox configuration

The tox.ini file contains various config sections.

  • [tox] are global options
  • [testenv] are the default options for each virtual environment
  • [testenv:NAME] are the specific test environments

tox.ini

$ cat tox.ini
[tox]
distribute = False
envlist = py33,py34,py26,py27,pep8

[testenv]
setenv = VIRTUAL_ENV={envdir}
deps = -r{toxinidir}/requirements.txt
       -r{toxinidir}/test-requirements.txt
commands = python setup.py testr --slowest --testr-args='{posargs}'

[testenv:pep8]
commands = flake8

[testenv:cover]
setenv = VIRTUAL_ENV={envdir}
commands =
  python setup.py testr --coverage

[testenv:venv]
commands = {posargs}

[testenv:docs]
commands = python setup.py build_sphinx

[flake8]
show-source = True
exclude = .tox,dist,doc,*.egg,build

NOTE: These file differ between projects. See later for an example comparison with python-openstackclient, nova and horizon.

Prerequisites

The default [testenv] options first refer to requirements.txt and test-requirements.txt which define the specific packages and required versions. Either minimum (e.g. netaddr>=0.7.12), range (e.g. stevedore>=1.3.0,<1.4.0) or more specific (e.g. pbr>=0.6,!=0.7,<1.0).

requirements.txt

$ cat requirements.txt
# The order of packages is significant, because pip processes them in the order
# of appearance. Changing the order has an impact on the overall integration
# process, which may cause wedges in the gate later.

pbr>=0.6,!=0.7,<1.0
argparse
netaddr>=0.7.12
six>=1.9.0
stevedore>=1.3.0,<1.4.0  # Apache-2.0

test-requirements.txt

$ cat test-requirements.txt
# The order of packages is significant, because pip processes them in the order
# of appearance. Changing the order has an impact on the overall integration
# process, which may cause wedges in the gate later.

hacking>=0.10.0,<0.11

discover
fixtures>=0.3.14
python-subunit>=0.0.18
testrepository>=0.0.18
testscenarios>=0.4
testtools>=0.9.36,!=1.2.0
oslotest>=1.5.1,<1.6.0  # Apache-2.0

# when we can require tox>= 1.4, this can go into tox.ini:
#  [testenv:cover]
#  deps = {[testenv]deps} coverage
coverage>=3.6

# this is required for the docs build jobs
sphinx>=1.1.2,!=1.2.0,!=1.3b1,<1.3
oslosphinx>=2.5.0,<2.6.0  # Apache-2.0

# Required only for tests
oslo.i18n>=1.5.0,<1.6.0  # Apache-2.0

# mocking framework
mock>=1.0

Style Guidelines (PEP8)

The first test we look at is pep8 run by flake8. This starts by reviewing the code with Style Guide for Python Code and any specific Openstack Style Guidelines.

$ tox -e pep8
GLOB sdist-make: /home/rbradfor/oslo.config/setup.py
pep8 inst-nodeps: /home/rbradfor/oslo.config/.tox/dist/oslo.config-1.10.0.zip
pep8 runtests: PYTHONHASHSEED='3973315668'
pep8 runtests: commands[0] | flake8
_________ summary ___________
  pep8: commands succeeded
  congratulations :)

As with all unit tests you are wanting to see "The bar is green, the code is clean". An example of a failing test would look like:

$ tox -e pep8
GLOB sdist-make: /home/rbradfor/oslo.config/setup.py
pep8 inst-nodeps: /home/rbradfor/oslo.config/.tox/dist/oslo.config-1.10.0.zip
pep8 runtests: PYTHONHASHSEED='820640265'
pep8 runtests: commands[0] | flake8
./oslo_config/types.py:51:31: E702 multiple statements on one line (semicolon)
        self.choices = choices; self.quotes = quotes
                              ^
ERROR: InvocationError: '/home/rbradfor/oslo.config/.tox/pep8/bin/flake8'
________ summary _________
ERROR:   pep8: commands failed


$ tox -e pep8
GLOB sdist-make: /home/rbradfor/oslo.config/setup.py
pep8 inst-nodeps: /home/rbradfor/oslo.config/.tox/dist/oslo.config-1.10.0.zip
pep8 runtests: PYTHONHASHSEED='1937373059'
pep8 runtests: commands[0] | flake8
./oslo_config/types.py:52:13: E113 unexpected indentation
            self.quotes = quotes
            ^
./oslo_config/types.py:52:13: E901 IndentationError: unexpected indent
            self.quotes = quotes
            ^
ERROR: InvocationError: '/home/rbradfor/oslo.config/.tox/pep8/bin/flake8'
__________ summary __________
ERROR:   pep8: commands failed

Running tests

To run all tests for a given Python version you just specify said version.

$ tox -e py27
GLOB sdist-make: /home/rbradfor/oslo.config/setup.py
py27 inst-nodeps: /home/rbradfor/oslo.config/.tox/dist/oslo.config-1.10.0.zip
py27 runtests: PYTHONHASHSEED='1822382852'
py27 runtests: commands[0] | python setup.py testr --slowest --testr-args=
running testr
running=OS_STDOUT_CAPTURE=1 OS_STDERR_CAPTURE=1 OS_TEST_TIMEOUT=60 ${PYTHON:-python} -m subunit.run discover -t ./ . --list
running=OS_STDOUT_CAPTURE=1 OS_STDERR_CAPTURE=1 OS_TEST_TIMEOUT=60 ${PYTHON:-python} -m subunit.run discover -t ./ .  --load-list /tmp/tmpbHjMgm
running=OS_STDOUT_CAPTURE=1 OS_STDERR_CAPTURE=1 OS_TEST_TIMEOUT=60 ${PYTHON:-python} -m subunit.run discover -t ./ .  --load-list /tmp/tmpLA0oO0
running=OS_STDOUT_CAPTURE=1 OS_STDERR_CAPTURE=1 OS_TEST_TIMEOUT=60 ${PYTHON:-python} -m subunit.run discover -t ./ .  --load-list /tmp/tmpMqT_s_
running=OS_STDOUT_CAPTURE=1 OS_STDERR_CAPTURE=1 OS_TEST_TIMEOUT=60 ${PYTHON:-python} -m subunit.run discover -t ./ .  --load-list /tmp/tmpyJLbu8
running=OS_STDOUT_CAPTURE=1 OS_STDERR_CAPTURE=1 OS_TEST_TIMEOUT=60 ${PYTHON:-python} -m subunit.run discover -t ./ .  --load-list /tmp/tmpF5KG5t
running=OS_STDOUT_CAPTURE=1 OS_STDERR_CAPTURE=1 OS_TEST_TIMEOUT=60 ${PYTHON:-python} -m subunit.run discover -t ./ .  --load-list /tmp/tmpebkBDp
running=OS_STDOUT_CAPTURE=1 OS_STDERR_CAPTURE=1 OS_TEST_TIMEOUT=60 ${PYTHON:-python} -m subunit.run discover -t ./ .  --load-list /tmp/tmpscXbNV
running=OS_STDOUT_CAPTURE=1 OS_STDERR_CAPTURE=1 OS_TEST_TIMEOUT=60 ${PYTHON:-python} -m subunit.run discover -t ./ .  --load-list /tmp/tmpTv0jAn
Ran 1182 tests in 0.475s (-0.068s)
PASSED (id=4)
Slowest Tests
Test id                                                                                                Runtime (s)
-----------------------------------------------------------------------------------------------------  -----------
tests.test_cfg.ConfigFileOptsTestCase.test_conf_file_dict_value_no_colon                               0.029
oslo_config.tests.test_cfg.ConfigFileReloadTestCase.test_conf_files_reload_default                     0.024
oslo_config.tests.test_cfg.SubCommandTestCase.test_sub_command_resparse                                0.016
tests.test_cfg.ConfigFileOptsTestCase.test_conf_file_dict_ignore_dname                                 0.016
tests.test_cfg.ConfigFileOptsTestCase.test_conf_file_list_spaces_use_dgroup_and_dname                  0.016
tests.test_cfg.MultipleDeprecatedCliOptionsTestCase.test_conf_file_override_use_deprecated_multi_opts  0.015
oslo_config.tests.test_cfg.OverridesTestCase.test_default_override                                     0.014
oslo_config.tests.test_cfg.ConfigFileOptsTestCase.test_conf_file_list_default_wrong_type               0.014
oslo_config.tests.test_cfg.RequiredOptsTestCase.test_missing_required_group_opt                        0.012
tests.test_generator.GeneratorTestCase.test_generate(long_help,output_file)                            0.011
________ summary _______
  py27: commands succeeded
  congratulations :)

You can pass a specific test or tests via command line identifying the names by looking at the test classes.

$ ls -l oslo_config/tests/[^_]*.py
-rw-rw-r-- 1 rbradfor rbradfor  12788 Apr 30 12:46 oslo_config/tests/test_cfgfilter.py
-rw-rw-r-- 1 rbradfor rbradfor 144538 Apr 30 12:46 oslo_config/tests/test_cfg.py
-rw-rw-r-- 1 rbradfor rbradfor   4938 Apr 30 12:46 oslo_config/tests/test_fixture.py
-rw-rw-r-- 1 rbradfor rbradfor  16479 Apr 30 12:46 oslo_config/tests/test_generator.py
-rw-rw-r-- 1 rbradfor rbradfor   3865 Apr 30 12:46 oslo_config/tests/test_iniparser.py
-rw-rw-r-- 1 rbradfor rbradfor  13259 Apr 30 12:46 oslo_config/tests/test_types.py

NOTE: This project has a top level /tests directory which uses the old import API and I am informed is being removed for liberty.

$ tox -e py27 -- test_types
GLOB sdist-make: /home/rbradfor/oslo.config/setup.py
py27 create: /home/rbradfor/oslo.config/.tox/py27
py27 installdeps: -r/home/rbradfor/oslo.config/requirements.txt, -r/home/rbradfor/oslo.config/test-requirements.txt
py27 inst: /home/rbradfor/oslo.config/.tox/dist/oslo.config-1.10.0.zip
py27 runtests: PYTHONHASHSEED='1505218584'
py27 runtests: commands[0] | python setup.py testr --slowest --testr-args=test_types
running testr
...
Ran 186 (-996) tests in 0.100s (-0.334s)
PASSED (id=6)
Slowest Tests
Test id                                                                                     Runtime (s)
------------------------------------------------------------------------------------------  -----------
tests.test_types.BooleanTypeTests.test_other_values_produce_error                           0.001
oslo_config.tests.test_types.DictTypeTests.test_equal                                       0.001
oslo_config.tests.test_types.BooleanTypeTests.test_not_equal_to_other_class                 0.000
tests.test_types.IntegerTypeTests.test_positive_values_are_valid                            0.000
tests.test_types.DictTypeTests.test_dict_of_dicts                                           0.000
oslo_config.tests.test_types.ListTypeTests.test_not_equal_with_non_equal_custom_item_types  0.000
tests.test_types.IntegerTypeTests.test_with_max_and_min                                     0.000
oslo_config.tests.test_types.FloatTypeTests.test_exponential_format                         0.000
tests.test_types.BooleanTypeTests.test_yes                                                  0.000
tests.test_types.ListTypeTests.test_repr                                                    0.000
________ summary ________
  py27: commands succeeded
  congratulations :)
$ echo $?
0
$ tox -epy27 -- '(test_types|test_generator)'

A failing test is going to produce the following.

$ tox -epy27 -- test_types
GLOB sdist-make: /home/rbradfor/oslo.config/setup.py
py27 create: /home/rbradfor/oslo.config/.tox/py27
py27 installdeps: -r/home/rbradfor/oslo.config/requirements.txt, -r/home/rbradfor/oslo.config/test-requirements.txt
py27 inst: /home/rbradfor/oslo.config/.tox/dist/oslo.config-1.10.0.zip
py27 runtests: PYTHONHASHSEED='3672144590'
py27 runtests: commands[0] | python setup.py testr --slowest --testr-args=test_types
running testr
...
======================================================================
FAIL: oslo_config.tests.test_types.IPv4AddressTypeTests.test_ipv4_address
tags: worker-0
----------------------------------------------------------------------
Traceback (most recent call last):
  File "/home/rbradfor/oslo.config/oslo_config/tests/test_types.py", line 386, in test_ipv4_address
    self.assertConvertedValue('192.168.0.1', '192.168.0.2')
  File "/home/rbradfor/oslo.config/oslo_config/tests/test_types.py", line 27, in assertConvertedValue
    self.assertEqual(expected, self.type_instance(s))
  File "/usr/lib/python2.7/unittest/case.py", line 515, in assertEqual
    assertion_func(first, second, msg=msg)
  File "/usr/lib/python2.7/unittest/case.py", line 508, in _baseAssertEqual
    raise self.failureException(msg)
AssertionError: '192.168.0.2' != '192.168.0.1'
Ran 186 (-117) tests in 0.102s (-0.046s)
FAILED (id=8, failures=2 (+2))
error: testr failed (1)
ERROR: InvocationError: '/home/rbradfor/oslo.config/.tox/py27/bin/python setup.py testr --slowest --testr-args=test_types'
________ summary ________
ERROR:   py27: commands failed
$ echo $?
1

Testr

This is a wrapper for the underlying testr command (found in the command line of the [testenv] section). We can reproduce what this runs manually with.

$ source .tox/py27/bin/activate
(py27)$  python setup.py testr
running testr
...
Ran 1182 tests in 0.443s (-0.025s)
PASSED (id=5)

The current tox.ini config includes the --slowest argument which is self explaining.

One benefit of running this specifically is when writing failing tests (i.e. the Test Driven Development (TDD) approach to agile software development). You do not really want to run all tests in order to see a failure. The -f option helps.

$ testr run
...
Ran 1182 (+637) tests in 2.058s (+1.064s)
FAILED (id=12, failures=2 (+1))
$ testr run -- -f
...
Ran 545 (-637) tests in 1.075s (-0.900s)
FAILED (id=13, failures=1 (-1))
$ testr run test_types -- -f
...
Ran 34 (-152) tests in 0.030s (-0.000s)
FAILED (id=18, failures=1 (-1))

NOTE: It takes a bit to realize the syntax of tox and testr and handling doubledash? -- placement. When you work it out you realize you can reproduce this with tox directly using:

$ tox -e py27 -- test_types -- -f
...
Ran 151 (+117) tests in 0.125s (+0.120s)
FAILED (id=19, failures=2 (+1))
error: testr failed (1)
ERROR: InvocationError: '/home/rbradfor/oslo.config/.tox/py27/bin/python setup.py testr --slowest --testr-args=test_types -- -f'
________ summary ________
ERROR:   py27: commands failed

The reason for dropping into an activated virtual environment and running testr manually is because tox will destroy and recreate your virtual environment each time the command is executed, which is time consuming.

The Testr source can be found at testrepository, identified by (py27)$ more `which testr`.

Testr syntax

Testr has multiple options and commands you can read about via various help options:

$ testr help
$ testr quickstart
$ testr commands
$ testr help run

Usage: testr run [options] testfilters* doubledash? testargs*
...

While debugging several testr commands were useful.

List all tests

$ testr list-tests
running=OS_STDOUT_CAPTURE=1 OS_STDERR_CAPTURE=1 OS_TEST_TIMEOUT=60 ${PYTHON:-python} -m subunit.run discover -t ./ . --list
oslo_config.tests.test_cfg.ChoicesTestCase.test_choice_bad
oslo_config.tests.test_cfg.ChoicesTestCase.test_choice_default
oslo_config.tests.test_cfg.ChoicesTestCase.test_choice_good
oslo_config.tests.test_cfg.ChoicesTestCase.test_conf_file_bad_choice_value
oslo_config.tests.test_cfg.ChoicesTestCase.test_conf_file_choice_bad_default
oslo_config.tests.test_cfg.ChoicesTestCase.test_conf_file_choice_empty_value
...

(py27)$ testr list-tests | wc -l
1183

1183 - 1 corresponds to the 1182 test run.

Last run

This enables you to review the last run tests (in a separate thread) and also get a correct error response code.

(py27)$ testr last
Ran 1182 tests in 0.575s (+0.099s)
PASSED (id=27)
(py27)$ echo $?
0
(py27)$ testr last
======================================================================
FAIL: oslo_config.tests.test_types.IPAddressTypeTests.test_ipv4_address
tags: worker-6
----------------------------------------------------------------------
Traceback (most recent call last):
  File "/home/rbradfor/oslo.config/oslo_config/tests/test_types.py", line 386, in test_ipv4_address
    self.assertConvertedValue('192.168.0.1', '192.168.0.2')
  File "/home/rbradfor/oslo.config/oslo_config/tests/test_types.py", line 27, in assertConvertedValue
    self.assertEqual(expected, self.type_instance(s))
  File "/usr/lib/python2.7/unittest/case.py", line 515, in assertEqual
    assertion_func(first, second, msg=msg)
  File "/usr/lib/python2.7/unittest/case.py", line 508, in _baseAssertEqual
    raise self.failureException(msg)
AssertionError: '192.168.0.2' != '192.168.0.1'
======================================================================
FAIL: oslo_config.tests.test_types.IPv4AddressTypeTests.test_ipv4_address
tags: worker-7
----------------------------------------------------------------------
Traceback (most recent call last):
  File "/home/rbradfor/oslo.config/oslo_config/tests/test_types.py", line 386, in test_ipv4_address
    self.assertConvertedValue('192.168.0.1', '192.168.0.2')
  File "/home/rbradfor/oslo.config/oslo_config/tests/test_types.py", line 27, in assertConvertedValue
    self.assertEqual(expected, self.type_instance(s))
  File "/usr/lib/python2.7/unittest/case.py", line 515, in assertEqual
    assertion_func(first, second, msg=msg)
  File "/usr/lib/python2.7/unittest/case.py", line 508, in _baseAssertEqual
    raise self.failureException(msg)
AssertionError: '192.168.0.2' != '192.168.0.1'
Ran 1182 tests in 0.445s (-0.130s)
FAILED (id=28, failures=2 (+2))
(py27)$ echo $?
1

Code Coverage

The tox.ini also provides a section for code coverage.

$ tox -e cover
GLOB sdist-make: /home/rbradfor/oslo.config/setup.py
cover inst-nodeps: /home/rbradfor/oslo.config/.tox/dist/oslo.config-1.10.0.zip
cover runtests: PYTHONHASHSEED='546795877'
cover runtests: commands[0] | python setup.py testr --coverage
running testr
...
Ran 1182 tests in 0.493s (-0.046s)
PASSED (id=26)
_________ summary _________
  cover: commands succeeded
  congratulations :)

Which is a wrapper for:

$ python setup.py testr --coverage
...
Ran 1182 tests in 0.592s (+0.116s)
PASSED (id=27)

These commands produces a /cover directory (which is not currently in .gitignore). The contents are HTML. I suspect there is likely an option for a more CLI readable format however for simplicity we publish these to an available running web server.

Apache Setup

In order to view what code coverage produces I configured Apache with a separate port and vhost in this devstack environment.

$ echo "ServerName "`hostname` | sudo tee /etc/apache2/conf-enabled/servername.conf
$ echo "Listen 81


    DocumentRoot /var/www/html
    
        Options FollowSymLinks MultiViews
        AllowOverride All
        Order allow,deny
        allow from all
    

    LogLevel warn
    ErrorLog \${APACHE_LOG_DIR}/localhost.error.log
    CustomLog \${APACHE_LOG_DIR}/localhost.access.log combined
" | sudo tee /etc/apache2/sites-enabled/localhost.conf
$ sudo apache2ctl graceful

Then I simply copied the projects coverage output as a quick hack to view.

$ sudo cp -r cover/ /var/www/html/
$ sudo apt-get install lynx-cur
$ lynx http://localhost:81/cover
                             Module                            statements missing excluded coverage
   Total                                                       12         0       0        100%
   .tox/py27/lib/python2.7/site-packages/oslo/config/__init__  6          0       0        100%
   .tox/py27/lib/python2.7/site-packages/oslo/config/cfg       1          0       0        100%
   .tox/py27/lib/python2.7/site-packages/oslo/config/cfgfilter 1          0       0        100%
   .tox/py27/lib/python2.7/site-packages/oslo/config/fixture   1          0       0        100%
   .tox/py27/lib/python2.7/site-packages/oslo/config/generator 1          0       0        100%
   .tox/py27/lib/python2.7/site-packages/oslo/config/iniparser 1          0       0        100%
   .tox/py27/lib/python2.7/site-packages/oslo/config/types     1          0       0        100%

   coverage.py v3.7.1

Documentation

The last testenv setup in oslo.config is for documentation.

$ tox -e docs
GLOB sdist-make: /home/rbradfor/oslo.config/setup.py
docs create: /home/rbradfor/oslo.config/.tox/docs
docs installdeps: -r/home/rbradfor/oslo.config/requirements.txt, -r/home/rbradfor/oslo.config/test-requirements.txt
docs inst: /home/rbradfor/oslo.config/.tox/dist/oslo.config-1.10.0.zip
docs runtests: PYTHONHASHSEED='4293391351'
docs runtests: commands[0] | python setup.py build_sphinx
running build_sphinx
creating /home/rbradfor/oslo.config/doc/build
creating /home/rbradfor/oslo.config/doc/build/doctrees
creating /home/rbradfor/oslo.config/doc/build/html
Running Sphinx v1.2.3
loading pickled environment... not yet created
Using openstack theme from /home/rbradfor/oslo.config/.tox/docs/local/lib/python2.7/site-packages/oslosphinx/theme
building [html]: all source files
updating environment: 15 added, 0 changed, 0 removed
reading sources... [100%] types
looking for now-outdated files... none found
pickling environment... done
checking consistency... done
preparing documents... done
writing output... [100%] types
writing additional files... genindex py-modindex search
copying static files... WARNING: html_static_path entry u'/home/rbradfor/oslo.config/doc/source/static' does not exist
done
copying extra files... done
dumping search index... done
dumping object inventory... done
build succeeded, 1 warning.
creating /home/rbradfor/oslo.config/doc/build/man
Running Sphinx v1.2.3
loading pickled environment... done
Using openstack theme from /home/rbradfor/oslo.config/.tox/docs/local/lib/python2.7/site-packages/oslosphinx/theme
building [man]: all source files
updating environment: 0 added, 0 changed, 0 removed
looking for now-outdated files... none found
writing... osloconfig.1 { cfg opts types configopts cfgfilter helpers fixture parser exceptions namespaces styleguide generator faq contributing }
build succeeded.
___________________________________________________________________________________________________________________________ summary ____________________________________________________________________________________________________________________________
  docs: commands succeeded
  congratulations :)

This creates a /doc directory (in .gitignore) which I copied to my previously configured web container to view in HTML.

$ sudo cp -r doc/ /var/www/html/
$ lynx http://localhost:81/doc/build/html

Other tox.ini configuration

As I navigate around other Openstack projects I have noticed some differences. These include:

Alternative global settings

[tox]
minversion = 1.6
skipdist = True

More detailed [testenv]

[testenv]
setenv = VIRTUAL_ENV={envdir}
deps = -r{toxinidir}/requirements.txt
       -r{toxinidir}/test-requirements.txt
commands = python setup.py testr --slowest --testr-args='{posargs}'
[testenv]
usedevelop = True
install_command = pip install -U {opts} {packages}
setenv = VIRTUAL_ENV={envdir}
deps = -r{toxinidir}/requirements.txt
       -r{toxinidir}/test-requirements.txt
commands = python setup.py testr --testr-args='{posargs}'
whitelist_externals = bash

Some fancy output coloring.

[testenv]
usedevelop = True
install_command = pip install -U {opts} {packages}
setenv = VIRTUAL_ENV={envdir}
         NOSE_WITH_OPENSTACK=1
         NOSE_OPENSTACK_COLOR=1
         NOSE_OPENSTACK_RED=0.05
         NOSE_OPENSTACK_YELLOW=0.025
         NOSE_OPENSTACK_SHOW_ELAPSED=1
# Note the hash seed is set to 0 until horizon can be tested with a
# random hash seed successfully.
         PYTHONHASHSEED=0
deps = -r{toxinidir}/requirements.txt
       -r{toxinidir}/test-requirements.txt
commands = /bin/bash run_tests.sh -N --no-pep8 {posargs}
[testenv]
usedevelop = True
# tox is silly... these need to be separated by a newline....
whitelist_externals = bash
                      find
install_command = pip install -U --force-reinstall {opts} {packages}
# Note the hash seed is set to 0 until nova can be tested with a
# random hash seed successfully.
setenv = VIRTUAL_ENV={envdir}
         OS_TEST_PATH=./nova/tests/unit
         LANGUAGE=en_US
deps = -r{toxinidir}/requirements.txt
       -r{toxinidir}/test-requirements.txt
commands =
  find . -type f -name "*.pyc" -delete
  bash tools/pretty_tox.sh '{posargs}'
# there is also secret magic in pretty_tox.sh which lets you run in a fail only
# mode. To do this define the TRACE_FAILONLY environmental variable.

Alternative [testenv:NAME] sections

[testenv:functional]
commands = bash -x {toxinidir}/functional/harpoon.sh

[testenv:debug]
commands = oslo_debug_helper -t openstackclient/tests {posargs}

[tox:jenkins]
downloadcache = ~/cache/pip

[testenv:jshint]
commands = nodeenv -p
           npm install jshint -g
           /bin/bash run_tests.sh -N --jshint

[testenv:genconfig]
commands =
  bash tools/config/generate_sample.sh -b . -p nova -o etc/nova

Different Style guidelines

[flake8]
show-source = True
exclude = .tox,dist,doc,*.egg,build
[flake8]
show-source = True
exclude =  .venv,.git,.tox,dist,doc,*openstack/common*,*lib/python*,*egg,build,tools
[testenv:pep8]
commands = flake8
[testenv:pep8]
commands =
  /bin/bash run_tests.sh -N --pep8
  /bin/bash run_tests.sh -N --makemessages --check-only

Different Code Coverage

[testenv:cover]
commands = python setup.py testr --coverage --testr-args='{posargs}'
[testenv:cover]
# Also do not run test_coverage_ext tests while gathering coverage as those
# tests conflict with coverage.
commands =
  coverage erase
  python setup.py testr --coverage \
    --testr-args='{posargs}'
  coverage combine
  coverage html --include='nova/*' --omit='nova/openstack/common/*' -d covhtml -i

Different Docs

[testenv:docs]
commands = python setup.py build_sphinx
[testenv:docs]
commands =
  python setup.py build_sphinx
  bash -c '! find doc/ -type f -name *.json | xargs -t -n1 python -m json.tool 2>&1 > /dev/null | grep -B1 -v ^python'

Additional sections

[testenv:pip-missing-reqs]
# do not install test-requirements as that will pollute the virtualenv for
# determining missing packages
# this also means that pip-missing-reqs must be installed separately, outside
# of the requirements.txt files
deps = pip_missing_reqs
       -rrequirements.txt
commands=pip-missing-reqs -d --ignore-file=nova/tests/* nova
[hacking]
import_exceptions = oslo_log._i18n

What's Next

In a followup blog I will be talking about debugging with pdb and how to use this with tox.

References

Installing Python 3.3 on Ubuntu 14.04.2 LTS

Ubuntu 14.04 by default uses Python 2.7 and 3.4. If you want to install Python 3.3, in my case because various Openstack projects that maintain 3.3 compatibility.

I had a hard time finding what I would consider an official means. These are a third party PPA steps. I welcome comments for any other ways to install multiple Python environments.

$ sudo apt-get install -y python-software-properties
$ sudo add-apt-repository -y ppa:fkrull/deadsnakes
gpg: keyring `/tmp/tmpuljbio98/secring.gpg' created
gpg: keyring `/tmp/tmpuljbio98/pubring.gpg' created
gpg: requesting key DB82666C from hkp server keyserver.ubuntu.com
gpg: /tmp/tmpuljbio98/trustdb.gpg: trustdb created
gpg: key DB82666C: public key "Launchpad Old Python Versions" imported
gpg: Total number processed: 1
gpg:               imported: 1  (RSA: 1)

NOTE: The add repo command prompts for a user response without -y.

$ sudo add-apt-repository ppa:fkrull/deadsnakes

 This PPA has older and newer Python versions for Ubuntu. The packages in the official archives generally don't go back all that far, but people might still need to develop and test against these old Python interpreters. There also was a time when Google App Engine still ran on Python 2.5, but nobody likes to talk about that.

A disclaimer first: I do not guarantee any kind of updates. In particular, I shed all responsibility for security issues in these packages. If you want to use them in a security-or-otherwise-critical environment (say, on a production server), you do so at your own risk.

For Python 2.7 updates for supported Ubuntu releases, see my dedicated 2.7 PPA:

https://launchpad.net/~fkrull/+archive/ubuntu/deadsnakes-python2.7

Reporting Issues
================
Issues can be reported in the master issue tracker at:

https://bitbucket.org/fk/deadsnakes-issues

Donations
=========
If you like what I'm doing here, you can show your appreciation by donating:

https://www.paypal.com/cgi-bin/webscr?cmd=_s-xclick&hosted_button_id=TTTFWBJ2DZK6E

Supported Ubuntu Versions
=========================
Supported — Precise, Trusty, Utopic

Generally, I try to support Ubuntu releases until their official End-of-Life.

Supported Python Versions
=========================
Currently supported releases — 2.3, 2.4, 2.5, 2.6, 2.7, 3.1, 3.2, 3.3, 3.4

Basically, if an Ubuntu version doesn't have an official package for a specific major Python version (be it "any more" or "yet"), look for one in this PPA. However, for a given Python major release, don't expect to find newer point releases if there is already an older point release in the official Ubuntu repositories (i.e., if an Ubuntu release has a package for Python 2.6.4, I won't provide a package with 2.6.5 for that Ubuntu release): newer Python point releases shouldn't add new features or change behaviour, so they're rather pointless (no pun intended) for development and testing; conversely, if that Python point release has a bug that is fixed in a newer release, that's still an issue with the original package and should be taken up with the Ubuntu or Debian maintainer of the package. Besides, making these update packages externally to the original repositories is a bit of a pain.

As an exception, I have updated Python 2.7 packages for several Ubuntu releases in a separate PPA:

https://launchpad.net/~fkrull/+archive/ubuntu/deadsnakes-python2.7

Supported Python Packages
=========================
Using third-party modules packaged for Debian or Ubuntu with the Python interpreters from this repository is a bit of a mixed bag. For Python 2, Python modules from the official repositories will not work, as a consequence of how Python packaging works in Debian. For Python 3 on the other hand, all pure-Python module packages at least should be available; compiled extension modules will not work however.

In general, you're better off installing Python modules using the common Python packaging tools rather than the system package manager. For an introduction into the Python packaging ecosystem and its tools, refer to the Python Packaging User Guide [1].

[1] https://packaging.python.org
 More info: https://launchpad.net/~fkrull/+archive/ubuntu/deadsnakes
Press [ENTER] to continue or ctrl-c to cancel adding it

gpg: keyring `/tmp/tmp1rda6tjx/secring.gpg' created
gpg: keyring `/tmp/tmp1rda6tjx/pubring.gpg' created
gpg: requesting key DB82666C from hkp server keyserver.ubuntu.com
gpg: /tmp/tmp1rda6tjx/trustdb.gpg: trustdb created
gpg: key DB82666C: public key "Launchpad Old Python Versions" imported
gpg: Total number processed: 1
gpg:               imported: 1  (RSA: 1)
OK
$ sudo apt-get update
$ sudo apt-cache show python3.3
Package: python3.3
Priority: optional
Section: python
Installed-Size: 255
Maintainer: Felix Krull 
Architecture: amd64
Version: 3.3.6-4+trusty1
Suggests: python3.3-doc, binutils
Depends: python3.3-minimal (= 3.3.6-4+trusty1), libpython3.3-stdlib (= 3.3.6-4+trusty1), mime-support
Filename: pool/main/p/python3.3/python3.3_3.3.6-4+trusty1_amd64.deb
Size: 136098
MD5sum: 924f7fcd5e84d0938c1ae8e8c5b7f226
SHA1: 8e34edec87644b7c620a98a5f2e5fa54f4cbba67
SHA256: 44bc419559695dd78f9b5e37a9bf7ce586c4d3b1922e896bb15ed9d243cb578c
Description-en: Interactive high-level object-oriented language (version 3.3)
 Python is a high-level, interactive, object-oriented language. Its 3.3 version
 includes an extensive class library with lots of goodies for
 network programming, system administration, sounds and graphics.
Description-md5: d77f2abf1b0095e2e7bf5e21022e3d54
Multi-Arch: allowed
Original-Maintainer: Matthias Klose 

And now you can install the specific version.

$ sudo apt-get install -y python3.3 python3.3-dev

At this time I now have 3 different versions as well as the python and python3 aliases.

$ python --version
Python 2.7.6

$ python3 --version
Python 3.4.0

$ python2.7 --version
Python 2.7.6

$ python3.3 --version
Python 3.3.6

$ python3.4 --version
Python 3.4.0

This enabled me to now use Python 3.3. for my Openstack tox testing which at first pass produces the same error as Python 3.4

$ tox -epy33 --notest

Running openstack tests with tox

Recently the OSC (python-openstackclient) project removed run_tests.sh #177066 and tools/install_venv.py scripts #177086.

As I was very new to OpenStack development practices this threw me because of reading several OpenStack documentation pages including Getting the code that specifically mentions in Hacking on your laptop and running unit tests an example Setting Up a Developer Environment, and consulting with a friend that is a ATC this is the way I learned to setup virtual environments and running tests.

The Testing OpenStack Projects documentation also refers to run_tests.sh however caveats “There is an older convention, as follows. Most projects have a shell script, named “run_tests.sh”, that runs the unit tests of that project.” (i.e. devil in the details).

With run_tests.sh and tools/install_venv.py removed what is the *correct* way?

Setting up a virtual environment with tox

First you create the tox virtual environments. The tox configuration is held in tox.ini and this supports multiple environments for compatibility testing. You can see the environments created with.

$ grep envlist tox.ini
envlist = py33,py34,py26,py27,pep8

I have chosen to specify the Python 2.7 version. I am running Ubuntu 12.04.2 LTS which has Python 2.7 and Python 3.4. The HACKING.rst docs makes reference to “OpenStackClient strives to be Python 3.3 compatible.” Side Note: Python 3.4 fails to work with the openstackclient codebase, See later for issues I am seeing.

I setup the 2.7 virtual environment without running any tests.

$ tox -e py27 --notest
py27 create: /home/rbradfor/tmp/python-openstackclient/.tox/py27
py27 installdeps: -r/home/rbradfor/tmp/python-openstackclient/requirements.txt, -r/home/rbradfor/tmp/python-openstackclient/test-requirements.txt
py27 develop-inst: /home/rbradfor/tmp/python-openstackclient
_________ summary ____________
  py27: skipped tests
  congratulations :)

I can then reference the openstack binary directly in this virtual environment with:

$ .tox/py27/bin/openstack --version
openstack 1.1.0

You can use this virtual environment without requiring any pathing by activating.

$ source .tox/py27/bin/activate
$ openstack

This actually adds the applicable /bin directory to PATH and not PYTHONPATH.

$ which openstack
/home/rbradfor/tmp/python-openstackclient/.tox/py27/bin/openstack
$ openstack --version
openstack 1.1.0

Running Tests

There are now several ways I can run individual or full tests.

$ tox -epy27 -- test_shell
py27 create: /home/rbradfor/tmp/python-openstackclient/.tox/py27
py27 installdeps: -r/home/rbradfor/tmp/python-openstackclient/requirements.txt, -r/home/rbradfor/tmp/python-openstackclient/test-requirements.txt
py27 develop-inst: /home/rbradfor/tmp/python-openstackclient
py27 runtests: PYTHONHASHSEED='2928878700'
py27 runtests: commands[0] | python setup.py testr --testr-args=test_shell
running testr
...
Ran 32 tests in 0.148s (+0.029s)
PASSED (id=6)
_____ summary _________________
  py27: commands succeeded
  congratulations :)

NOTE: It seems every second invocation of this fails. This is what I see.

$ tox -epy27 -- test_shell
py27 recreate: /home/rbradfor/tmp/python-openstackclient/.tox/py27
ERROR: invocation failed (exit code 3), logfile: /home/rbradfor/tmp/python-openstackclient/.tox/py27/log/py27-0.log
ERROR: actionid=py27
msg=getenv
cmdargs=['/usr/bin/python', '-m', 'virtualenv', '--setuptools', '--python', '/home/rbradfor/tmp/python-openstackclient/.tox/py27/bin/python2.7', 'py27']
env={'LESSOPEN': '| /usr/bin/lesspipe %s', 'SSH_CLIENT': '192.168.1.2 60030 22', 'LOGNAME': 'rbradfor', 'USER': 'rbradfor', 'PATH': '/home/rbradfor/tmp/python-openstackclient/.tox/py27/bin:/home/rbradfor/tmp/python-openstackclient/.tox/py27/bin:/usr/local/sbin:/usr/local/bin:/usr/sbin:/usr/bin:/sbin:/bin:/usr/games:/usr/local/games', 'HOME': '/home/rbradfor', 'PS1': '(py27)\\[\\e]0;\\u@\\h: \\w\\a\\]${debian_chroot:+($debian_chroot)}\\u@\\h:\\w\\$ ', 'LANG': 'en_US.UTF-8', 'TERM': 'xterm', 'SHELL': '/bin/bash', 'SHLVL': '1', 'PYTHONHASHSEED': '4072653076', 'XDG_RUNTIME_DIR': '/run/user/1000', 'VIRTUAL_ENV': '/home/rbradfor/tmp/python-openstackclient/.tox/py27', 'XDG_SESSION_ID': '12', '_': '/usr/local/bin/tox', 'SSH_CONNECTION': '192.168.1.2 60030 192.168.1.60 22', 'LESSCLOSE': '/usr/bin/lesspipe %s %s', 'SSH_TTY': '/dev/pts/2', 'OLDPWD': '/home/rbradfor', 'PWD': '/home/rbradfor/tmp/python-openstackclient', 'MAIL': '/var/mail/rbradfor', 'LS_COLORS': 'rs=0:di=01;34:ln=01;36:mh=00:pi=40;33:so=01;35:do=01;35:bd=40;33;01:cd=40;33;01:or=40;31;01:su=37;41:sg=30;43:ca=30;41:tw=30;42:ow=34;42:st=37;44:ex=01;32:*.tar=01;31:*.tgz=01;31:*.arj=01;31:*.taz=01;31:*.lzh=01;31:*.lzma=01;31:*.tlz=01;31:*.txz=01;31:*.zip=01;31:*.z=01;31:*.Z=01;31:*.dz=01;31:*.gz=01;31:*.lz=01;31:*.xz=01;31:*.bz2=01;31:*.bz=01;31:*.tbz=01;31:*.tbz2=01;31:*.tz=01;31:*.deb=01;31:*.rpm=01;31:*.jar=01;31:*.war=01;31:*.ear=01;31:*.sar=01;31:*.rar=01;31:*.ace=01;31:*.zoo=01;31:*.cpio=01;31:*.7z=01;31:*.rz=01;31:*.jpg=01;35:*.jpeg=01;35:*.gif=01;35:*.bmp=01;35:*.pbm=01;35:*.pgm=01;35:*.ppm=01;35:*.tga=01;35:*.xbm=01;35:*.xpm=01;35:*.tif=01;35:*.tiff=01;35:*.png=01;35:*.svg=01;35:*.svgz=01;35:*.mng=01;35:*.pcx=01;35:*.mov=01;35:*.mpg=01;35:*.mpeg=01;35:*.m2v=01;35:*.mkv=01;35:*.webm=01;35:*.ogm=01;35:*.mp4=01;35:*.m4v=01;35:*.mp4v=01;35:*.vob=01;35:*.qt=01;35:*.nuv=01;35:*.wmv=01;35:*.asf=01;35:*.rm=01;35:*.rmvb=01;35:*.flc=01;35:*.avi=01;35:*.fli=01;35:*.flv=01;35:*.gl=01;35:*.dl=01;35:*.xcf=01;35:*.xwd=01;35:*.yuv=01;35:*.cgm=01;35:*.emf=01;35:*.axv=01;35:*.anx=01;35:*.ogv=01;35:*.ogx=01;35:*.aac=00;36:*.au=00;36:*.flac=00;36:*.mid=00;36:*.midi=00;36:*.mka=00;36:*.mp3=00;36:*.mpc=00;36:*.ogg=00;36:*.ra=00;36:*.wav=00;36:*.axa=00;36:*.oga=00;36:*.spx=00;36:*.xspf=00;36:'}
The executable /home/rbradfor/tmp/python-openstackclient/.tox/py27/bin/python2.7 (from --python=/home/rbradfor/tmp/python-openstackclient/.tox/py27/bin/python2.7) does not exist

ERROR: InvocationError: /usr/bin/python -m virtualenv --setuptools --python /home/rbradfor/tmp/python-openstackclient/.tox/py27/bin/python2.7 py27 (see /home/rbradfor/tmp/python-openstackclient/.tox/py27/log/py27-0.log)
______ summary ___________
ERROR:   py27: InvocationError: /usr/bin/python -m virtualenv --setuptools --python /home/rbradfor/tmp/python-openstackclient/.tox/py27/bin/python2.7 py27 (see /home/rbradfor/tmp/python-openstackclient/.tox/py27/log/py27-0.log)

Using the tox.ini command syntax.

$ python setup.py testr --slowest --testr-args=test_shell
...

PASSED (id=5)
Slowest Tests
Test id                                                                             Runtime (s)
----------------------------------------------------------------------------------  -----------
openstackclient.tests.test_shell.TestShellHelp.test_help_options                    0.026
openstackclient.tests.test_shell.TestShellPasswordAuth.test_only_url_flow           0.015
openstackclient.tests.test_shell.TestShellPasswordAuth.test_only_project_id_flow    0.009
openstackclient.tests.test_shell.TestShellTokenAuth.test_empty_auth                 0.009
openstackclient.tests.test_shell.TestShellTokenEndpointAuth.test_only_url           0.008
openstackclient.tests.test_shell.TestShellPasswordAuth.test_only_auth_type_flow     0.007
openstackclient.tests.test_shell.TestShellPasswordAuth.test_only_project_name_flow  0.007
openstackclient.tests.test_shell.TestShellPasswordAuth.test_only_trust_id_flow      0.007
openstackclient.tests.test_shell.TestShellTokenAuthEnv.test_only_auth_url           0.007
openstackclient.tests.test_shell.TestShellTokenAuthEnv.test_only_token              0.007

References

The following is recommended reading.

Thanks to Jeremy Stanley (fungi) and Doug Hellmann from the openstack-dev mailing list for setting me on the correct path.

Problems with Python 3.4 on Ubuntu 14.04.2 LTS

I was unable to run tests with Python 3.x. I have not spent the time to investigate why there are issues with libyaml which is not listed as core dependency in requirements.txt.
UPDATE: Seems this also is a simple problem. I did not have the -dev package installed.

$ sudo apt-get install -y python3.4-dev

And it’s all fine. Thanks Doug for that insight.

My next objective is to install Python 3.3 also as this is referenced as the baseline compatibility of the project.

$ git rev-parse HEAD
416d840dc4cb00026bac2512b259ce88a0e4a765

$ tox -epy34 -- notests
py34 create: /home/rbradfor/tmp/python-openstackclient/.tox/py34
py34 installdeps: -r/home/rbradfor/tmp/python-openstackclient/requirements.txt, -r/home/rbradfor/tmp/python-openstackclient/test-requirements.txt
ERROR: invocation failed (exit code 1), logfile: /home/rbradfor/tmp/python-openstackclient/.tox/py34/log/py34-1.log
ERROR: actionid=py34
msg=getenv
cmdargs=[local('/home/rbradfor/tmp/python-openstackclient/.tox/py34/bin/pip'), 'install', '-U', '-r/home/rbradfor/tmp/python-openstackclient/requirements.txt', '-r/home/rbradfor/tmp/python-openstackclient/test-requirements.txt']
env={'XDG_RUNTIME_DIR': '/run/user/1000', 'VIRTUAL_ENV': '/home/rbradfor/tmp/python-openstackclient/.tox/py34', 'LESSOPEN': '| /usr/bin/lesspipe %s', 'SSH_CLIENT': '192.168.1.2 60030 22', 'LOGNAME': 'rbradfor', 'USER': 'rbradfor', 'HOME': '/home/rbradfor', 'PATH': '/home/rbradfor/tmp/python-openstackclient/.tox/py34/bin:/usr/local/sbin:/usr/local/bin:/usr/sbin:/usr/bin:/sbin:/bin:/usr/games:/usr/local/games', 'XDG_SESSION_ID': '12', '_': '/usr/local/bin/tox', 'SSH_CONNECTION': '192.168.1.2 60030 192.168.1.60 22', 'LANG': 'en_US.UTF-8', 'TERM': 'xterm', 'SHELL': '/bin/bash', 'LESSCLOSE': '/usr/bin/lesspipe %s %s', 'SHLVL': '1', 'SSH_TTY': '/dev/pts/2', 'OLDPWD': '/home/rbradfor', 'PWD': '/home/rbradfor/tmp/python-openstackclient', 'PYTHONHASHSEED': '1330227753', 'MAIL': '/var/mail/rbradfor', 'LS_COLORS': 'rs=0:di=01;34:ln=01;36:mh=00:pi=40;33:so=01;35:do=01;35:bd=40;33;01:cd=40;33;01:or=40;31;01:su=37;41:sg=30;43:ca=30;41:tw=30;42:ow=34;42:st=37;44:ex=01;32:*.tar=01;31:*.tgz=01;31:*.arj=01;31:*.taz=01;31:*.lzh=01;31:*.lzma=01;31:*.tlz=01;31:*.txz=01;31:*.zip=01;31:*.z=01;31:*.Z=01;31:*.dz=01;31:*.gz=01;31:*.lz=01;31:*.xz=01;31:*.bz2=01;31:*.bz=01;31:*.tbz=01;31:*.tbz2=01;31:*.tz=01;31:*.deb=01;31:*.rpm=01;31:*.jar=01;31:*.war=01;31:*.ear=01;31:*.sar=01;31:*.rar=01;31:*.ace=01;31:*.zoo=01;31:*.cpio=01;31:*.7z=01;31:*.rz=01;31:*.jpg=01;35:*.jpeg=01;35:*.gif=01;35:*.bmp=01;35:*.pbm=01;35:*.pgm=01;35:*.ppm=01;35:*.tga=01;35:*.xbm=01;35:*.xpm=01;35:*.tif=01;35:*.tiff=01;35:*.png=01;35:*.svg=01;35:*.svgz=01;35:*.mng=01;35:*.pcx=01;35:*.mov=01;35:*.mpg=01;35:*.mpeg=01;35:*.m2v=01;35:*.mkv=01;35:*.webm=01;35:*.ogm=01;35:*.mp4=01;35:*.m4v=01;35:*.mp4v=01;35:*.vob=01;35:*.qt=01;35:*.nuv=01;35:*.wmv=01;35:*.asf=01;35:*.rm=01;35:*.rmvb=01;35:*.flc=01;35:*.avi=01;35:*.fli=01;35:*.flv=01;35:*.gl=01;35:*.dl=01;35:*.xcf=01;35:*.xwd=01;35:*.yuv=01;35:*.cgm=01;35:*.emf=01;35:*.axv=01;35:*.anx=01;35:*.ogv=01;35:*.ogx=01;35:*.aac=00;36:*.au=00;36:*.flac=00;36:*.mid=00;36:*.midi=00;36:*.mka=00;36:*.mp3=00;36:*.mpc=00;36:*.ogg=00;36:*.ra=00;36:*.wav=00;36:*.axa=00;36:*.oga=00;36:*.spx=00;36:*.xspf=00;36:'}
Collecting pbr!=0.7,<1.0,>=0.6 (from -r /home/rbradfor/tmp/python-openstackclient/requirements.txt (line 4))
  Using cached pbr-0.10.8-py2.py3-none-any.whl
Collecting six>=1.9.0 (from -r /home/rbradfor/tmp/python-openstackclient/requirements.txt (line 5))
  Using cached six-1.9.0-py2.py3-none-any.whl
Collecting Babel>=1.3 (from -r /home/rbradfor/tmp/python-openstackclient/requirements.txt (line 7))
  Using cached Babel-1.3.tar.gz
Collecting cliff>=1.10.0 (from -r /home/rbradfor/tmp/python-openstackclient/requirements.txt (line 8))
  Using cached cliff-1.12.0.tar.gz
Collecting cliff-tablib>=1.0 (from -r /home/rbradfor/tmp/python-openstackclient/requirements.txt (line 9))
  Using cached cliff-tablib-1.1.tar.gz
Collecting os-client-config (from -r /home/rbradfor/tmp/python-openstackclient/requirements.txt (line 10))
  Using cached os-client-config-0.8.0.tar.gz
Collecting oslo.config>=1.9.3 (from -r /home/rbradfor/tmp/python-openstackclient/requirements.txt (line 11))
  Using cached oslo.config-1.11.0-py2.py3-none-any.whl
Collecting oslo.i18n>=1.5.0 (from -r /home/rbradfor/tmp/python-openstackclient/requirements.txt (line 12))
  Using cached oslo.i18n-1.6.0-py2.py3-none-any.whl
Collecting oslo.utils>=1.4.0 (from -r /home/rbradfor/tmp/python-openstackclient/requirements.txt (line 13))
  Using cached oslo.utils-1.5.0-py2.py3-none-any.whl
Collecting oslo.serialization>=1.4.0 (from -r /home/rbradfor/tmp/python-openstackclient/requirements.txt (line 14))
  Using cached oslo.serialization-1.5.0-py2.py3-none-any.whl
Collecting python-glanceclient>=0.15.0 (from -r /home/rbradfor/tmp/python-openstackclient/requirements.txt (line 15))
  Using cached python_glanceclient-0.18.0-py2.py3-none-any.whl
Collecting python-keystoneclient>=1.1.0 (from -r /home/rbradfor/tmp/python-openstackclient/requirements.txt (line 16))
  Using cached python_keystoneclient-1.4.0-py2.py3-none-any.whl
Collecting python-novaclient>=2.22.0 (from -r /home/rbradfor/tmp/python-openstackclient/requirements.txt (line 17))
  Using cached python_novaclient-2.24.1-py2.py3-none-any.whl
Collecting python-cinderclient>=1.1.0 (from -r /home/rbradfor/tmp/python-openstackclient/requirements.txt (line 18))
  Using cached python_cinderclient-1.2.0-py2.py3-none-any.whl
Collecting python-neutronclient<3,>=2.3.11 (from -r /home/rbradfor/tmp/python-openstackclient/requirements.txt (line 19))
  Using cached python_neutronclient-2.5.0-py2.py3-none-any.whl
Collecting requests!=2.4.0,>=2.2.0 (from -r /home/rbradfor/tmp/python-openstackclient/requirements.txt (line 20))
  Using cached requests-2.6.2-py2.py3-none-any.whl
Collecting stevedore>=1.3.0 (from -r /home/rbradfor/tmp/python-openstackclient/requirements.txt (line 21))
  Using cached stevedore-1.4.0-py2.py3-none-any.whl
Collecting hacking<0.11,>=0.10.0 (from -r /home/rbradfor/tmp/python-openstackclient/test-requirements.txt (line 4))
  Using cached hacking-0.10.1-py2.py3-none-any.whl
Collecting coverage>=3.6 (from -r /home/rbradfor/tmp/python-openstackclient/test-requirements.txt (line 6))
  Using cached coverage-3.7.1.tar.gz
Collecting discover (from -r /home/rbradfor/tmp/python-openstackclient/test-requirements.txt (line 7))
  Using cached discover-0.4.0.tar.gz
Collecting fixtures>=0.3.14 (from -r /home/rbradfor/tmp/python-openstackclient/test-requirements.txt (line 8))
  Using cached fixtures-1.0.0.tar.gz
Collecting mock>=1.0 (from -r /home/rbradfor/tmp/python-openstackclient/test-requirements.txt (line 9))
  Using cached mock-1.0.1.tar.gz
Collecting oslosphinx>=2.5.0 (from -r /home/rbradfor/tmp/python-openstackclient/test-requirements.txt (line 10))
  Using cached oslosphinx-2.5.0-py2.py3-none-any.whl
Collecting oslotest>=1.5.1 (from -r /home/rbradfor/tmp/python-openstackclient/test-requirements.txt (line 11))
  Using cached oslotest-1.6.0-py2.py3-none-any.whl
Collecting requests-mock>=0.6.0 (from -r /home/rbradfor/tmp/python-openstackclient/test-requirements.txt (line 12))
  Using cached requests_mock-0.6.0-py2.py3-none-any.whl
Collecting sphinx!=1.2.0,!=1.3b1,<1.3,>=1.1.2 (from -r /home/rbradfor/tmp/python-openstackclient/test-requirements.txt (line 13))
  Using cached Sphinx-1.2.3-py3-none-any.whl
Collecting testrepository>=0.0.18 (from -r /home/rbradfor/tmp/python-openstackclient/test-requirements.txt (line 14))
  Using cached testrepository-0.0.20.tar.gz
Collecting testtools!=1.2.0,>=0.9.36 (from -r /home/rbradfor/tmp/python-openstackclient/test-requirements.txt (line 15))
  Using cached testtools-1.7.1-py2.py3-none-any.whl
Collecting WebOb>=1.2.3 (from -r /home/rbradfor/tmp/python-openstackclient/test-requirements.txt (line 16))
  Using cached WebOb-1.4.1.tar.gz
Requirement already up-to-date: pip in ./.tox/py34/lib/python3.4/site-packages (from pbr!=0.7,<1.0,>=0.6->-r /home/rbradfor/tmp/python-openstackclient/requirements.txt (line 4))
Collecting pytz>=0a (from Babel>=1.3->-r /home/rbradfor/tmp/python-openstackclient/requirements.txt (line 7))
  Using cached pytz-2015.2-py2.py3-none-any.whl
Collecting argparse (from cliff>=1.10.0->-r /home/rbradfor/tmp/python-openstackclient/requirements.txt (line 8))
  Using cached argparse-1.3.0-py2.py3-none-any.whl
Collecting cmd2>=0.6.7 (from cliff>=1.10.0->-r /home/rbradfor/tmp/python-openstackclient/requirements.txt (line 8))
  Using cached cmd2-0.6.8.tar.gz
Collecting PrettyTable<0.8,>=0.7 (from cliff>=1.10.0->-r /home/rbradfor/tmp/python-openstackclient/requirements.txt (line 8))
  Using cached prettytable-0.7.2.tar.bz2
Collecting pyparsing>=2.0.1 (from cliff>=1.10.0->-r /home/rbradfor/tmp/python-openstackclient/requirements.txt (line 8))
  Using cached pyparsing-2.0.3-py2.py3-none-any.whl
Collecting tablib (from cliff-tablib>=1.0->-r /home/rbradfor/tmp/python-openstackclient/requirements.txt (line 9))
  Using cached tablib-0.10.0-py2.py3-none-any.whl
Collecting PyYAML>=3.1.0 (from os-client-config->-r /home/rbradfor/tmp/python-openstackclient/requirements.txt (line 10))
  Using cached PyYAML-3.11.tar.gz
Collecting netaddr>=0.7.12 (from oslo.config>=1.9.3->-r /home/rbradfor/tmp/python-openstackclient/requirements.txt (line 11))
  Using cached netaddr-0.7.14-py2.py3-none-any.whl
Collecting iso8601>=0.1.9 (from oslo.utils>=1.4.0->-r /home/rbradfor/tmp/python-openstackclient/requirements.txt (line 13))
  Using cached iso8601-0.1.10-py33-none-any.whl
Collecting netifaces>=0.10.4 (from oslo.utils>=1.4.0->-r /home/rbradfor/tmp/python-openstackclient/requirements.txt (line 13))
  Using cached netifaces-0.10.4.tar.gz
Collecting msgpack-python>=0.4.0 (from oslo.serialization>=1.4.0->-r /home/rbradfor/tmp/python-openstackclient/requirements.txt (line 14))
  Using cached msgpack-python-0.4.6.tar.gz
Collecting pyOpenSSL>=0.11 (from python-glanceclient>=0.15.0->-r /home/rbradfor/tmp/python-openstackclient/requirements.txt (line 15))
  Using cached pyOpenSSL-0.15.1-py2.py3-none-any.whl
Collecting warlock<2,>=1.0.1 (from python-glanceclient>=0.15.0->-r /home/rbradfor/tmp/python-openstackclient/requirements.txt (line 15))
  Using cached warlock-1.1.0.tar.gz
Collecting simplejson>=2.2.0 (from python-novaclient>=2.22.0->-r /home/rbradfor/tmp/python-openstackclient/requirements.txt (line 17))
  Using cached simplejson-3.6.5.tar.gz
Collecting flake8==2.2.4 (from hacking<0.11,>=0.10.0->-r /home/rbradfor/tmp/python-openstackclient/test-requirements.txt (line 4))
  Using cached flake8-2.2.4.tar.gz
Collecting pep8==1.5.7 (from hacking<0.11,>=0.10.0->-r /home/rbradfor/tmp/python-openstackclient/test-requirements.txt (line 4))
  Using cached pep8-1.5.7-py2.py3-none-any.whl
Collecting mccabe==0.2.1 (from hacking<0.11,>=0.10.0->-r /home/rbradfor/tmp/python-openstackclient/test-requirements.txt (line 4))
  Using cached mccabe-0.2.1.tar.gz
Collecting pyflakes==0.8.1 (from hacking<0.11,>=0.10.0->-r /home/rbradfor/tmp/python-openstackclient/test-requirements.txt (line 4))
  Using cached pyflakes-0.8.1-py2.py3-none-any.whl
Collecting testscenarios>=0.4 (from oslotest>=1.5.1->-r /home/rbradfor/tmp/python-openstackclient/test-requirements.txt (line 11))
  Using cached testscenarios-0.4.tar.gz
Collecting python-subunit>=0.0.18 (from oslotest>=1.5.1->-r /home/rbradfor/tmp/python-openstackclient/test-requirements.txt (line 11))
  Using cached python-subunit-1.1.0.tar.gz
Collecting mox3>=0.7.0 (from oslotest>=1.5.1->-r /home/rbradfor/tmp/python-openstackclient/test-requirements.txt (line 11))
  Using cached mox3-0.7.0.tar.gz
Collecting docutils>=0.10 (from sphinx!=1.2.0,!=1.3b1,<1.3,>=1.1.2->-r /home/rbradfor/tmp/python-openstackclient/test-requirements.txt (line 13))
  Using cached docutils-0.12.tar.gz
Collecting Jinja2>=2.3 (from sphinx!=1.2.0,!=1.3b1,<1.3,>=1.1.2->-r /home/rbradfor/tmp/python-openstackclient/test-requirements.txt (line 13))
  Using cached Jinja2-2.7.3.tar.gz
Collecting Pygments>=1.2 (from sphinx!=1.2.0,!=1.3b1,<1.3,>=1.1.2->-r /home/rbradfor/tmp/python-openstackclient/test-requirements.txt (line 13))
  Using cached Pygments-2.0.2-py3-none-any.whl
Collecting unittest2>=1.0.0 (from testtools!=1.2.0,>=0.9.36->-r /home/rbradfor/tmp/python-openstackclient/test-requirements.txt (line 15))
  Using cached unittest2-1.0.1-py2.py3-none-any.whl
Collecting traceback2 (from testtools!=1.2.0,>=0.9.36->-r /home/rbradfor/tmp/python-openstackclient/test-requirements.txt (line 15))
  Using cached traceback2-1.4.0-py2.py3-none-any.whl
Collecting extras (from testtools!=1.2.0,>=0.9.36->-r /home/rbradfor/tmp/python-openstackclient/test-requirements.txt (line 15))
  Using cached extras-0.0.3.tar.gz
Collecting python-mimeparse (from testtools!=1.2.0,>=0.9.36->-r /home/rbradfor/tmp/python-openstackclient/test-requirements.txt (line 15))
  Using cached python-mimeparse-0.1.4.tar.gz
Collecting cryptography>=0.7 (from pyOpenSSL>=0.11->python-glanceclient>=0.15.0->-r /home/rbradfor/tmp/python-openstackclient/requirements.txt (line 15))
  Using cached cryptography-0.8.2.tar.gz
Collecting jsonschema<3,>=0.7 (from warlock<2,>=1.0.1->python-glanceclient>=0.15.0->-r /home/rbradfor/tmp/python-openstackclient/requirements.txt (line 15))
  Using cached jsonschema-2.4.0-py2.py3-none-any.whl
Collecting jsonpatch<2,>=0.10 (from warlock<2,>=1.0.1->python-glanceclient>=0.15.0->-r /home/rbradfor/tmp/python-openstackclient/requirements.txt (line 15))
  Using cached jsonpatch-1.9.tar.gz
Collecting markupsafe (from Jinja2>=2.3->sphinx!=1.2.0,!=1.3b1,<1.3,>=1.1.2->-r /home/rbradfor/tmp/python-openstackclient/test-requirements.txt (line 13))
  Using cached MarkupSafe-0.23.tar.gz
Collecting linecache2 (from traceback2->testtools!=1.2.0,>=0.9.36->-r /home/rbradfor/tmp/python-openstackclient/test-requirements.txt (line 15))
  Using cached linecache2-1.0.0-py2.py3-none-any.whl
Collecting pyasn1 (from cryptography>=0.7->pyOpenSSL>=0.11->python-glanceclient>=0.15.0->-r /home/rbradfor/tmp/python-openstackclient/requirements.txt (line 15))
  Using cached pyasn1-0.1.7.tar.gz
Collecting setuptools (from cryptography>=0.7->pyOpenSSL>=0.11->python-glanceclient>=0.15.0->-r /home/rbradfor/tmp/python-openstackclient/requirements.txt (line 15))
  Using cached setuptools-15.2-py2.py3-none-any.whl
Collecting cffi>=0.8 (from cryptography>=0.7->pyOpenSSL>=0.11->python-glanceclient>=0.15.0->-r /home/rbradfor/tmp/python-openstackclient/requirements.txt (line 15))
  Using cached cffi-0.9.2.tar.gz
Collecting jsonpointer>=1.5 (from jsonpatch<2,>=0.10->warlock<2,>=1.0.1->python-glanceclient>=0.15.0->-r /home/rbradfor/tmp/python-openstackclient/requirements.txt (line 15))
  Using cached jsonpointer-1.7.tar.gz
Collecting pycparser (from cffi>=0.8->cryptography>=0.7->pyOpenSSL>=0.11->python-glanceclient>=0.15.0->-r /home/rbradfor/tmp/python-openstackclient/requirements.txt (line 15))
  Using cached pycparser-2.12.tar.gz
Installing collected packages: pbr, six, pytz, Babel, argparse, pyparsing, cmd2, PrettyTable, stevedore, cliff, tablib, cliff-tablib, PyYAML, os-client-config, netaddr, oslo.config, oslo.i18n, iso8601, netifaces, oslo.utils, msgpack-python, oslo.serialization, pyasn1, setuptools, pycparser, cffi, cryptography, pyOpenSSL, requests, jsonschema, jsonpointer, jsonpatch, warlock, python-keystoneclient, python-glanceclient, simplejson, python-novaclient, python-cinderclient, python-neutronclient, pyflakes, pep8, mccabe, flake8, hacking, coverage, discover, linecache2, traceback2, unittest2, extras, python-mimeparse, testtools, fixtures, mock, oslosphinx, testscenarios, python-subunit, mox3, testrepository, oslotest, requests-mock, docutils, markupsafe, Jinja2, Pygments, sphinx, WebOb
  Running setup.py install for Babel
  Running setup.py install for cmd2
  Running setup.py install for PrettyTable
  Running setup.py install for cliff
  Running setup.py install for cliff-tablib
  Running setup.py install for PyYAML
    Complete output from command /home/rbradfor/tmp/python-openstackclient/.tox/py34/bin/python3.4 -c "import setuptools, tokenize;__file__='/tmp/pip-build-p19auoc2/PyYAML/setup.py';exec(compile(getattr(tokenize, 'open', open)(__file__).read().replace('\r\n', '\n'), __file__, 'exec'))" install --record /tmp/pip-xlgu_evx-record/install-record.txt --single-version-externally-managed --compile --install-headers /home/rbradfor/tmp/python-openstackclient/.tox/py34/include/site/python3.4/PyYAML:
    running install
    running build
    running build_py
    creating build
    creating build/lib.linux-x86_64-3.4
    creating build/lib.linux-x86_64-3.4/yaml
    copying lib3/yaml/representer.py -> build/lib.linux-x86_64-3.4/yaml
    copying lib3/yaml/tokens.py -> build/lib.linux-x86_64-3.4/yaml
    copying lib3/yaml/constructor.py -> build/lib.linux-x86_64-3.4/yaml
    copying lib3/yaml/reader.py -> build/lib.linux-x86_64-3.4/yaml
    copying lib3/yaml/__init__.py -> build/lib.linux-x86_64-3.4/yaml
    copying lib3/yaml/error.py -> build/lib.linux-x86_64-3.4/yaml
    copying lib3/yaml/scanner.py -> build/lib.linux-x86_64-3.4/yaml
    copying lib3/yaml/loader.py -> build/lib.linux-x86_64-3.4/yaml
    copying lib3/yaml/parser.py -> build/lib.linux-x86_64-3.4/yaml
    copying lib3/yaml/nodes.py -> build/lib.linux-x86_64-3.4/yaml
    copying lib3/yaml/serializer.py -> build/lib.linux-x86_64-3.4/yaml
    copying lib3/yaml/cyaml.py -> build/lib.linux-x86_64-3.4/yaml
    copying lib3/yaml/emitter.py -> build/lib.linux-x86_64-3.4/yaml
    copying lib3/yaml/events.py -> build/lib.linux-x86_64-3.4/yaml
    copying lib3/yaml/dumper.py -> build/lib.linux-x86_64-3.4/yaml
    copying lib3/yaml/resolver.py -> build/lib.linux-x86_64-3.4/yaml
    copying lib3/yaml/composer.py -> build/lib.linux-x86_64-3.4/yaml
    running build_ext
    creating build/temp.linux-x86_64-3.4
    checking if libyaml is compilable
    x86_64-linux-gnu-gcc -pthread -DNDEBUG -g -fwrapv -O2 -Wall -Wstrict-prototypes -g -fstack-protector --param=ssp-buffer-size=4 -Wformat -Werror=format-security -D_FORTIFY_SOURCE=2 -fPIC -I/usr/include/python3.4m -I/home/rbradfor/tmp/python-openstackclient/.tox/py34/include/python3.4m -c build/temp.linux-x86_64-3.4/check_libyaml.c -o build/temp.linux-x86_64-3.4/check_libyaml.o
    checking if libyaml is linkable
    x86_64-linux-gnu-gcc -pthread build/temp.linux-x86_64-3.4/check_libyaml.o -lyaml -o build/temp.linux-x86_64-3.4/check_libyaml
    building '_yaml' extension
    creating build/temp.linux-x86_64-3.4/ext
    x86_64-linux-gnu-gcc -pthread -DNDEBUG -g -fwrapv -O2 -Wall -Wstrict-prototypes -g -fstack-protector --param=ssp-buffer-size=4 -Wformat -Werror=format-security -D_FORTIFY_SOURCE=2 -fPIC -I/usr/include/python3.4m -I/home/rbradfor/tmp/python-openstackclient/.tox/py34/include/python3.4m -c ext/_yaml.c -o build/temp.linux-x86_64-3.4/ext/_yaml.o
    ext/_yaml.c:8:22: fatal error: pyconfig.h: No such file or directory
     #include "pyconfig.h"
                          ^
    compilation terminated.
    error: command 'x86_64-linux-gnu-gcc' failed with exit status 1

    ----------------------------------------
    Command "/home/rbradfor/tmp/python-openstackclient/.tox/py34/bin/python3.4 -c "import setuptools, tokenize;__file__='/tmp/pip-build-p19auoc2/PyYAML/setup.py';exec(compile(getattr(tokenize, 'open', open)(__file__).read().replace('\r\n', '\n'), __file__, 'exec'))" install --record /tmp/pip-xlgu_evx-record/install-record.txt --single-version-externally-managed --compile --install-headers /home/rbradfor/tmp/python-openstackclient/.tox/py34/include/site/python3.4/PyYAML" failed with error code 1 in /tmp/pip-build-p19auoc2/PyYAML

ERROR: could not install deps [-r/home/rbradfor/tmp/python-openstackclient/requirements.txt, -r/home/rbradfor/tmp/python-openstackclient/test-requirements.txt]; v = InvocationError('/home/rbradfor/tmp/python-openstackclient/.tox/py34/bin/pip install -U -r/home/rbradfor/tmp/python-openstackclient/requirements.txt -r/home/rbradfor/tmp/python-openstackclient/test-requirements.txt (see /home/rbradfor/tmp/python-openstackclient/.tox/py34/log/py34-1.log)', 1)
________________________________________________________________________________________________________________________ summary ________________________________________________________________________________________________________________________
ERROR:   py34: could not install deps [-r/home/rbradfor/tmp/python-openstackclient/requirements.txt, -r/home/rbradfor/tmp/python-openstackclient/test-requirements.txt]; v = InvocationError('/home/rbradfor/tmp/python-openstackclient/.tox/py34/bin/pip install -U -r/home/rbradfor/tmp/python-openstackclient/requirements.txt -r/home/rbradfor/tmp/python-openstackclient/test-requirements.txt (see /home/rbradfor/tmp/python-openstackclient/.tox/py34/log/py34-1.log)', 1)

Percona Live Presentation: MySQL Security Essentials

The slides for my MySQL Security Essentials presentation at Percona Live 2015 MySQL Conference and Expo are now available.

In this presentation I discuss just how insecure legacy versions of MySQL are and what are the essential requirements for securing your installation on disk, via network and with user privileges. I provide recommendations for how to manage application access for your most important data asset.

This presentation describes the key security improvements in MySQL 5.6 and MySQL 5.7 as well as additional features provided in MariaDB 10.0 and 10.1 supporting roles and encryption.

I have also included slides for how easy it is to Hack MySQL and examples of denial of service attacks that are possible with even limited MySQL access.

Inconsistent messaging for OpenStackClient

As I mentioned earlier in Moving to OpenStackClient CLI I came across several differences in reconciling the legacy CLI tools.

I have also come across very inconsistent messaging. Here is a simple example.

In nova

$ nova list
ERROR (CommandError): You must provide an auth url via either --os-auth-url or env[OS_AUTH_URL] or specify an auth_system which defines a default url with --os-auth-system or env[OS_AUTH_SYSTEM]

In openstack

$ openstack service list
ERROR: openstack Authorization Failed: Cannot authenticate without an auth_url

$ openstack keypair list
ERROR: openstack Authentication requires 'auth_url', which should be specified in 'HTTPClient'

$ openstack catalog list
ERROR: openstack 'NoneType' object has no attribute 'auth'

$ openstack volume list
ERROR: openstack unsupported operand type(s) for +: 'NoneType' and 'str'

All three errors are effectively the same. That is I have not setup environment variables (OS_PROJECT_NAME, OS_AUTH_URL, OS_USERNAME, OS_PASSWORD) or passed all correctly as arguments.

In delving to the openstackclient source code specifically auth.py#147 I see another message “Set an authentication URL, with –os-auth-url, OS_AUTH_URL or auth.auth_url”. api.auth is also referenced in the Authentication Documentation as the place to start.

Time to delve in the code to see what I can find out.

cd
git clone git://git.openstack.org/openstack/python-openstackclient
cd python-openstackclient
python tools/install_venv.py
source .venv/bin/activate
# Don't need sudo for local environment
which openstack

After setting OS_USERNAME, OS_PASSWORD, and OS_PROJECT NAME (and not setting OS_AUTH_URL in my test) I run the following.

$ openstack image list
WARNING: openstackclient.shell Possible error authenticating: Missing parameter(s):
Set an authentication URL, with --os-auth-url, OS_AUTH_URL or auth.auth_url

ERROR: openstack Missing parameter(s):
Set an authentication URL, with --os-auth-url, OS_AUTH_URL or auth.auth_url

This matches what I saw in the code, so it’s the installed version that is older code. While user, service and keypair lists returns the same message volume and catalog still do not.

(.venv)rbradfor@octogon:~/python-openstackclient$ openstack volume list
WARNING: openstackclient.shell Possible error authenticating: Missing parameter(s):
Set an authentication URL, with --os-auth-url, OS_AUTH_URL or auth.auth_url

ERROR: openstack unsupported operand type(s) for +: 'NoneType' and 'str'

(.venv)rbradfor@octogon:~/python-openstackclient$ openstack catalog list
WARNING: openstackclient.shell Possible error authenticating: Missing parameter(s):
Set an authentication URL, with --os-auth-url, OS_AUTH_URL or auth.auth_url

ERROR: openstack 'NoneType' object has no attribute 'auth'

Moving to OpenStackClient CLI

In working with the keynote CLI within the TripleO scripts I came across the following deprecation warning message.

$ keystone token-get
/usr/local/lib/python2.7/dist-packages/keystoneclient/shell.py:65: DeprecationWarning: The keystone CLI is deprecated in favor of python-openstackclient. For a Python library, continue using python-keystoneclient.
  'python-keystoneclient.', DeprecationWarning)

Time to switch to using the OpenStackClient, historically also called the unified CLI.

Very easy to install.

$ sudo pip install python-openstackclient

$ openstack help
usage: openstack help [-h] [cmd [cmd ...]]

print detailed help for another command

positional arguments:
  cmd         name of the command

optional arguments:
  -h, --help  show this help message and exit

I would also suggest you add the following alias to your startup shell rc.

alias os='openstack'

The --help option also provides a much detailed list of available argument options.

$ os --help
usage: openstack [--version] [-v] [--log-file LOG_FILE] [-q] [--debug]
                 [--os-region-name ]
                 [--os-cacert ] [--verify | --insecure]
                 [--os-default-domain ] [--timing]
                 [--os-compute-api-version ]
                 [--os-network-api-version ]
                 [--os-image-api-version ]
                 [--os-volume-api-version ]
                 [--os-identity-api-version ]
                 [--os-auth-type ] [--os-username ]
                 [--os-identity-provider ]
                 [--os-project-domain-name ]
                 [--os-project-domain-id ]
                 [--os-project-name ]
                 [--os-auth-url ]
                 [--os-trust-id ]
                 [--os-service-provider-endpoint ]
                 [--os-user-domain-id ]
                 [--os-domain-name ]
                 [--os-identity-provider-url ]
                 [--os-token ] [--os-domain-id ]
                 [--os-url ]
                 [--os-user-domain-name ]
                 [--os-user-id ] [--os-password ]
                 [--os-project-id ]
                 [--os-object-api-version ] [-h]

Command-line interface to the OpenStack APIs

optional arguments:
  --version             show program's version number and exit
  -v, --verbose         Increase verbosity of output. Can be repeated.
...

The new CLI provides a number of benefits above the consolidation of syntax into a single client. There is the flexibility in formatting output, both selecting columns and output format.

Working with nova for more simple initial examples.

$ nova image-list
+--------------------------------------+---------------------------------+--------+--------+
| ID                                   | Name                            | Status | Server |
+--------------------------------------+---------------------------------+--------+--------+
| a8672506-049f-4fda-bc58-e64a646d587e | cirros-0.3.2-x86_64-uec         | ACTIVE |        |
| 557dec3a-f912-430c-bda1-ace9c669b78d | cirros-0.3.2-x86_64-uec-kernel  | ACTIVE |        |
| 1d9b6c2e-96d9-4426-a98d-7fa378c26189 | cirros-0.3.2-x86_64-uec-ramdisk | ACTIVE |        |
+--------------------------------------+---------------------------------+--------+--------+
$ openstack image list
+--------------------------------------+---------------------------------+
| ID                                   | Name                            |
+--------------------------------------+---------------------------------+
| a8672506-049f-4fda-bc58-e64a646d587e | cirros-0.3.2-x86_64-uec         |
| 1d9b6c2e-96d9-4426-a98d-7fa378c26189 | cirros-0.3.2-x86_64-uec-ramdisk |
| 557dec3a-f912-430c-bda1-ace9c669b78d | cirros-0.3.2-x86_64-uec-kernel  |
+--------------------------------------+---------------------------------+

As you can see the Status and Server columns are not in the default format. You can access a list of columns, however both the column order, and even the contents (e.g. ACTIVE v active) means you need to adjust your existing scripts. In this case Status exists, Server does not.

$ openstack image list --long
+--------------------------------------+---------------------------------+-------------+------------------+----------+--------+------------+-----------+----------------------------------+-----------------------------------------------------------------------------------------------------+
| ID                                   | Name                            | Disk Format | Container Format |     Size | Status | Visibility | Protected | Owner                            | Properties                                                                                          |
+--------------------------------------+---------------------------------+-------------+------------------+----------+--------+------------+-----------+----------------------------------+-----------------------------------------------------------------------------------------------------+
| a8672506-049f-4fda-bc58-e64a646d587e | cirros-0.3.2-x86_64-uec         | ami         | ami              | 25165824 | active | public     | False     | 0087dccc995e4ea3aaf209ddc8ad33e2 | kernel_id='557dec3a-f912-430c-bda1-ace9c669b78d', ramdisk_id='1d9b6c2e-96d9-4426-a98d-7fa378c26189' |
| 1d9b6c2e-96d9-4426-a98d-7fa378c26189 | cirros-0.3.2-x86_64-uec-ramdisk | ari         | ari              |  3723817 | active | public     | False     | 0087dccc995e4ea3aaf209ddc8ad33e2 |                                                                                                     |
| 557dec3a-f912-430c-bda1-ace9c669b78d | cirros-0.3.2-x86_64-uec-kernel  | aki         | aki              |  4969360 | active | public     | False     | 0087dccc995e4ea3aaf209ddc8ad33e2 |                                                                                                     |
+--------------------------------------+---------------------------------+-------------+------------------+----------+--------+------------+-----------+----------------------------------+-----------------------------------------------------------------------------------------------------+

Column Options

openstack provides the ability to pass column names, so we can try to simulate what we seen in the legacy nova client.

$ openstack image list -c ID
+--------------------------------------+
| ID                                   |
+--------------------------------------+
| 1b79bbb2-e8b6-430f-8cb7-ced8f3589807 |
| e52bd241-db30-40e2-9230-40f21ff3e4c7 |
| 59e28cdf-c4af-4b02-bdeb-3779ec4c306d |
+--------------------------------------+

$ openstack image list -c ID -c Name
+--------------------------------------+---------------------------------+
| ID                                   | Name                            |
+--------------------------------------+---------------------------------+
| 1b79bbb2-e8b6-430f-8cb7-ced8f3589807 | cirros-0.3.2-x86_64-uec         |
| e52bd241-db30-40e2-9230-40f21ff3e4c7 | cirros-0.3.2-x86_64-uec-ramdisk |
| 59e28cdf-c4af-4b02-bdeb-3779ec4c306d | cirros-0.3.2-x86_64-uec-kernel  |
+--------------------------------------+---------------------------------+

$ openstack image list -c ID -c Name -c Status
+--------------------------------------+---------------------------------+
| ID                                   | Name                            |
+--------------------------------------+---------------------------------+
| 1b79bbb2-e8b6-430f-8cb7-ced8f3589807 | cirros-0.3.2-x86_64-uec         |
| e52bd241-db30-40e2-9230-40f21ff3e4c7 | cirros-0.3.2-x86_64-uec-ramdisk |
| 59e28cdf-c4af-4b02-bdeb-3779ec4c306d | cirros-0.3.2-x86_64-uec-kernel  |
+--------------------------------------+---------------------------------+

The Status column which is in both nova and openstack output above seems to provide no output or even an error. However if specified as the only individual column it draws an expected error message.

stack@ubuntu:~$ openstack image list -c Status
ERROR: openstack No recognized column names in ['Status']

Not knowing what the actual list of valid columns are, as it does not match the --long output we move on.

Update 4/23/15
It pays to read the source code, specifically openstackclient/image/v2/image.py. In order to list additional columns you must also specify --long.

$ python openstackclient/shell.py image list --long -c ID -c Name -c Status
+--------------------------------------+---------------------------------+--------+
| ID                                   | Name                            | Status |
+--------------------------------------+---------------------------------+--------+
| c5153c2b-df9c-488c-995e-5cb347c0ee35 | cirros-0.3.2-x86_64-uec         | active |
| ac7e0c04-e47c-43da-ba28-b0d47d293eb7 | cirros-0.3.2-x86_64-uec-ramdisk | active |
| 52cc99f5-a9aa-4f27-98b8-d8ec762a246d | cirros-0.3.2-x86_64-uec-kernel  | active |
+--------------------------------------+---------------------------------+--------+

I should also point out that column names are Case Sensitive. Id is not valid.

$ python openstackclient/shell.py image list --long -c Id -c Name -c Status
+---------------------------------+--------+
| Name                            | Status |
+---------------------------------+--------+
| cirros-0.3.2-x86_64-uec         | active |
| cirros-0.3.2-x86_64-uec-ramdisk | active |
| cirros-0.3.2-x86_64-uec-kernel  | active |
+---------------------------------+--------+

Format Options

One cool feature is the formatting options. There are currently 6 types.

TABLE

$ openstack image list --format table
+--------------------------------------+---------------------------------+
| ID                                   | Name                            |
+--------------------------------------+---------------------------------+
| a8672506-049f-4fda-bc58-e64a646d587e | cirros-0.3.2-x86_64-uec         |
| 1d9b6c2e-96d9-4426-a98d-7fa378c26189 | cirros-0.3.2-x86_64-uec-ramdisk |
| 557dec3a-f912-430c-bda1-ace9c669b78d | cirros-0.3.2-x86_64-uec-kernel  |
+--------------------------------------+---------------------------------+

CSV

$ openstack image list --format csv
"ID","Name"
"a8672506-049f-4fda-bc58-e64a646d587e","cirros-0.3.2-x86_64-uec"
"1d9b6c2e-96d9-4426-a98d-7fa378c26189","cirros-0.3.2-x86_64-uec-ramdisk"
"557dec3a-f912-430c-bda1-ace9c669b78d","cirros-0.3.2-x86_64-uec-kernel"

JSON

$ openstack image list --format json | python -m json.tool
[
    {
        "ID": "1b79bbb2-e8b6-430f-8cb7-ced8f3589807",
        "Name": "cirros-0.3.2-x86_64-uec"
    },
    {
        "ID": "e52bd241-db30-40e2-9230-40f21ff3e4c7",
        "Name": "cirros-0.3.2-x86_64-uec-ramdisk"
    },
    {
        "ID": "59e28cdf-c4af-4b02-bdeb-3779ec4c306d",
        "Name": "cirros-0.3.2-x86_64-uec-kernel"
    }
]

HTML

$ openstack image list --format html
<table>
<thead>
<tr><th>ID</th>
<th>Name</th></tr>
</thead>
<tr><td>a8672506-049f-4fda-bc58-e64a646d587e</td>
<td>cirros-0.3.2-x86_64-uec</td></tr>
<tr><td>1d9b6c2e-96d9-4426-a98d-7fa378c26189</td>
<td>cirros-0.3.2-x86_64-uec-ramdisk</td></tr>
<tr><td>557dec3a-f912-430c-bda1-ace9c669b78d</td>
<td>cirros-0.3.2-x86_64-uec-kernel</td></tr>
</table>

YAML

$ openstack image list --format yaml
- {ID: a8672506-049f-4fda-bc58-e64a646d587e, Name: cirros-0.3.2-x86_64-uec}
- {ID: 1d9b6c2e-96d9-4426-a98d-7fa378c26189, Name: cirros-0.3.2-x86_64-uec-ramdisk}
- {ID: 557dec3a-f912-430c-bda1-ace9c669b78d, Name: cirros-0.3.2-x86_64-uec-kernel}

SHELL

$ openstack image list --format shell
usage: openstack image list [-h] [-f {csv,html,json,table,yaml}] [-c COLUMN]
                            [--max-width ]
                            [--quote {all,minimal,none,nonnumeric}]
                            [--public | --private] [--property ]
                            [--long] [--sort [:]]
openstack image list: error: argument -f/--format: invalid choice: 'shell' (choose from 'csv', 'html', 'json', 'table', 'yaml')

As you can see shell is invalid for the list argument, however it is valid for the show argument.

$ openstack image show a8672506-049f-4fda-bc58-e64a646d587e
+------------------+-----------------------------------------------------------------------------------------------------------------+
| Field            | Value                                                                                                           |
+------------------+-----------------------------------------------------------------------------------------------------------------+
| checksum         | 4eada48c2843d2a262c814ddc92ecf2c                                                                                |
| container_format | ami                                                                                                             |
| created_at       | 2015-03-31T19:42:53.000000                                                                                      |
| deleted          | False                                                                                                           |
| disk_format      | ami                                                                                                             |
| id               | a8672506-049f-4fda-bc58-e64a646d587e                                                                            |
| is_public        | True                                                                                                            |
| min_disk         | 0                                                                                                               |
| min_ram          | 0                                                                                                               |
| name             | cirros-0.3.2-x86_64-uec                                                                                         |
| owner            | 0087dccc995e4ea3aaf209ddc8ad33e2                                                                                |
| properties       | {u'kernel_id': u'557dec3a-f912-430c-bda1-ace9c669b78d', u'ramdisk_id': u'1d9b6c2e-96d9-4426-a98d-7fa378c26189'} |
| protected        | False                                                                                                           |
| size             | 25165824                                                                                                        |
| status           | active                                                                                                          |
| updated_at       | 2015-03-31T19:42:54.000000                                                                                      |
+------------------+-----------------------------------------------------------------------------------------------------------------+
$ openstack image show a8672506-049f-4fda-bc58-e64a646d587e --format=shell
checksum="4eada48c2843d2a262c814ddc92ecf2c"
container_format="ami"
created_at="2015-03-31T19:42:53.000000"
deleted="False"
disk_format="ami"
id="a8672506-049f-4fda-bc58-e64a646d587e"
is_public="True"
min_disk="0"
min_ram="0"
name="cirros-0.3.2-x86_64-uec"
owner="0087dccc995e4ea3aaf209ddc8ad33e2"
properties="{u'kernel_id': u'557dec3a-f912-430c-bda1-ace9c669b78d', u'ramdisk_id': u'1d9b6c2e-96d9-4426-a98d-7fa378c26189'}"
protected="False"
size="25165824"
status="active"
updated_at="2015-03-31T19:42:54.000000"

Interactive

The CLI also provides an interactive shell.

$ openstack
(openstack) image list
+--------------------------------------+---------------------------------+
| ID                                   | Name                            |
+--------------------------------------+---------------------------------+
| 1b79bbb2-e8b6-430f-8cb7-ced8f3589807 | cirros-0.3.2-x86_64-uec         |
| e52bd241-db30-40e2-9230-40f21ff3e4c7 | cirros-0.3.2-x86_64-uec-ramdisk |
| 59e28cdf-c4af-4b02-bdeb-3779ec4c306d | cirros-0.3.2-x86_64-uec-kernel  |
+--------------------------------------+---------------------------------+
(openstack) quit

Percona Live Presentation: Improving Performance With Better Indexes

The slides for my Improving Performance With Better Indexes presentation at Percona Live 2015 MySQL Conference and Expo are now available.

In this presentation I discuss how to identify, review and analyze SQL statements in order to create better indexes for your queries. This includes understanding the EXPLAIN syntax and how to create and identify covering and partial column indexes.

This presentation is based on the work with a customer showing the 95% improvement of a key 15 table join query running 15,000 QPS in a 25 billion SQL statements per day infrastructure.

As mentioned, Explaining the MySQL Explain is an additional presentation that goes into more detail for learning how to read Query Execution Plans (QEP) in MySQL.

Updating MySQL on Ubuntu 12.04 LTS to MySQL 5.6

The Ubuntu 12.04.3 LTS release only provides MySQL 5.1 and MySQL 5.5 using the default Ubuntu package manager.

Oracle (owners of the MySQL(tm)) now provide Debian/Ubuntu APT repositories for all GA and DMR versions of MySQL including supporting Ubuntu 12.04.

The following steps demonstrate upgrading from the Ubuntu 5.5 server package to the Oracle 5.6 server package.

Verify MySQL Packages

$ apt-cache search mysql-server
mysql-server - MySQL database server (metapackage depending on the latest version)
mysql-server-5.5 - MySQL database server binaries and system database setup
mysql-server-core-5.5 - MySQL database server binaries
auth2db - Powerful and eye-candy IDS logger, log viewer and alert generator
cacti - Frontend to rrdtool for monitoring systems and services
torrentflux - web based, feature-rich BitTorrent download manager

Verify MySQL on Server

$  dpkg -l | grep mysql
ii  libdbd-mysql-perl                      4.020-1build2                                       Perl5 database interface to the MySQL database
ii  libmysqlclient-dev                     5.5.34-0ubuntu0.12.04.1                             MySQL database development files
ii  libmysqlclient18                       5.5.34-0ubuntu0.12.04.1                             MySQL database client library
ii  mysql-client-5.5                       5.5.31-0ubuntu0.12.04.1                             MySQL database client binaries
ii  mysql-client-core-5.5                  5.5.34-0ubuntu0.12.04.1                             MySQL database core client binaries
ii  mysql-common                           5.5.34-0ubuntu0.12.04.1                             MySQL database common files, e.g. /etc/mysql/my.cnf
ii  mysql-server-5.5                       5.5.31-0ubuntu0.12.04.1                             MySQL database server binaries and system database setup
ii  mysql-server-core-5.5                  5.5.31-0ubuntu0.12.04.1                             MySQL database server binaries
ii  php5-mysqlnd                           5.3.10-1ubuntu3.8                                   MySQL module for php5 (Native Driver)

Results may vary based on dependencies.

Checking the MySQL error log (as it’s the right good practice to always do)

$ sudo tail -50 /var/log/mysql/error.log
150402 16:02:49 [Note] Plugin 'FEDERATED' is disabled.
150402 16:02:49 InnoDB: The InnoDB memory heap is disabled
150402 16:02:49 InnoDB: Mutexes and rw_locks use GCC atomic builtins
150402 16:02:49 InnoDB: Compressed tables use zlib 1.2.3.4
150402 16:02:49 InnoDB: Initializing buffer pool, size = 1.0G
150402 16:02:49 InnoDB: Completed initialization of buffer pool
150402 16:02:49 InnoDB: highest supported file format is Barracuda.
150402 16:02:49  InnoDB: Waiting for the background threads to start
150402 16:02:50 InnoDB: 5.5.31 started; log sequence number 20079278867
150402 16:02:50 [Note] Server hostname (bind-address): '127.0.0.1'; port: 3306
150402 16:02:50 [Note]   - '127.0.0.1' resolves to '127.0.0.1';
150402 16:02:50 [Note] Server socket created on IP: '127.0.0.1'.
150402 16:02:50 [Note] Event Scheduler: Loaded 0 events
150402 16:02:50 [Note] /usr/sbin/mysqld: ready for connections.
Version: '5.5.31-0ubuntu0.12.04.1'  socket: '/var/run/mysqld/mysqld.sock'  port: 3306  (Ubuntu)

A check shows that this is not the most current version available of 5.5 using the Ubuntu packages.

$ apt-cache show mysql-server-5.5
Package: mysql-server-5.5
Priority: optional
Section: database
Installed-Size: 31947
Maintainer: Ubuntu Developers 
Original-Maintainer: Debian MySQL Maintainers 
Architecture: amd64
Source: mysql-5.5
Version: 5.5.41-0ubuntu0.12.04.1
...

Package: mysql-server-5.5
Status: install ok installed
Priority: optional
Section: database
Installed-Size: 31950
Maintainer: Ubuntu Developers 
Architecture: amd64
Source: mysql-5.5
Version: 5.5.31-0ubuntu0.12.04.1
...

Just to be consistent with keeping current versions, you may choose to update MySQL 5.5 to the current available version.

$ sudo apt-get install mysql-server-5.5
...

Installing Oracle APT Packaging

The recommended documented way to move to using the Oracle repo is:

cd /tmp
# See https://dev.mysql.com/downloads/repo/apt/ for your right distro version
wget https://dev.mysql.com/get/mysql-apt-config_0.3.3-2ubuntu12.04_all.deb
sudo dpkg -i mysql-apt-config*.deb

This unfortunately uses a cursors based interface which is not something you automate for production systems and not the approach I would suggest.

So doing what this does

echo "deb http://repo.mysql.com/apt/ubuntu/ precise mysql-apt-config
deb http://repo.mysql.com/apt/ubuntu/ precise mysql-5.6" | sudo tee /etc/apt/sources.list.d/mysql.list
curl -s http://ronaldbradford.com/mysql/mysql.gpg | sudo apt-key add -
sudo apt-get update

Now we can look at available versions.


$ apt-cache search mysql-server
mysql-server-5.5 - MySQL database server binaries and system database setup
mysql-server-core-5.5 - MySQL database server binaries
auth2db - Powerful and eye-candy IDS logger, log viewer and alert generator
cacti - Frontend to rrdtool for monitoring systems and services
torrentflux - web based, feature-rich BitTorrent download manager
mysql-community-server - MySQL Server
mysql-server - MySQL Server meta package depending on latest version

This is where life gets a little confusing. Because Ubuntu supported MySQL 5.1 (as mysql-server) and MySQL 5.5 (as mysql-server-5.5) it can be misleading.

$ apt-cache show mysql-server
Package: mysql-server
Source: mysql-community
Version: 5.6.23-1ubuntu12.04
Architecture: amd64
Maintainer: MySQL Release Engineering 
Installed-Size: 46
Depends: mysql-community-server (= 5.6.23-1ubuntu12.04)
Homepage: http://www.mysql.com/
Priority: optional
Section: database
Filename: pool/mysql-5.6/m/mysql-community/mysql-server_5.6.23-1ubuntu12.04_amd64.deb
Size: 11644
SHA256: 1cb166cd230d2a4daca761ea80f2f34ee1fc0c92aaae972c914d81746f235d63
SHA1: 63548c852d5faeda751fbf038c0799fbbeac9905
MD5sum: da2f709a29a7cac97c834e6e69929891
Description: MySQL Server meta package depending on latest version
 The MySQL(TM) software delivers a very fast, multi-threaded, multi-user,
 and robust SQL (Structured Query Language) database server. MySQL Server
 is intended for mission-critical, heavy-load production systems as well
 as for embedding into mass-deployed software. MySQL is a trademark of
 Oracle. This is a meta package that depends on the latest mysql server
 package available in the repository.

Package: mysql-server
Priority: optional
Section: database
Installed-Size: 114
Maintainer: Ubuntu Developers 
Original-Maintainer: Debian MySQL Maintainers 
Architecture: all
Source: mysql-5.5
Version: 5.5.41-0ubuntu0.12.04.1
...

We are looking to ensure the Maintainer is the Official Release.

Upgrading to MySQL 5.6

sudo service mysql stop
ps -ef | grep mysql
sudo apt-get install -y mysql-server
$ sudo apt-get install -y mysql-server
...
The following extra packages will be installed:
  mysql-client mysql-common mysql-community-client mysql-community-server
The following packages will be REMOVED:
  mysql-client-5.5 mysql-client-core-5.5 mysql-server-5.5 mysql-server-core-5.5
The following NEW packages will be installed:
  mysql-client mysql-community-client mysql-community-server mysql-server
The following packages will be upgraded:
  mysql-common
...
Configuration file `/etc/mysql/my.cnf'
 ==> Modified (by you or by a script) since installation.
 ==> Package distributor has shipped an updated version.
   What would you like to do about it ?  Your options are:
    Y or I  : install the package maintainer's version
    N or O  : keep your currently-installed version
      D     : show the differences between the versions
      Z     : start a shell to examine the situation
 The default action is to keep your current version.
*** my.cnf (Y/I/N/O/D/Z) [default=N] ? N
...
Installing new version of config file /etc/apparmor.d/usr.sbin.mysqld ...
2015-04-02 16:53:07 0 [Warning] Using unique option prefix key_buffer instead of key_buffer_size is deprecated and will be removed in a future release. Please use the full name instead.
2015-04-02 16:53:07 0 [Warning] TIMESTAMP with implicit DEFAULT value is deprecated. Please use --explicit_defaults_for_timestamp server option (see documentation for more details).
150402 16:53:14 mysqld_safe Can't log to error log and syslog at the same time.  Remove all --log-error configuration options for --syslog to take effect
...

You may think the process is completed, but it is not. Always, Always check the error log. Have you checked your MySQL error log today?

$ sudo tail -300 /var/log/mysql/error.log
...
2015-04-02 16:53:14 20429 [Warning] Buffered warning: Changed limits: table_cache: 431 (requested 2000)

2015-04-02 16:53:14 20429 [Warning] Using unique option prefix myisam-recover instead of myisam-recover-options is deprecated and will be removed in a future release. Please use the full name instead.
2015-04-02 16:53:14 20429 [Note] Plugin 'FEDERATED' is disabled.
2015-04-02 16:53:14 20429 [Note] InnoDB: Using atomics to ref count buffer pool pages
2015-04-02 16:53:14 20429 [Note] InnoDB: The InnoDB memory heap is disabled
2015-04-02 16:53:14 20429 [Note] InnoDB: Mutexes and rw_locks use GCC atomic builtins
2015-04-02 16:53:14 20429 [Note] InnoDB: Memory barrier is not used
2015-04-02 16:53:14 20429 [Note] InnoDB: Compressed tables use zlib 1.2.3.4
2015-04-02 16:53:14 20429 [Note] InnoDB: Using Linux native AIO
2015-04-02 16:53:14 20429 [Note] InnoDB: Not using CPU crc32 instructions
2015-04-02 16:53:14 20429 [Note] InnoDB: Initializing buffer pool, size = 1.0G
2015-04-02 16:53:15 20429 [Note] InnoDB: Completed initialization of buffer pool
2015-04-02 16:53:15 20429 [Note] InnoDB: Highest supported file format is Barracuda.
2015-04-02 16:53:15 20429 [Note] InnoDB: 128 rollback segment(s) are active.
2015-04-02 16:53:15 20429 [Note] InnoDB: Waiting for purge to start
2015-04-02 16:53:15 20429 [Note] InnoDB: 5.6.23 started; log sequence number 20079286519
2015-04-02 16:53:15 20429 [Warning] No existing UUID has been found, so we assume that this is the first time that this server has been started. Generating a new UUID: 487fda28-d97a-11e4-9254-e0cb4e3feb73.
2015-04-02 16:53:15 20429 [Note] Server hostname (bind-address): '127.0.0.1'; port: 3306
2015-04-02 16:53:15 20429 [Note]   - '127.0.0.1' resolves to '127.0.0.1';
2015-04-02 16:53:15 20429 [Note] Server socket created on IP: '127.0.0.1'.
2015-04-02 16:53:15 20429 [ERROR] Column count of mysql.events_waits_current is wrong. Expected 19, found 16. Created with MySQL 50541, now running 50623. Please use mysql_upgrade to fix this error.
2015-04-02 16:53:15 20429 [ERROR] Column count of mysql.events_waits_history is wrong. Expected 19, found 16. Created with MySQL 50541, now running 50623. Please use mysql_upgrade to fix this error.
2015-04-02 16:53:15 20429 [ERROR] Column count of mysql.events_waits_history_long is wrong. Expected 19, found 16. Created with MySQL 50541, now running 50623. Please use mysql_upgrade to fix this error.
2015-04-02 16:53:15 20429 [ERROR] Native table 'performance_schema'.'events_waits_summary_by_host_by_event_name' has the wrong structure
2015-04-02 16:53:15 20429 [ERROR] Incorrect definition of table performance_schema.events_waits_summary_by_thread_by_event_name: expected column 'THREAD_ID' at position 0 to have type bigint(20), found type int(11).
2015-04-02 16:53:15 20429 [ERROR] Native table 'performance_schema'.'events_waits_summary_by_user_by_event_name' has the wrong structure
2015-04-02 16:53:15 20429 [ERROR] Native table 'performance_schema'.'events_waits_summary_by_account_by_event_name' has the wrong structure
2015-04-02 16:53:15 20429 [ERROR] Column count of mysql.file_summary_by_event_name is wrong. Expected 23, found 5. Created with MySQL 50541, now running 50623. Please use mysql_upgrade to fix this error.
2015-04-02 16:53:15 20429 [ERROR] Column count of mysql.file_summary_by_instance is wrong. Expected 25, found 6. Created with MySQL 50541, now running 50623. Please use mysql_upgrade to fix this error.
2015-04-02 16:53:15 20429 [ERROR] Native table 'performance_schema'.'host_cache' has the wrong structure
2015-04-02 16:53:15 20429 [ERROR] Incorrect definition of table performance_schema.mutex_instances: expected column 'LOCKED_BY_THREAD_ID' at position 2 to have type bigint(20), found type int(11).
2015-04-02 16:53:15 20429 [ERROR] Native table 'performance_schema'.'objects_summary_global_by_type' has the wrong structure
2015-04-02 16:53:15 20429 [ERROR] Incorrect definition of table performance_schema.rwlock_instances: expected column 'WRITE_LOCKED_BY_THREAD_ID' at position 2 to have type bigint(20), found type int(11).
2015-04-02 16:53:15 20429 [ERROR] Native table 'performance_schema'.'setup_actors' has the wrong structure
2015-04-02 16:53:15 20429 [ERROR] Native table 'performance_schema'.'setup_objects' has the wrong structure
2015-04-02 16:53:15 20429 [ERROR] Native table 'performance_schema'.'table_io_waits_summary_by_index_usage' has the wrong structure
2015-04-02 16:53:15 20429 [ERROR] Native table 'performance_schema'.'table_io_waits_summary_by_table' has the wrong structure
2015-04-02 16:53:15 20429 [ERROR] Native table 'performance_schema'.'table_lock_waits_summary_by_table' has the wrong structure
2015-04-02 16:53:15 20429 [ERROR] Column count of mysql.threads is wrong. Expected 14, found 3. Created with MySQL 50541, now running 50623. Please use mysql_upgrade to fix this error.
2015-04-02 16:53:15 20429 [ERROR] Native table 'performance_schema'.'events_stages_current' has the wrong structure
2015-04-02 16:53:15 20429 [ERROR] Native table 'performance_schema'.'events_stages_history' has the wrong structure
2015-04-02 16:53:15 20429 [ERROR] Native table 'performance_schema'.'events_stages_history_long' has the wrong structure
...

Completing the MySQL 5.6 Upgrade

A MySQL upgrade of the meta schema is necessary.

$ sudo mysql_upgrade -uroot -p
Enter password:
Looking for 'mysql' as: mysql
Looking for 'mysqlcheck' as: mysqlcheck
Running 'mysqlcheck' with connection arguments: '--port=3306' '--socket=/var/run/mysqld/mysqld.sock'
Warning: Using a password on the command line interface can be insecure.
Running 'mysqlcheck' with connection arguments: '--port=3306' '--socket=/var/run/mysqld/mysqld.sock'
Warning: Using a password on the command line interface can be insecure.
mysql.columns_priv                                 OK
mysql.db                                           OK
mysql.event                                        OK
mysql.func                                         OK
mysql.general_log                                  OK
mysql.help_category                                OK
mysql.help_keyword                                 OK
mysql.help_relation                                OK
mysql.help_topic                                   OK
mysql.host                                         OK
mysql.ndb_binlog_index                             OK
mysql.plugin                                       OK
mysql.proc                                         OK
mysql.procs_priv                                   OK
mysql.proxies_priv                                 OK
mysql.servers                                      OK
mysql.slow_log                                     OK
mysql.tables_priv                                  OK
mysql.time_zone                                    OK
mysql.time_zone_leap_second                        OK
mysql.time_zone_name                               OK
mysql.time_zone_transition                         OK
mysql.time_zone_transition_type                    OK
mysql.user                                         OK
Running 'mysql_fix_privilege_tables'...
Warning: Using a password on the command line interface can be insecure.
Running 'mysqlcheck' with connection arguments: '--port=3306' '--socket=/var/run/mysqld/mysqld.sock'
Warning: Using a password on the command line interface can be insecure.
Running 'mysqlcheck' with connection arguments: '--port=3306' '--socket=/var/run/mysqld/mysqld.sock'
Warning: Using a password on the command line interface can be insecure.
...
OK
$ sudo service mysql restart
 * Stopping MySQL Community Server 5.6.23
....
 * MySQL Community Server 5.6.23 is stopped
 * Re-starting MySQL Community Server 5.6.23
150402 17:06:17 mysqld_safe Can't log to error log and syslog at the same time.  Remove all --log-error configuration options for --syslog to take effect.
......
 * MySQL Community Server 5.6.23 is started
$ sudo tail -300 /var/log/mysql/error.log
...
2015-04-02 17:06:15 20429 [Note] /usr/sbin/mysqld: Shutdown complete

150402 17:06:15 mysqld_safe mysqld from pid file /var/run/mysqld/mysqld.pid ended
150402 17:06:17 mysqld_safe Starting mysqld daemon with databases from /var/lib/mysql
2015-04-02 17:06:17 0 [Warning] Using unique option prefix key_buffer instead of key_buffer_size is deprecated and will be removed in a future release. Please use the full name instead.
2015-04-02 17:06:17 0 [Warning] TIMESTAMP with implicit DEFAULT value is deprecated. Please use --explicit_defaults_for_timestamp server option (see documentation for more details).
2015-04-02 17:06:17 20994 [Warning] Buffered warning: Changed limits: max_open_files: 1024 (requested 5000)

2015-04-02 17:06:17 20994 [Warning] Buffered warning: Changed limits: table_cache: 431 (requested 2000)

2015-04-02 17:06:17 20994 [Warning] Using unique option prefix myisam-recover instead of myisam-recover-options is deprecated and will be removed in a future release. Please use the full name instead.
2015-04-02 17:06:17 20994 [Note] Plugin 'FEDERATED' is disabled.
2015-04-02 17:06:17 20994 [Note] InnoDB: Using atomics to ref count buffer pool pages
2015-04-02 17:06:17 20994 [Note] InnoDB: The InnoDB memory heap is disabled
2015-04-02 17:06:17 20994 [Note] InnoDB: Mutexes and rw_locks use GCC atomic builtins
2015-04-02 17:06:17 20994 [Note] InnoDB: Memory barrier is not used
2015-04-02 17:06:17 20994 [Note] InnoDB: Compressed tables use zlib 1.2.3.4
2015-04-02 17:06:17 20994 [Note] InnoDB: Using Linux native AIO
2015-04-02 17:06:17 20994 [Note] InnoDB: Not using CPU crc32 instructions
2015-04-02 17:06:17 20994 [Note] InnoDB: Initializing buffer pool, size = 1.0G
2015-04-02 17:06:17 20994 [Note] InnoDB: Completed initialization of buffer pool
2015-04-02 17:06:17 20994 [Note] InnoDB: Highest supported file format is Barracuda.
2015-04-02 17:06:17 20994 [Note] InnoDB: 128 rollback segment(s) are active.
2015-04-02 17:06:17 20994 [Note] InnoDB: Waiting for purge to start
2015-04-02 17:06:17 20994 [Note] InnoDB: 5.6.23 started; log sequence number 20081020877
2015-04-02 17:06:17 20994 [Note] Server hostname (bind-address): '127.0.0.1'; port: 3306
2015-04-02 17:06:17 20994 [Note]   - '127.0.0.1' resolves to '127.0.0.1';
2015-04-02 17:06:17 20994 [Note] Server socket created on IP: '127.0.0.1'.
2015-04-02 17:06:17 20994 [Note] Event Scheduler: Loaded 0 events
2015-04-02 17:06:17 20994 [Note] /usr/sbin/mysqld: ready for connections.
Version: '5.6.23'  socket: '/var/run/mysqld/mysqld.sock'  port: 3306  MySQL Community Server (GPL)

Correcting errors

As you can see there are several warnings/errors when starting MySQL.

The first is

 mysqld_safe Can't log to error log and syslog at the same time.  Remove all --log-error configuration options for --syslog to take effect.

We solve this with

$ sudo rm -f /etc/mysql/conf.d/mysqld_safe_syslog.cnf
$ sudo service mysql restart
 * Stopping MySQL Community Server 5.6.23
....
 * MySQL Community Server 5.6.23 is stopped
 * Re-starting MySQL Community Server 5.6.23
......
 * MySQL Community Server 5.6.23 is started

This is an Ubuntu default that conflicts with the my.cnf log_error were are familiar with in monitoring the MySQL error log. You can read my opinion on this in The correct approach to rolling MySQL logs

The second is

2015-04-02 17:06:17 0 [Warning] Using unique option prefix key_buffer instead of key_buffer_size is deprecated and will be removed in a future release. Please use the full name instead.

We solve this with

sudo sed -ie "s/^key_buffer[^_]/key_buffer_size/" /etc/mysql/my.cnf

Next

2015-04-02 17:18:06 22123 [Warning] Using unique option prefix myisam-recover instead of myisam-recover-options is deprecated and will be removed in a future release. Please use the full name instead.

We solve this with

sudo sed -ie "s/^myisam-recover[^-]/myisam-recover-options/" /etc/mysql/my.cnf

The warnings are interesting, and will part of the following post on MySQL 5.6 configuration changes discussed in the next point.

2015-04-02 17:22:08 22626 [Warning] Buffered warning: Changed limits: max_open_files: 1024 (requested 5000)
2015-04-02 17:22:08 22626 [Warning] Buffered warning: Changed limits: table_cache: 431 (requested 2000)

Leveraging MySQL 5.6 benefits

We may now have a MySQL 5.6 installation however we are far from utilizing the benefits of MySQL 5.6 fully. In a subsequent post I will talk about the configuration options we need to now consider, both new options such as innodb_purge_threads and important improvements such as sync_binlog. There are far greater complex changes including innodb_file_per_table, master_info_repository and relay_log_info_repository and then changes in defaults such as performance_schema

Validating MySQL version numbers

As part of a MySQL 5.5 to MySQL 5.6 upgrade across several Ubuntu servers of varying distros an audit highlighted a trivial but interesting versioning identification error in Ubuntu’s packaging of MySQL.

Ubuntu 12.04 LTS

$ sudo dpkg -l | grep mysql-server-5.5
ii  mysql-server-5.5   5.5.41-0ubuntu0.12.04.1  ...
$ mysql -uroot -p -e "SELECT VERSION()"
+-------------------------+
| VERSION()               |
+-------------------------+
| 5.5.41-0ubuntu0.12.04.1 |
+-------------------------+

But when you look at the mysql --version it does NOT say 5.5.41.

$ mysql --version
mysql  Ver 14.14 Distrib 5.5.34, for debian-linux-gnu (x86_64) using readline 6.2

Ubuntu 14.04 LTS

On 14.04 I get expected results.

$ sudo dpkg -l | grep mysql-server-5.5
ii  mysql-server-5.5       5.5.41-0ubuntu0.14.04.1   ...
rbradfor@rubble:~$ mysql -uroot -p -e "SELECT VERSION()"
+-------------------------+
| VERSION()               |
+-------------------------+
| 5.5.41-0ubuntu0.14.04.1 |
+-------------------------+
$ mysql --version
mysql  Ver 14.14 Distrib 5.5.41, for debian-linux-gnu (x86_64) using readline 6.3

Dynamic recreation of InnoDB redo logs

MySQL 5.6 will now automatically recreate the InnoDB redo log files during a MySQL restart if the size (or number) of these logs changes, i.e. a change to innodb_log_file_size. See Changing the Number or Size of InnoDB Log Files which states “If InnoDB detects that the innodb_log_file_size differs from the redo log file size, it will write a log checkpoint, close and remove the old log files, create new log files at the requested size, and open the new log files.”

Before MySQL 5.6 it was necessary to stop MySQL and remove the InnoDB log files manually before restarting MySQL.

The error log shows:

tail -f /mysql/log/error.log
...
2015-03-28 21:51:25 3767 [Warning] InnoDB: Resizing redo log from 2*3072 to 2*65536 pages, LSN=1626017
2015-03-28 21:51:25 3767 [Warning] InnoDB: Starting to delete and rewrite log files.
2015-03-28 21:51:25 3767 [Note] InnoDB: Setting log file ./ib_logfile101 size to 1024 MB
InnoDB: Progress in MB: 100 200 300 400 500 600 700 800 900 1000
2015-03-28 21:51:28 3767 [Note] InnoDB: Setting log file ./ib_logfile1 size to 1024 MB
InnoDB: Progress in MB: 100 200 300 400 500 600 700 800 900 1000
2015-03-28 21:51:31 3767 [Note] InnoDB: Renaming log file ./ib_logfile101 to ./ib_logfile0
2015-03-28 21:51:31 3767 [Warning] InnoDB: New log files created, LSN=1626017
...

It was however odd that MySQL had indicated it had successfully started but the underlying Redo log files were not complete and in-place as seen by the following directory listings.

$ sudo service mysql start
......
 * MySQL Community Server 5.6.23 is started
$
$ ls -lh /var/lib/mysql/
total 1.9G
-rw-rw---- 1 mysql mysql   56 Mar 28 19:42 auto.cnf
-rw-rw---- 1 mysql mysql  12M Mar 28 21:51 ibdata1
-rw-rw---- 1 mysql mysql 902M Mar 28 21:51 ib_logfile1
-rw-rw---- 1 mysql mysql 1.0G Mar 28 21:51 ib_logfile101
drwxr-x--- 2 mysql mysql 4.0K Mar 28 19:42 mysql
drwx------ 2 mysql mysql 4.0K Mar 28 19:42 performance_schema
$ ls -lh /var/lib/mysql/
total 2.1G
-rw-rw---- 1 mysql mysql   56 Mar 28 19:42 auto.cnf
-rw-rw---- 1 mysql mysql  12M Mar 28 21:51 ibdata1
    -rw-rw---- 1 mysql mysql 1.0G Mar 28 21:51 ib_logfile0 -rw-rw---- 1 mysql mysql 1.0G Mar 28 21:51 ib_logfile1 drwxr-x--- 2 mysql mysql 4.0K Mar 28 19:42 mysql drwx------ 2 mysql mysql 4.0K Mar 28 19:42 performance_schema

SQL, ANSI Standards, PostgreSQL and MySQL

I have recently been working with the Donors Choose Open Data Set which happens to be in PostgreSQL. Easy enough to install and load the data in PostgreSQL, however as I live and breath MySQL, lets load the data into MySQL.

And here is where start our discussion, first some history.

SQL History

SQL – Structure Query Language is a well known common language for communicating with Relational Databases (RDBMS). It is not the only language I might add, having both used many years ago and just mentioned QUEL at a Looker Look and Tell event in New York. It has also been around since the 1970s making it; along with C; one of oldest in general use programming languages today.

SQL became an ANSI standard in 1986, and an ISO standard in 1987. The purpose of a standard is to provide commonality when communicating or exchanging information; in our case; a programming language communicating with a RDBMS. There have been several iterations of the standard as functionality and syntax improves. These are commonly referred to as SQL-86, SQL-89, SQL-92, SQL:1999, SQL:2003, SQL:2006, SQL:2008 and SQL:2011.

And so, with SQL being a standard it means that what we can do in PostgreSQL should translate to what we can do in MySQL.

SQL Communication

Both products provide a Command Line Interface (CLI) client tool for SQL communication, mysql for MySQL and psql for PostgreSQL. No surprises there. Both use by default the semicolon ; as a SQL statement terminator, and both CLI tools use \q as a means to quit and exit the tool. Certainly not a standard but great for syntax compatibility.

DDL Specification

Our journey begins with defining tables.

DROP TABLE

Both products SQL syntax support DROP TABLE. Infact, both support the DROP TABLE [IF EXISTS] syntax.

DROP TABLE donorschoose_projects;
DROP TABLE IF EXISTS donorschoose_projects;

CREATE TABLE

Both support CREATE TABLE.

Both support defining columns in the typical format <column_name> <datatype>, and both support the NOT NULL attribute. Talking about specific datatypes for columns is a topic on its own and so I discuss this later.

The PostgreSQL syntax was a table option WITHOUT OIDS which is not valid in MySQL. It is also obsolescent syntax in PostgreSQL 9.3. From the PostgreSQL manual “This optional clause specifies whether rows of the new table should have OIDs (object identifiers) assigned to them. The default is to have OIDs. Specifying WITHOUT OIDS allows the user to suppress generation of OIDs for rows of a table. This may be worthwhile for large tables … Specifying WITHOUT OIDS also reduces the space required to store the table on disk by 4 bytes per row of the table, thereby improving performance.”

In this example as this is just for testing, dropping the WITHOUT OIDS syntax creates a mutually compatible syntax.

Comments

Both MySQL and PostgreSQL support -- as an inline comment in an SQL statement. No need to strip those out.

ALTER TABLE

Both support ALTER TABLE ADD CONSTRAINT syntax which in our example is used to define the PRIMARY KEY, however while the syntax remains the same, the choice of datatype affects the outcome.

The following works in both products when the datatype is CHARACTER(32). More about CHARACTER() later.

ALTER TABLE donorschoose_projects ADD CONSTRAINT pk_donorschoose_projects PRIMARY KEY(_projectid);

In our example dataset, the primary key is defined with a TEXT datatype, and in MySQL this fails.

ERROR 1170 (42000): BLOB/TEXT column '_projectid' used in key specification without a key length

As the data in the dataset for primary keys by further analysis is indeed a 32 byte hexadecimal value, this is changed to CHARACTER(32) to be compatible for this data loading need. This however is an important key difference in any migration process with other data sets.

Side Note

Both products support the definition of the PRIMARY KEY in the CREATE TABLE syntax two different ways.

CREATE TABLE demo_pk1 (id character(32) NOT NULL PRIMARY KEY);
CREATE TABLE demo_pk2 (id character(32) NOT NULL, PRIMARY KEY(id));

CREATE INDEX

Both use CREATE INDEX syntax however with our sample dataset, this is the first observed difference in syntax with provided sample SQL statements.

PostgresSQL

CREATE INDEX projects_schoolid ON projects USING btree (_schoolid);

MySQL
The USING <type> qualifier must appear before the ON <table>.

CREATE INDEX USING btree projects_schoolid ON projects (_schoolid);

In both products USING btree is an optional syntax (for minimum compatibility) purposes so removing this provides a consistency.

Data Types

The following data types are defined in the PostgreSQL example data set. Each is discussed to identify a best fit in MySQL. For reference:

character

This data type is for a fixed width character field and requires a length attribute. MySQL supports CHARACTER(n) syntax for compatibility, however generally CHAR(n) is the preferred syntax. Indeed, PostgreSQL also supports CHAR(n).

The following showing both variants is valid in both products.

CREATE TABLE demo_character(c1 CHARACTER(1), c2 CHAR(1));

varchar/character varying

While this dataset does not use these datatypes, they are critical in the general conservations of character (aka string) types. This refers to a variable length string.

While character varying is not a valid MySQL syntax, varchar is compatible with both products.

CREATE TABLE demo_varchar(vc1 VARCHAR(10));

text

In PostgresSQL, text is used for variables of undefined length. The maximum length of a field is 1GB as stated in the FAQ.

In MySQL however TEXT only stores 2^16 characters (64K). The use of LONGTEXT is needed to support the full length capacity in PostgeSQL. This store 2^32 characters (~4GB).

Of all the complexity of this example dataset, the general use of text will be the most difficult to modify to a more applicable VARCHAR or TEXT datatype when optimizing in MySQL.

integer

PostgreSQL uses the integer datatype for a signed 4 byte integer value. MySQL supports the same syntax, however generally prefers to refer to the shorter INT syntax. Both products support both overall.

mysql> CREATE TABLE demo_integer(i1 INTEGER, i2 INT);
Query OK, 0 rows affected (0.11 sec)

mysql> INSERT INTO demo_integer VALUES (1,-1);
Query OK, 1 row affected (0.05 sec)

mysql> SELECT * FROM demo_integer;
+------+------+
| i1   | i2   |
+------+------+
|    1 |   -1 |
+------+------+
1 row in set (0.00 sec)
demo=# CREATE TABLE demo_integer(i1 INTEGER, i2 INT);
CREATE TABLE
demo=# INSERT INTO demo_integer VALUES (1,-1);
INSERT 0 1
demo=# SELECT * FROM demo_integer;
 i1 | i2
----+----
  1 | -1
(1 row)

And just to note the boundary of this data type.

mysql> TRUNCATE TABLE demo_integer;
Query OK, 0 rows affected (0.04 sec)

mysql> INSERT INTO demo_integer VALUES (2147483647, -2147483648);
Query OK, 1 row affected (0.04 sec)

mysql> SELECT * FROM demo_integer;
+------------+-------------+
| i1         | i2          |
+------------+-------------+
| 2147483647 | -2147483648 |
+------------+-------------+
1 row in set (0.00 sec)
demo=# TRUNCATE TABLE demo_integer;
TRUNCATE TABLE

demo=# INSERT INTO demo_integer VALUES (2147483647, -2147483648);
INSERT 0 1
demo=# SELECT * FROM demo_integer;
     i1     |     i2
------------+-------------
 2147483647 | -2147483648
(1 row)

The difference is in out-of-bounds value management, and here MySQL defaults suck. You can read my views at DP#4 The importance of using sql_mode.

demo=# TRUNCATE TABLE demo_integer;
TRUNCATE TABLE
demo=# INSERT INTO demo_integer VALUES (2147483647 + 1, -2147483648 - 1);
ERROR:  integer out of range
demo=# SELECT * FROM demo_integer;
 i1 | i2
----+----
(0 rows)
mysql> TRUNCATE TABLE demo_integer;
Query OK, 0 rows affected (0.04 sec)

mysql> INSERT INTO demo_integer VALUES (2147483647 + 1, -2147483648 - 1);
Query OK, 1 row affected, 2 warnings (0.07 sec)

mysql> SELECT * from demo_integer;
+------------+-------------+
| i1         | i2          |
+------------+-------------+
| 2147483647 | -2147483648 |
+------------+-------------+
1 row in set (0.00 sec)

While not in this dataset, both support the bigint data type. While the PostgreSQL docs indicate bigint is 8 bytes, testing with PostgresSQL 9.3 failed. Something to investigate more later.

demo=# CREATE TABLE demo_bigint(i1 BIGINT);
CREATE TABLE
demo=# INSERT INTO demo_bigint VALUES (2147483647 + 1), (-2147483648 - 1);
ERROR:  integer out of range
mysql> CREATE TABLE demo_bigint(i1 BIGINT);
Query OK, 0 rows affected (0.12 sec)

mysql> INSERT INTO demo_bigint VALUES (2147483647 + 1), (-2147483648 - 1);
Query OK, 2 rows affected (0.04 sec)
Records: 2  Duplicates: 0  Warnings: 0

mysql> SELECT * from demo_bigint;
+-------------+
| i1          |
+-------------+
|  2147483648 |
| -2147483649 |
+-------------+
2 rows in set (0.01 sec)

And for reference, both products support smallint, a 2-byte integer.

Each product has additional integer data types.

numeric

For a fixed-precision number, PostgreSQL uses numeric but supports decimal.It would not be surprising to know that MySQL uses DECIMAL and for compatibility supports NUMERIC.

This leads to a side-bar discussion on knowing your data-types for your product. In a recent interview for a MySQL Engineer, a candidate (with SQL Server experience) provided a code example defining the NUMERIC datatype. I knew it was technically valid in MySQL syntax, but never actually seen this in use. When I asked the candidate for what was the syntax commonly used for a fixed-precision datatype they were unable to answer.

real/double precision

This dataset does not include these data types, however for reference, PostgresSQL uses real for 4 bytes, and double precision for 8 bytes. MySQL uses float for 4 bytes, and double for 8 bytes. MySQL however supports both PostgreSQL syntax options, however PostgreSQL supports float, but not double.

demo=# CREATE TABLE demo_floatingpoint(f1 FLOAT, f2 REAL, d1 DOUBLE, d2 DOUBLE PRECISION);
ERROR:  type "double" does not exist
LINE 1: ...TE TABLE demo_floatingpoint(f1 FLOAT, f2 REAL, d1 DOUBLE, d2...

demo=# CREATE TABLE demo_floatingpoint(f1 FLOAT, f2 REAL, d2 DOUBLE PRECISION);
CREATE TABLE
mysql> CREATE TABLE demo_floatingpoint(f1 FLOAT, f2 REAL, d1 DOUBLE, d2 DOUBLE PRECISION);
Query OK, 0 rows affected (0.07 sec)

date

Both PostgreSQL and MySQL use the date data type.

timestamp

Both PostgreSQL and MySQL use the timestamp data type to store date/time values. However, there is a difference in both precision and implementation here.

In PostgresSQL, timestamp supports a date before EPOCH, while in MySQL it does not. MySQL uses the DATETIME datatype.

Using PostgresSQL timestamp and MySQL DATETIME, both support microsecond precision. MySQL however only started to provide this in MySQL 5.6.

A key difference in column definition is the PostgreSQL timestamp without time zone syntax, used in our example dataset. Analysis of data loading will determine the impact here.

boolean

SQL:1999 calls for a Boolean datatype, and both PostgreSQL and MySQL support defining a column as BOOLEAN. MySQL however implicitly converts this to a SIGNED TINYINT, and any future DDL viewing shows this reference.

When referencing boolean, in PostgreSQL WHERE column_name = TRUE or WHERE column_name = t retrieves a true value. In MySQL WHERE column_name = TRUE or WHERE column_name = 1. When you SELECT a boolean, in PostgresSQL the answer is ‘t’, in MySQL, the answer is 1.

demo=# CREATE TABLE demo_boolean (b1 boolean);
CREATE TABLE
demo=# INSERT INTO demo_boolean VALUES (TRUE),(FALSE);
INSERT 0 2
demo=# SELECT * FROM demo_boolean;
 b1
----
 t
 f
(2 rows)
mysql> CREATE TABLE demo_boolean (b1 boolean);
Query OK, 0 rows affected (0.11 sec)

mysql> INSERT INTO demo_boolean VALUES (TRUE),(FALSE);
Query OK, 2 rows affected (0.03 sec)
Records: 2  Duplicates: 0  Warnings: 0

mysql> SELECT * FROM demo_boolean;
+------+
| b1   |
+------+
|    1 |
|    0 |
+------+
2 rows in set (0.00 sec)

Other Data Types

Only the data types in this example have been reviewed.

Other syntax

In our sample SQL script, there is psql specific syntax to show a debugging line with \qecho .... For compatibility these are removed.

The loading of data with the \COPY <table_name> FROM PSTDIN WITH CSV HEADER is PostgreSQL specific and so loading the data is a future topic.

Finally, the VACUUM ANALYZE <table_name> command is also PostgreSQL specific and removed. This is a means effectively of optimizing and analyzing the table.

Both PostgreSQL and MySQL have an ANALYZE command, however the syntax is different, with the required TABLE keyword in MySQL.

PostgresSQL

ANALYZE donorschoose_projects;

ANALYZE TABLE donorschoose_projects;
ERROR:  syntax error at or near "table"

MySQL

ANALYZE donorschoose_projects;
ERROR 1064 (42000): You have an error in your SQL syntax;...

ANALYZE TABLE donorschoose_projects;

MySQL has an OPTIMIZE TABLE syntax, however while technically valid syntax this is not compatible with the default storage table InnoDB.

mysql> OPTIMIZE TABLE donorschoose_projects;
+----------------------------+----------+----------+-------------------------------------------------------------------+
| Table                      | Op       | Msg_type | Msg_text                                                          |
+----------------------------+----------+----------+-------------------------------------------------------------------+
| test.donorschoose_projects | optimize | note     | Table does not support optimize, doing recreate + analyze instead |
| test.donorschoose_projects | optimize | status   | OK                                                                |
+----------------------------+----------+----------+-------------------------------------------------------------------+
2 rows in set (0.32 sec)

Loops in shell scripting

If you are die hard Bourne Shell (/bin/sh) scripter, it can be a challenge not to be enticed by the syntax niceties of the Born Again Borne Shell (/bin/bash).

One example is the {..} syntax

#!/bin/bash
for I in {0..5}
do
   echo $I
done
0
1
2
3
4
5

This syntax is not valid in /bin/sh on Linux.

#!/bin/sh
for I in {0..5}
do
   echo $I
done
{0..5}

NOTE: However apparently it does work in Mac OS X, which is derived from BSD, not Linux.

/bin/sh gives you a for loop but it requires the full list of iterated values instead of a range.

#!/bin/sh

for I in 0 1 2 3 4 5
do
  echo $I
done

Note: Passing a string does not work by default.

#!/bin/sh

for I in "0 1 2 3 4 5"
do
  echo $I
done

The approach to product the same result requires some format management.

#!/bin/sh

OIFS=$IFS
IFS=" "
for I in `echo "0 1 2 3 4 5"`
do
  echo $I
done
IFS=$OIFS

You can use while

#!/bin/sh

I=0
while [ $I -le 5 ]
do 
  echo $I
  I=`expr $I + 1`
done

You can use one of several other shell commands, in this example awk

#!/bin/sh

for I in `awk 'BEGIN{for (i=0;i<=5;i++) print i}'`
do 
  echo $I
done

Or, the function specifically design for sequences of numbers seq

#!/bin/sh

for I in `seq 0 5`
do 
  echo $I
done

And for these few examples, there will be more possibilities to achieve close to feature parity of the /bin/bash syntax.
An example found on BSD is jot - 0 5. This is not available Ubuntu by default but installed with the athena-jot package. However the syntax is then different for correct usage.

Understanding when EXPLAIN is not using an index as intended

When reading a MySQL Query Execution Plan (QEP) produced by the EXPLAIN command, generally one of the first observations is to validate an index is being used per table (i.e. per row of output). In MySQL, this is observed with the key column.

In the following two simple single table examples we see the use of the PRIMARY key. To the untrained eye this may lead to assume that the right index is being used.

Example 1

+----+-------------+----------------+-------+---------------+---------+---------+------+------+-------------+
| id | select_type | table          | type  | possible_keys | key     | key_len | ref  | rows | Extra       |
+----+-------------+----------------+-------+---------------+---------+---------+------+------+-------------+
|  1 | SIMPLE      | txxxxxxxxxxxx  | index | NULL          | PRIMARY | 4       | NULL |  100 | Using where |
+----+-------------+----------------+-------+---------------+---------+---------+------+------+-------------+

Example 2

+----+-------------+------------+-------+---------------+---------+---------+-------+------+-------+
| id | select_type | table      | type  | possible_keys | key     | key_len | ref   | rows | Extra |
+----+-------------+------------+-------+---------------+---------+---------+-------+------+-------+
|  1 | SIMPLE      | txxxxxxxxx | const | PRIMARY       | PRIMARY | 4       | const |    1 |       |
+----+-------------+------------+-------+---------------+---------+---------+-------+------+-------+

However this is not entirely true. While used, it is not as intended. A MySQL index can be used during three different stages of the query execution, the JOIN/WHERE, the GROUP BY and the ORDER BY. This type of use can be seen by looking at the Index Hint Syntax which enables you to suggest or force an index at these three various stages.

Without looking at the SQL statements for the above plans, the first giveaway is the possible_keys column which indicates the indexes considered when evaluating the JOIN/WHERE of your SQL statement. The absence in the first query informs you that no index was used. The use of the PRIMARY key in the first query is the result of an ORDER BY syntax. If we remove this ORDER BY we see the true possible execution.

+----+-------------+----------------+------+---------------+------+---------+------+--------+-------------+
| id | select_type | table          | type | possible_keys | key  | key_len | ref  | rows   | Extra       |
+----+-------------+----------------+------+---------------+------+---------+------+--------+-------------+
|  1 | SIMPLE      | txxxxxxxxxxxx  | ALL  | NULL          | NULL | NULL    | NULL | 262827 | Using where |
+----+-------------+----------------+------+---------------+------+---------+------+--------+-------------+

The first query also includes a LIMIT and hence gives the perception that only a small number of rows are processed. In relational theory you would surmise this query is not efficient. Unfortunately as this example was on version MySQL 5.5, it was not possible to use the optimizer_trace functionality in MySQL 5.6 to delve deeper into understanding what decisions MySQL would take.

This example is not to say that you should add an index. This is one possible outcome in optimizing the SQL statement, however there are advantages and disadvantages. Each SQL statement should be reviewed in conjunction with it’s usage, the overall table structure(s) and all other SQL statements that utilize applicable tables.

What is testing?

In software development this is a simple question. What is [the purpose of] testing? If asked to give a one sentence answer what would you say? I have asked this simple question of attendees at many presentations, and also to software developers I have worked with or consulted to.

The most common answer is. “Testing is about making sure the software works, the function your testing does what it should, for example saves the information you entered”.

Unfortunately this is not the purpose of testing, and this attitude leads to what I generally term as poor quality software. “Testing is about trying to break your product any way possible, all the time.”

With this clarification in understanding of a basic and necessary software engineering principle, the attitude towards software development and the entire focus and mindset of engineering and quality assurance can change for the better.

Another very simple example which I often ask when consulting. What does your website look like when it’s down? Again, the general answer is often vague and/or incomplete. How do you know when your website is down? I have heard the response “The users will let you know”. You may laugh, but it is certainly not funny. Show me your website in a down state? Show me your website in a degraded state? When the answer is either unclear, or with a recent employment the same response, there has simply been little thought into producing a quality product by a testing process that is intent on breaking your software.

What procedures do you follow when receiving alerts about errors? What procedures do you put in place to ensure they do not happen again? Again, one has to be disappointed when the response is, “I will set up an email alert to the team for this type of error?” This reactive response is not addressing the problem, only acknowledging the existence of a problem. What is needed is being proactive. Was a bug raised? Can the problem be easily reproduced? How was the problem fixed the first time? Can this be corrected in the code? Can the interim resolution be automated?

When there is a negative user experience from any type of failure or error another important feedback loop is the post-mortem to review the when, why, how and who of the situation and to create a plan to ensure this does not happen again.

Testing needs to baked in to everything that is done, and practice makes for a more perfect outcome. In a high volume environment it is critical to have a simulated environment where you can benchmark performance of any new release for any regressions. A well defined load testing environment can be used to review experimental branches of possible performance improvements. It is also where you can determine the bottleneck and breaking point as you increase load 2X, 5X, 10X. It is impossible to be proactive when your system can fail at 2X load, and the engineering resources needed to implement a solution will not happen in time.

Disaster is inevitable. It will happen, whether small or large. Hardware and software inherently fails. How it fails and what is done to mitigate this to ensure the best possible consistent and rewarding consumer experience is only possible by consistently practicing to break your software at all stages in the development and deployment lifecycle.